J1 in a Day is a tutorial learning to create modern websites using the J1 Template. This Tutorial focuses on the basics of Jekyll and J1, which all people need to know for a successful way to a modern static website. It is recommended that everyone read and work on this Tutorial, independently from what level of knowledge they begin. Jekyll is quite different from classic Content Management Systems (CMS).
It sounds much, spending a whole day to get Jekyll to know. Yes, it is much. You’ll find many Blog articles like Learn Something in 15 minutes on the Internet. But what can be learned in 15 minutes? Most of these blogs are intended to get the first steps managed for a project.
Jekyll’s generator engine also offers a built-in template for a base website: Minima. If you let Jekyll create a website based on Minima, the resulting website will be very simple. For sure, a website based on Minima cannot give you an idea of what static website generators can do. With the help of the J1 Theme, this is significantly different, and you will get a full-featured website.
However, it will take some time to benefit from the extended capabilities that J1 offers. I recommend spending some minutes on the technical terms and components used by the J1 Theme. This knowledge will help a lot to manage your site.
Meet and Greet
Jekyll
Jekyll was first released in 2008 by Tom Preston-Werner, one of the co-founders of GitHub. Today the project is led by Parker Moore together with a motivated team. Jekyll is a tool written in the Ruby programming language. It builds static websites from a few simple ingredients: templates, partials, Liquid tags, and markup files such as Asciidoc or Markdown.
Jekyll is delivered as a Ruby gem — that is the standard packaging format for Ruby libraries. The same gem can be used on the command line as a stand-alone program, or it can be integrated into a larger Ruby application. Inside J1, Jekyll is the central tool that generates every page of your website.
To produce the final HTML, Jekyll reads your content (written in Asciidoc or Markdown) and combines it with shared page parts (written using the Liquid templating language). The result is a complete website ready to be served by any web server. Because Jekyll does not use a database to build pages on demand, the term static is sometimes misleading: you can still load data into your pages, but the data comes from simple files in standard formats such as YAML, JSON, CSV, or TSV.
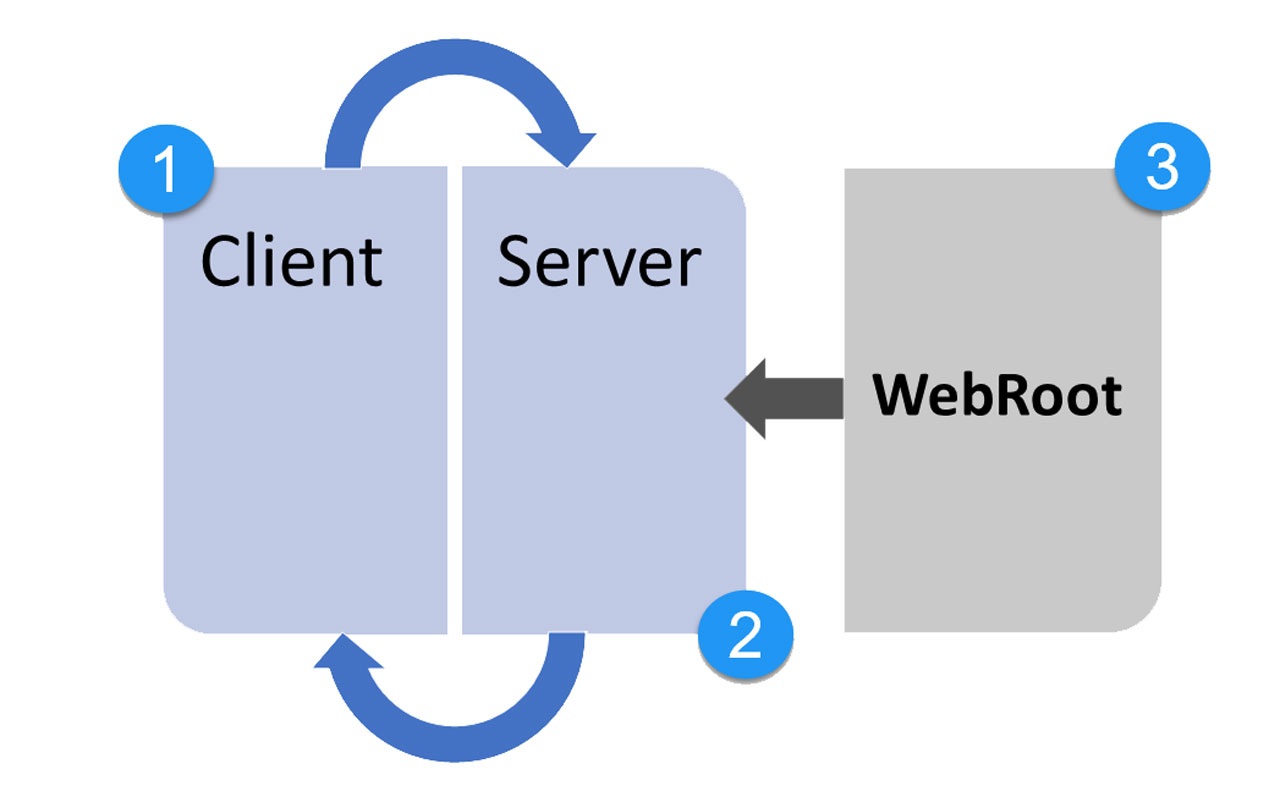
What is a static site?
A static site is a website where every page is already prepared as a ready HTML file on the server. When a visitor opens the page, the server just sends that file directly — no extra work needed.
This is very different from a system like WordPress, which builds each page from a database every time someone visits. Because a static site delivers the same prepared HTML file to every visitor, the response is fast and inexpensive to host.
Over the past few years static sites have become much more popular. There are two main reasons: developer tools (programming languages, libraries, build systems) have become much better, and businesses want websites that are faster than what a classic database-driven site can deliver.
Static page access
A static site generator like Jekyll prepares all the pages of a website ahead of time, before anyone visits. That does not mean Jekyll has to rebuild your entire site from scratch every time you change something. Modern generators support incremental builds: when you edit a single page, only that page (and any pages that depend on it) is rebuilt.
Web Browser
Web Server
Server-side rendered (prepared) static content
Content Management System (CMS)
A CMS (Content Management System) is a software application for creating and publishing digital content. When the content in question is a website, the system is usually called a Web CMS (WCMS). Well-known examples are WordPress, Joomla, and Drupal.
A WCMS lets several people create, edit, and publish website pages from one shared place. This central approach is a big advantage for large web projects such as enterprise sites. It does, however, require a substantial software stack on the server: a database to store the pages and a rendering engine to turn database records into HTML on demand.
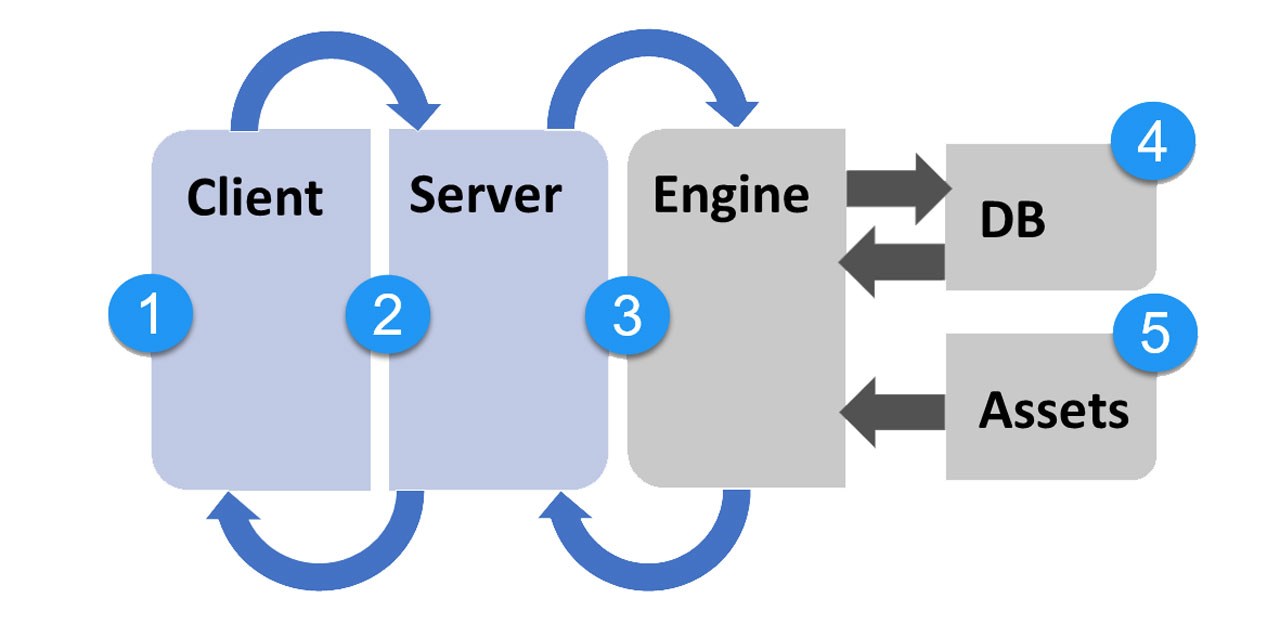
Dynamic page access
A typical CMS-driven website builds every page on demand. The server fetches the content from a database, hands it to a template engine, adds the required CSS styles and any JavaScript components, and only then sends the finished HTML to the visitor. Every page is assembled fresh for every request.
Web Browser
Web Server
Rendering Engine (e.g. PHP-based)
Database (e.g. MySQL, Postgres)
Static content (Images, Videos, JS- and CSS files) and Caches
J1 Theme
J1 Theme (or just J1) is a boilerplate for websites built with Jekyll. Although the underlying delivery model is static — every page is a real HTML file prepared in advance — J1 websites feel dynamic to visitors. This combination is the heart of the JAMstack approach.
On one hand, a J1 site is a pure static site: a folder of HTML files plus supporting assets (JavaScript, CSS, images, fonts) that any web server can hand out directly. On the other hand, J1 has no moving server-side parts. There is no PHP, no database, and no rendering engine waiting on the server to assemble pages.
Everything dynamic in a J1 site comes from JavaScript running in the visitor’s browser and from external APIs called from that JavaScript. The Jekyll build step prepares all of these JAM components (JavaScript, APIs, Markup) ahead of time. The result is a website that loads quickly and behaves like a modern web app.
Netlify platform
Netlify provides everything you need to host fast, modern websites built by static site generators like Jekyll (and many others such as Next.js, Hugo, Gatsby, and 11ty). The platform offers powerful features such as continuous deployment and serverless functions — features that make a real difference to the quality of your website.
Netlify is one option for putting a J1-based website on the Internet. Running a site on Netlify is easy to manage, very fast, and free for most small to medium sites.
Content Delivery Network (CDN)
A Content Delivery Network (CDN) is a network of servers spread out across the world. Its job is to deliver your website to every visitor quickly and reliably, by serving the files from a server that is geographically close to that visitor. The CDN keeps copies of your files (a cache) on each of its servers so the data does not have to travel halfway around the world.
The JAMstack approach makes CDNs especially useful. Because every HTML file, CSS file, and JavaScript file is already fully prepared, the CDN can deliver them directly without any extra processing on the server.
This is one of the main reasons static sites are so much faster than traditional CMS-driven sites: the CDN can serve a complete website straight out of its cache, with no database query and no template rendering involved.
Github platform
GitHub is a code hosting platform that uses the version-control system Git to track and manage source files. It lets developers, writers, and other contributors work together on projects from anywhere in the world. Millions of developers and companies build, ship, and maintain their software on GitHub every day.
Jekyll is also the engine behind GitHub Pages, a free GitHub service that hosts websites directly from a GitHub repository. J1-based projects are typically tracked with Git, so storing them on GitHub is a natural fit — especially for public projects and small teams.
The JAMstack
The JAMstack is a way of building websites and web applications using three ingredients: JavaScript, APIs, and Markup. At first that sounds trivial — after all, most modern web technologies use some of these. The point of the JAMstack is how the three are combined, not that they are involved.
JAMstack is a philosophy or approach, not a specific software bundle. It does not require any particular tool. In that respect it is different from something like the LAMP Stack, which names exact technologies (Linux, Apache, MySQL, PHP). The JAMstack just describes how you build a site, not which tools you must use.
JavaScript
JavaScript (JS) is the programming language that runs inside every modern web browser. It is what makes a web page dynamic — what lets a page respond to your clicks, load new content without reloading, animate elements, or run small calculations. In the JAMstack approach, JavaScript is the runtime layer that brings static HTML pages to life in the visitor’s browser.
APIs
An API (Application Programming Interface) is a defined way for two pieces of software to talk to each other. Think of it as a contract: "if you send me this request, I will send you that information back."
On the web, APIs are usually called by JavaScript running in the visitor’s browser. The JavaScript can call a local API to add extra items to the current page, or it can call a remote API (somewhere on the Internet) to fetch live data — for example, a translation service that converts your page to another language on the fly.
Markup Language
A markup language (ML) is a machine-readable way of describing both the structure and the formatting of a text. You write your text as usual and then mark certain parts with short tags — for example, to say "this is a heading" or "this is a list".
The point of markup is to keep the structure of your text separate from how it is finally displayed. The same marked-up text can be processed in different ways:
-
a web tool can turn it into HTML for the browser
-
another tool can turn it into a PDF document
-
yet another can prepare it for a printer
You write the document only once, in a neutral form, and the tools take care of producing each output format.
J1 Theme uses markup languages heavily to generate the HTML, CSS, and JavaScript files of your website. In line with the JAMstack approach, all your marked-up text is processed up front, so the resulting files can be delivered directly from a CDN.
A Awesome Site
The template J1 comes with a website included, a boilerplate for new a website This Web is called the Starter Web, a general-purpose scaffold to be modified for your needs.
The people on Netlify provide a really easy workflow to bring a website to life using a template like JekyllOne Theme on the Internet in minutes: The 1-Click Deployment. The Workflow allows users to deploy a website on the Internet without a locally running installation on their computers. I invite you on a journey to using the 1-Click Deployment for your new site on the Internet. At the end of this chapter, which only takes a few minutes, you will have your presence, a website on the Internet. You don’t need any software to be installed on your computer. You won’t pay anything for this.
Required Services
To follow this chapter, you need free accounts with two service providers: GitHub and Netlify. Together they let you build and host a J1 website on the Internet. Both providers offer a free tier that is more than enough for this tutorial.
| If you have already worked through the Rocketstart section, you can skip this chapter. Your Starter Web is already on GitHub and Netlify, and you can move straight on to the next chapter, Development System. |
If you do not have these accounts yet, sign up now:
| It is best to sign up on GitHub first. You can then use your GitHub account to sign in to Netlify, which saves you from creating yet another password. |
1-Click Deployment
The Netlify team has built a very simple process that takes a JAMstack template like J1 and turns it into a live website on the Internet in just a few minutes. It really only takes one click — Netlify handles the rest.
The 1-Click Deployment button opens a new browser tab. The deployment process itself is explained step by step in the Deployment Reference section. To follow along easily, place your two browser windows side by side: this tutorial in one, and the Netlify deployment in the other.
Ready? Click the button below to start the deployment on Netlify.
Development System
As you have seen, a website is created in just a few minutes with J1’s built-in basic web. This section will deal with preparing a toolset to edit your site from your local workstation. On the one hand, the local editing corresponds to the basic idea of version management using Git. On the other hand, the local development system will make the work much easier.
Setting up the required software and tools takes a lot of time. Depending on how proficient you are in installing applications, you will need between one and two hours to complete all installations.
Enough of the long speech: Now comes your tool kit for your personal websites.
Required PC hardware
Any reasonably modern desktop or laptop computer will do. As a guideline, a typical setup looks like this:
-
a multi-core CPU — Intel i5 or AMD Ryzen 5 (or newer)
-
8 GB of RAM, with 3–4 GB free
-
an Internet connection with at least 16 Mbit/s of bandwidth (basic DSL)
-
a monitor with a screen size of 21 inches or larger
You don’t need top-of-the-line hardware, but a reasonably fast computer makes the work much more pleasant. You don’t want to wait long every time you save a change. A larger monitor is helpful too, because you will often have a code editor, a terminal, and a browser open side by side.
A laptop with a 15-inch screen can work, but expect to switch between windows more often than you would on a larger screen.
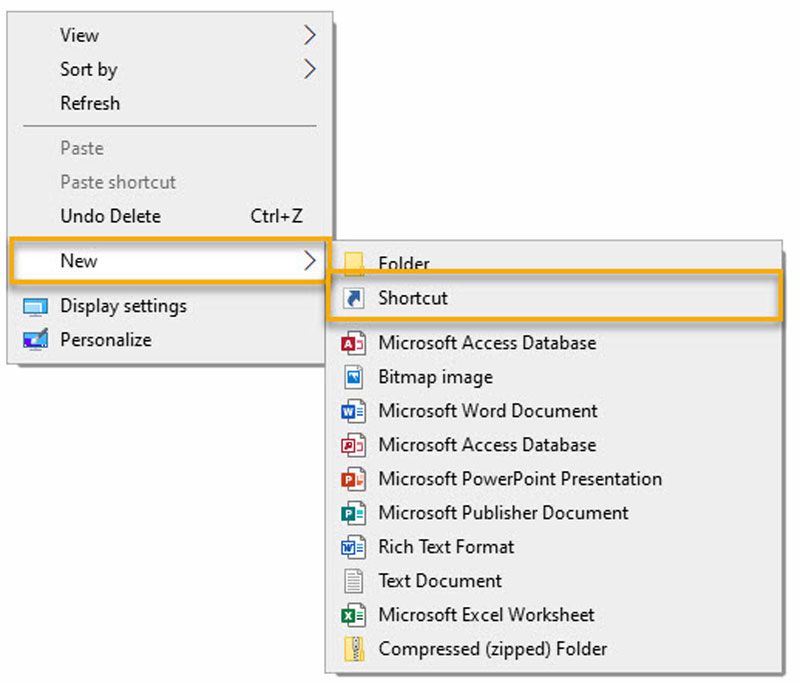
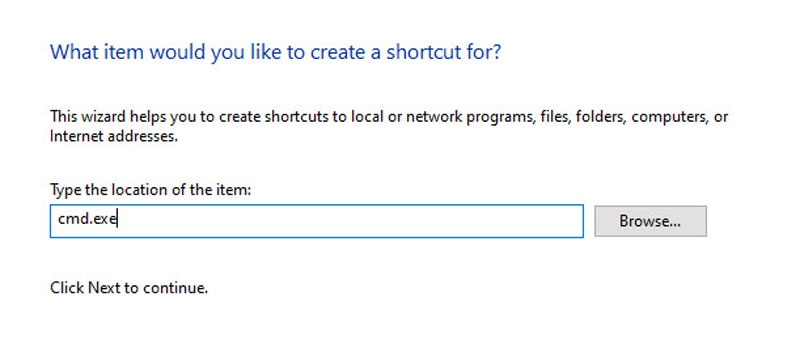
Work from command-line (Windows)
To manage J1 projects you will run a few commands in a shell (Windows calls this the command prompt). The easiest way to open a shell on Windows is to put a shortcut to cmd.exe on your desktop.
-
Right-click an empty area on your desktop. A context menu opens.
-
Choose New → Shortcut.
-
In the location field, type
cmd.exeand click Next. -
Name the shortcut
Shelland click Finish.
The screenshots below show each step in detail.

From now on you can open a shell any time by double-clicking that desktop icon.
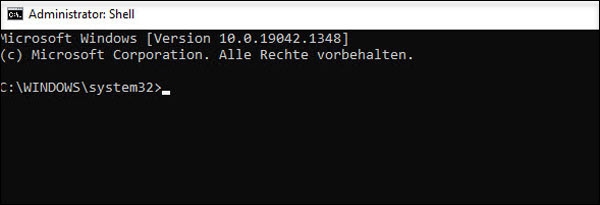
Administrative Shells
A few installation steps below need elevated operating-system rights. Working as an administrator should be the exception, not the rule — for this tutorial you only need it when installing or updating software that goes into system-wide directories.
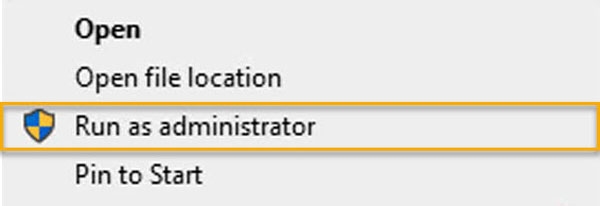
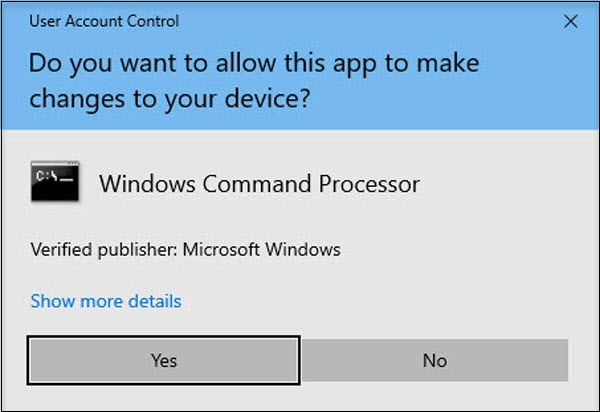
To start a shell with administrator rights, right-click the Shell icon on your desktop and choose Run as administrator from the context menu.
That covers everything you need to prepare the installation. The next steps install the toolset for your development environment so that you can manage J1 projects from your own computer.
Development languages
Jekyll and the J1 Theme run on every current 64-bit operating system:
-
Windows 10 or Windows 11
-
Linux with kernel 4.15 or newer (e.g. Ubuntu 18.x LTS or newer)
-
macOS 10.10.5 (Yosemite) or newer
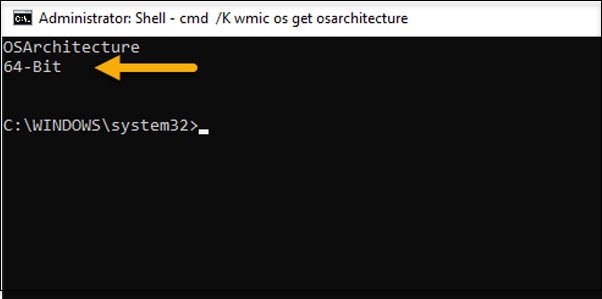
32-bit versions of Windows or Linux are not supported. If you bought your computer in the last few years it almost certainly runs a 64-bit operating system, but it is worth checking — especially on older home PCs. On Windows, you can find out which architecture is installed with this one-line command:
cmd /K wmic os get osarchitectureCopy the command, then paste it into the Windows search box on the taskbar (the magnifying-glass icon). A new window opens and displays your operating system’s architecture.
| All of the next installation steps require an active Internet connection. |
To run the development environment for J1 Theme you need these two programming languages installed:
-
Ruby, version 2.7 or higher (version 3 is recommended)
-
NodeJS, version 16.x to 18.x (npm v8.5.0 or higher)
For Windows, you can download both installers from the links in the following table.
| Language | Architecture | Download |
|---|---|---|
|
| |
|
|
Download both installers first. You will need them in the next two sections.
| You need administrator rights on your computer to install these development tools, because the software is installed system-wide into privileged directories. On Windows those directories are typically |
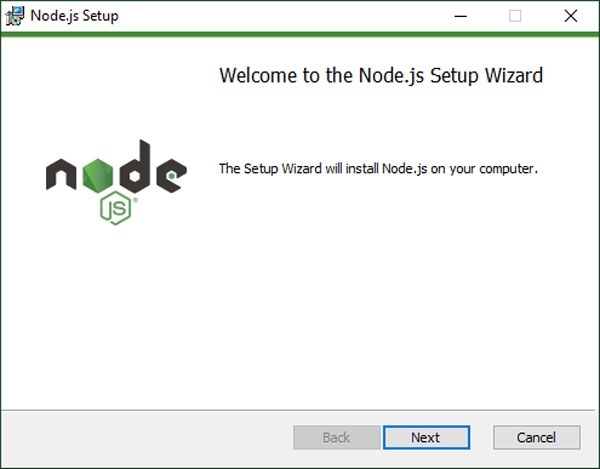
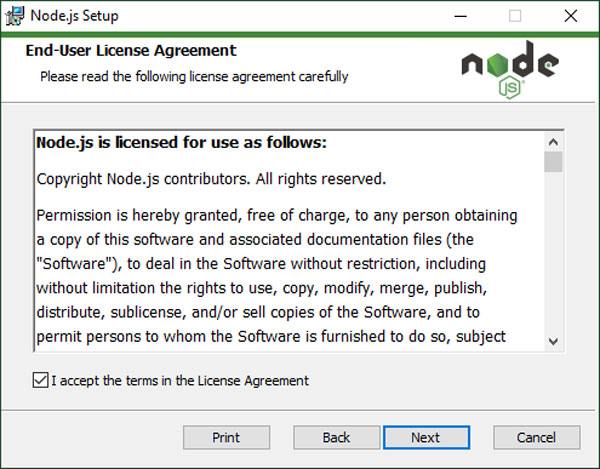
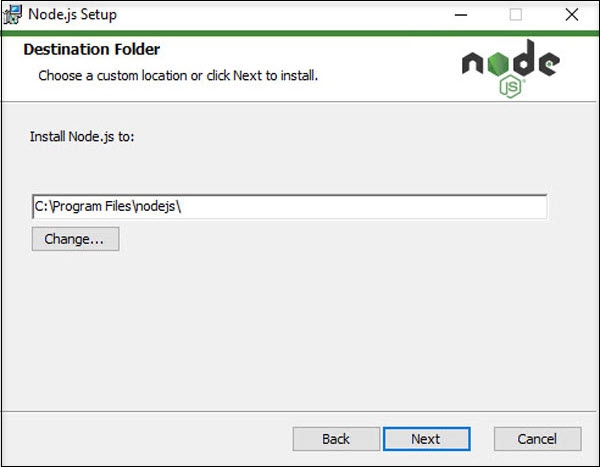
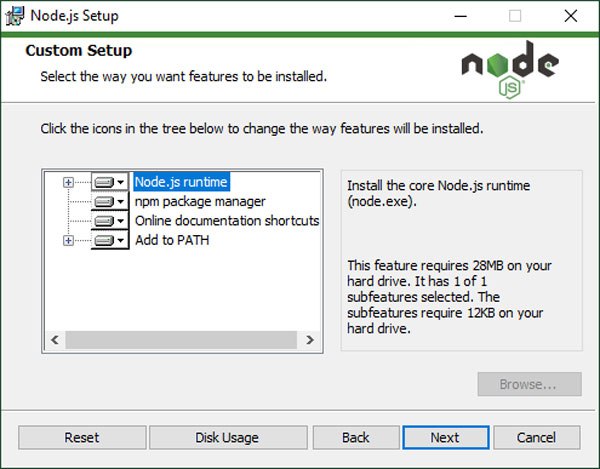
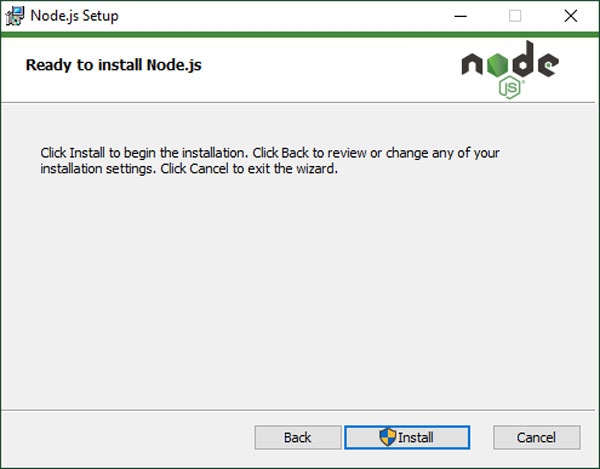
Install NodeJS
The NodeJS installer (for example node-v14.21.3-x64.msi) was saved to your default Downloads folder. Start it directly from your browser, or open the Downloads folder and double-click the installer there.
| On the Additional tools step of the installer, you will be offered the NodeJS DevKit. These tools are not required for the J1 development environment, and you should not install them now. The DevKit contains build tools for compiling platform-specific NodeJS modules. On Windows that is a fairly complex process. If you need it later, you can install the DevKit separately at any time. |


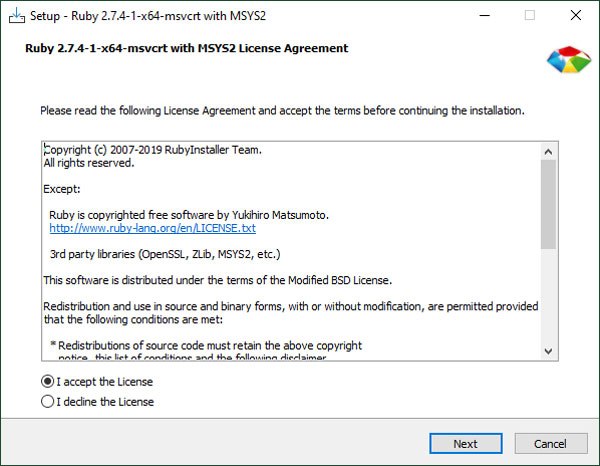
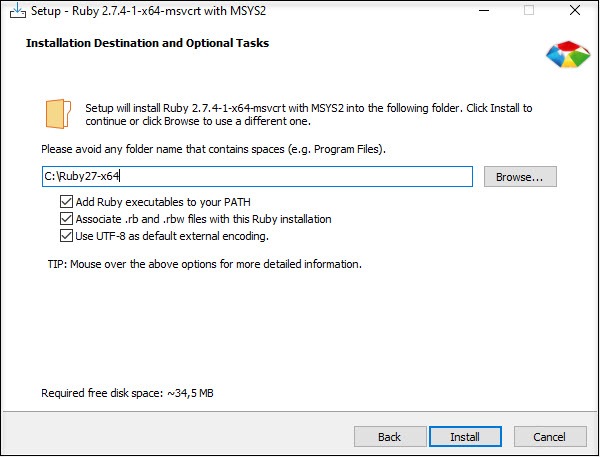
Install Ruby
Installing Ruby works much like installing NodeJS. Many of the steps look the same, so the description below is shorter and skips the screens you have already seen.
The Ruby installer (for example rubyinstaller-devkit-3.1.3-1-x64.exe) was saved to your default Downloads folder. Start it directly from your browser, or open the Downloads folder and double-click it.
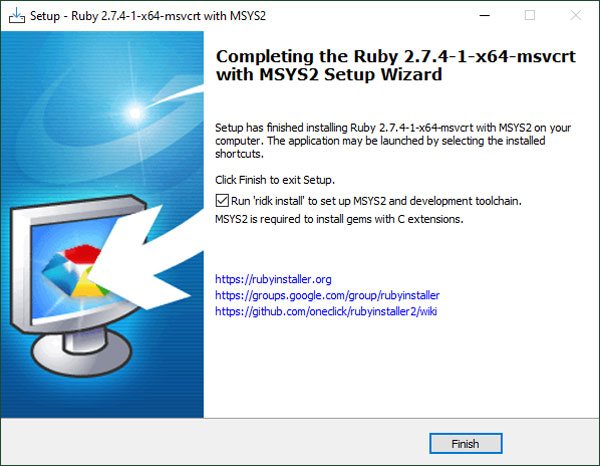
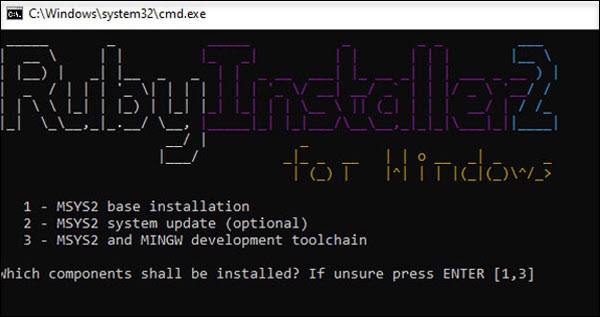
| On the final step of the Ruby installer choose option 3 to install all DevKit components. Press Enter to complete the installation. |
The first part of setting up your development environment is now finished. A few additional components and updates are still needed before you can work with J1. After that, the J1 Template itself can be installed.
Additions and Updates
After installing NodeJS and Ruby, you need to add a few extra components and apply updates to work smoothly with J1.
You can apply all of them directly from the command line. Because some updates touch system-wide files, you need to run a shell with administrator rights on Windows. Open one now, as described in the section Administrative Shells.
NodeJS
NodeJS uses a package manager to install and manage its modules (libraries). The package manager that comes with NodeJS is called NPM (short for Node Package Manager). There is also a popular alternative called Yarn.
| Yarn was originally developed at Facebook and can be used in place of NPM. The two behave similarly, but Yarn commands are usually a little shorter and easier to type. The rest of this tutorial uses Yarn because it is friendlier on the command line. |
To install the latest versions of NPM and Yarn, copy the following command and paste it into your administrator shell:
npm install -g npm@latest && npm install -g yarn@latest (1)| 1 | The -g switch performs a global installation, so the tools are available to every user on the computer. |
Ruby
The Ruby installer is often several months older than the very latest versions of Ruby’s built-in base components. It is a good idea to update the most important parts of your Ruby installation to the current versions.
Bundler
Ruby modules (called gems) come in many versions. Different projects often need different versions of the same gem. If two projects on the same computer expect different versions of the same gem, you can end up with mysterious errors. To solve this problem in a clean way, Ruby developers use a gem called Bundler.
| Each project lists the gems it needs (and the exact versions) in a configuration file called |
Bundler reads a Gemfile, downloads the right versions of every gem, and makes them available to the project. Bundler itself must be installed system-wide in Ruby’s privileged directories. Copy the following command into your administrator shell:
gem install bundler --no-documentRubyGems
RubyGems is the package manager for Ruby itself — it is the program you called when you typed gem install. RubyGems is in turn delivered as a gem named rubygems-update. Updating RubyGems is a good idea because the version that ships with the Ruby installer can be several months out of date.
The update commands look the same as for any other gem. RubyGems must be installed system-wide, so run them in your administrator shell:
gem install rubygems-update --no-document && ^
update_rubygems --no-document && ^
gem update --system
Checking versions
The hard part — installing and updating NodeJS and Ruby — is now done. The good news is that you rarely need to repeat it. Keeping these tools current prevents a whole class of obscure problems that are otherwise hard to track down.
From now on you do not need an administrator shell. Close the shell you started as administrator and continue with a regular user shell instead. Running commands as a normal user makes sure that programs cannot make unexpected changes to your operating system. Better safe than sorry.
Open a shell from the Command prompt icon on your desktop and copy these commands to display the installed versions of NodeJS and Ruby:
cls && ^
echo|set /p dummyName="NodeJS          " && node --version && ^
echo|set /p dummyName="NPM             " && npm --version && ^
echo|set /p dummyName="Yarn            " && yarn --version && ^
echo|set /p dummyName="Ruby (Core)     " && ruby --version && ^
echo|set /p dummyName="RubyGems        " && gem --version && ^
bundler --versionNodeJS v14.19.3 NPM 6.14.17 Yarn 1.22.17 Ruby (Core) ruby 3.1.3p185 (2022-11-24 revision 1a6b16756e) [x64-mingw-ucrt] RubyGems 3.3.26 Bundler version 2.3.26
If you run into trouble later, the output of these version checks is the first thing to look at. Many problems with Jekyll and J1 turn out to be caused by an outdated version of one of these tools.
Development tools
The essential tools for managing and editing a J1 website are:
-
Git, the version-control system
-
GitHub CLI, the GitHub command-line interface
-
a source-code editor (for example Atom)
Git keeps track of every change you make to your J1 project. With Git on your side, you have a complete history of your site and a very safe backup of all your project data on GitHub. Even if you break your local working copy beyond repair, you can always go back to a previous working version.
Git also protects you from serious data loss. You will start by creating a development branch — a parallel line of work where you can test changes without touching the main version of your site. You will see how useful this is when you start making big changes: your live site is never put at risk.
Download the latest version of Git for Windows from here (current as of 03/23): Git v2.40.0.
A powerful source-code editor like Atom is a developer’s most-used tool — it is the place where you spend most of your time. Editors typically come with many built-in features and you can install plug-ins for the rest.
If you already use a code editor that you like, by all means stick with it. You will not need to change.
If you have never used a code editor before, take the time to install one now. Yes, it is one more new tool to learn, but it will save you hours of work in return.
Installing programs is rarely exciting. To make it less tedious, the screenshots of every installer dialog below come with a short explanation, so you also pick up some technical terms along the way.
The notes will also help you pick the right options where the installer asks you something.
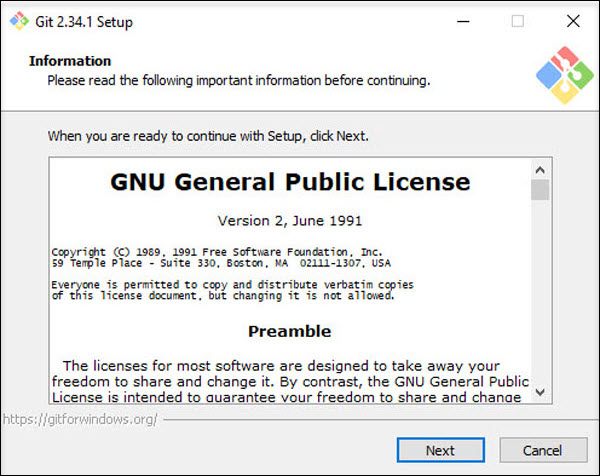
Install the version control system Git
The Git installer asks a lot of questions. The individual steps are commented below so you understand what each dialog is for.
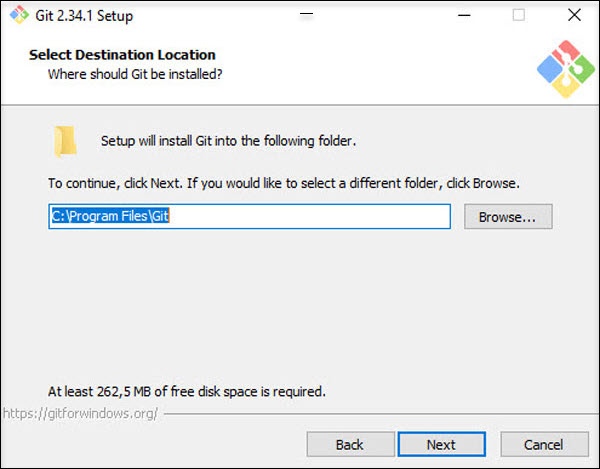
| To protect your Git installation from accidental changes, use the default (privileged) path |
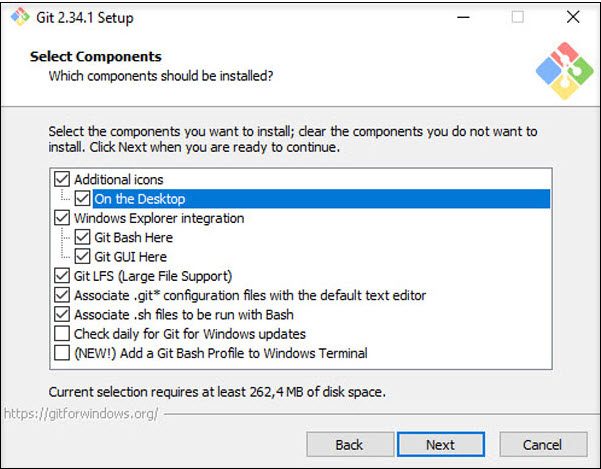
| The default selections make sense. If you would also like a handy desktop icon, tick the Additional icons option. |
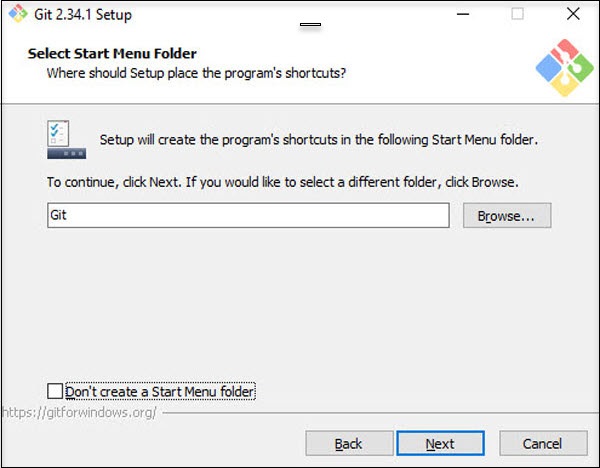
| On Windows, it is a good idea to create an additional folder in the Start Menu. If you ever lose your desktop icons, you can always find your important applications from there. |
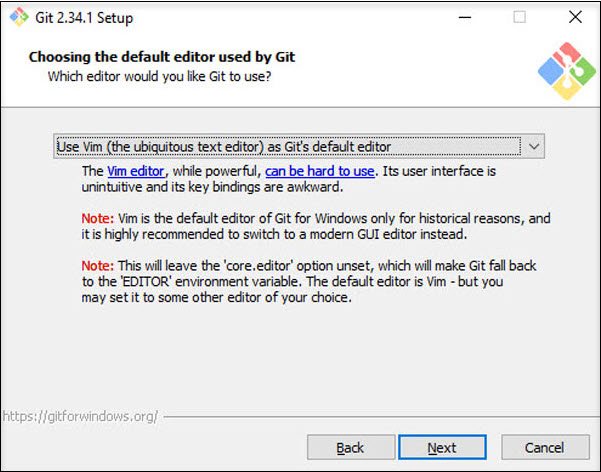
| Every change you commit to a Git repository is accompanied by a short commit message that describes what changed. You can write that message on the command line ( The default editor for Git is |
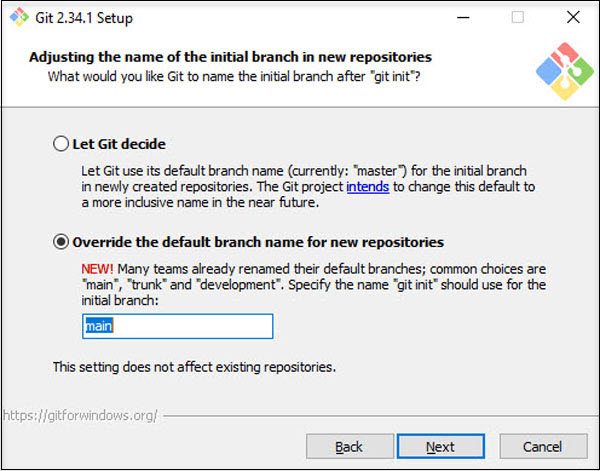
| A branch in a Git repository is the name of the current line of changes. For historical reasons the main branch used to be called master. That name is no longer the standard today; modern projects (and GitHub itself) use main. Pick main here so your repository matches GitHub’s default. |
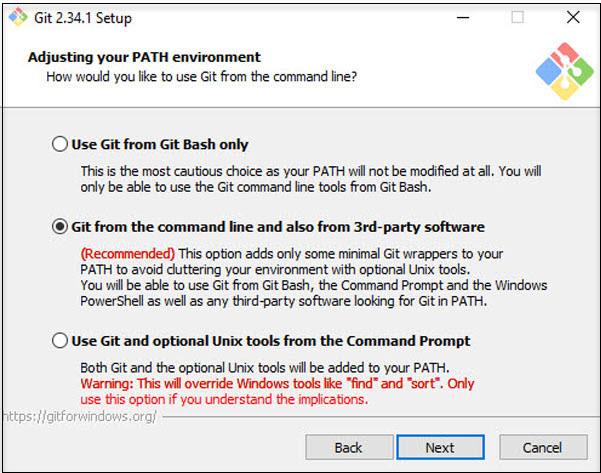
| Git was originally developed on Unix systems like Linux. The Windows version of Git uses real Unix-style commands under the hood, through a compatibility layer called MSYS. Some of these Unix commands (for example The default option avoids conflicts between commands that happen to share the same name, so we highly recommend keeping it. |
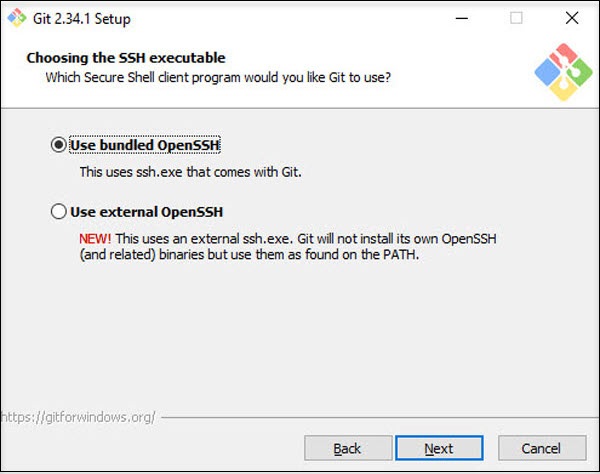
| As mentioned, Git comes from the Unix world. On Unix-like systems the Secure Shell (SSH) subsystem is widely used to create secure, encrypted connections. Windows does not include SSH by default. For most Git installations on Windows, the default option (use the bundled OpenSSH subsystem) is the right choice. |
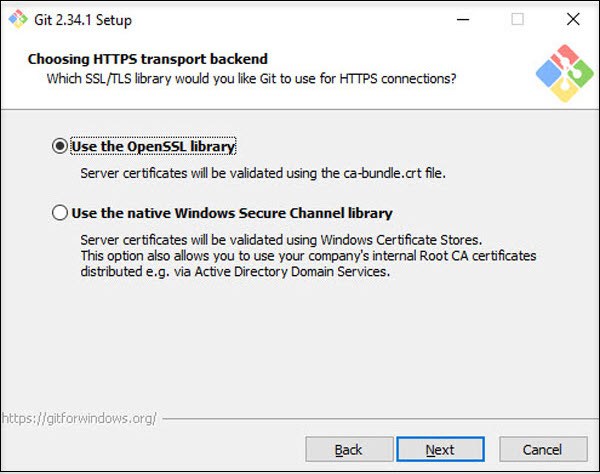
| Similarly, SSL libraries are not available on Windows by default. SSH itself relies on SSL to establish secure encrypted connections. For compatibility, keep the default option (OpenSSL). |
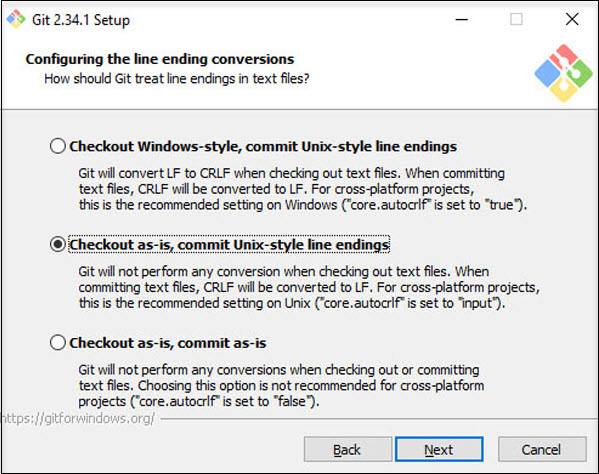
| Text files separate their lines with invisible line-ending characters. Annoyingly, different operating systems use different ones. Unix and Linux use The best compromise is to let Git handle this for you. All text files stored in the repository use |
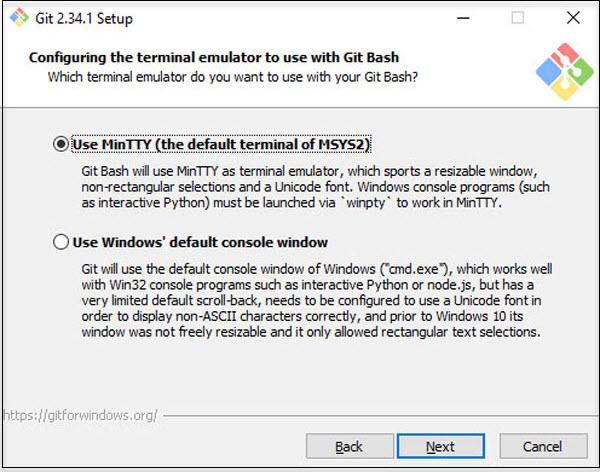
| As mentioned, Git uses MSYS to provide Unix-style commands on Windows. In addition to native Windows shells like the For working with J1 projects, a Windows command prompt is perfectly fine. Still, a real Unix shell can be handy from time to time, so leave the default unchanged. |
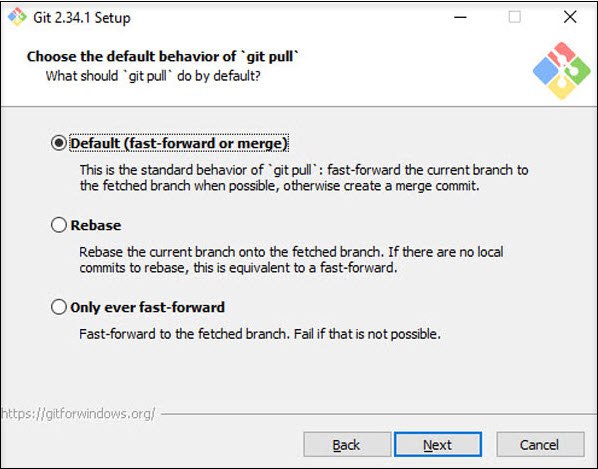
| You already know that Git is a distributed version-control system. The core idea is that there is a remote repository on a server somewhere and a local working copy on each developer’s computer. From time to time, the local changes have to be merged back into the remote. You can probably guess that merging changes from many people is not trivial and can produce conflicts. Git offers several strategies to do the merge. The simplest one is called fast-forward. Fast-forward merges work very well when the changes are small and frequent — which is exactly how most people work day to day. Keep this default setting. |
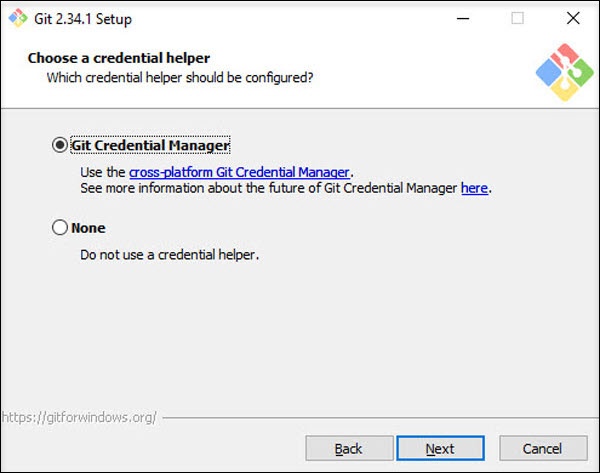
| You already know GitHub as a service provider and have an account there for managing your repositories. Unfortunately, the Internet is not always a peaceful place: passwords and access tokens have to be stored carefully. The Git Credential Helper takes care of storing your GitHub account information securely on your PC. Keep the default setting here for the simplest and safest way to authenticate to GitHub. |
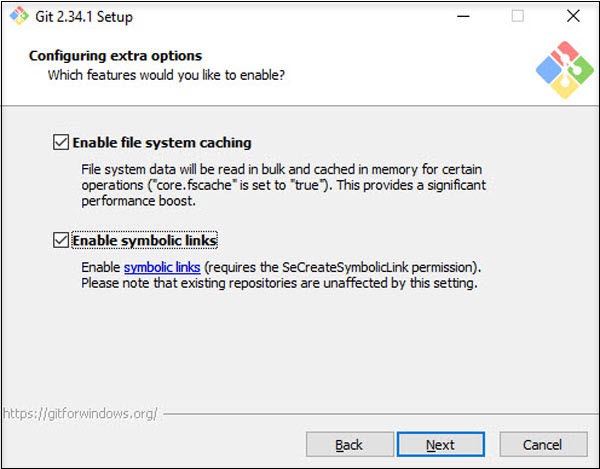
| Git can also use extended features of the operating system for handling files and directories. These extensions apply to every supported operating system. Keep both options enabled to get the best support for files and folders. |
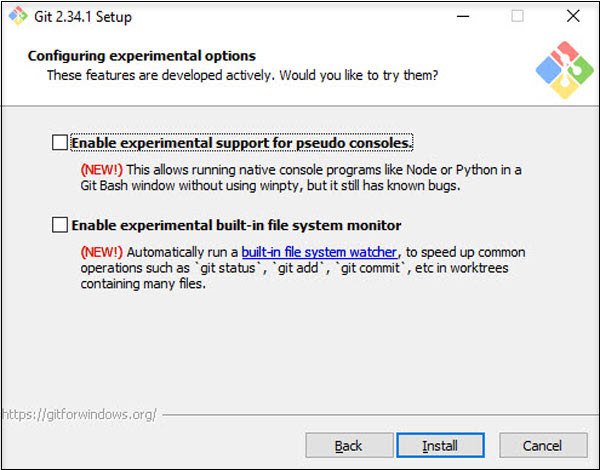
| Experimental features can be useful, but they are intended for experienced users. They are not required for using Git with J1 projects, so do not enable them here. |
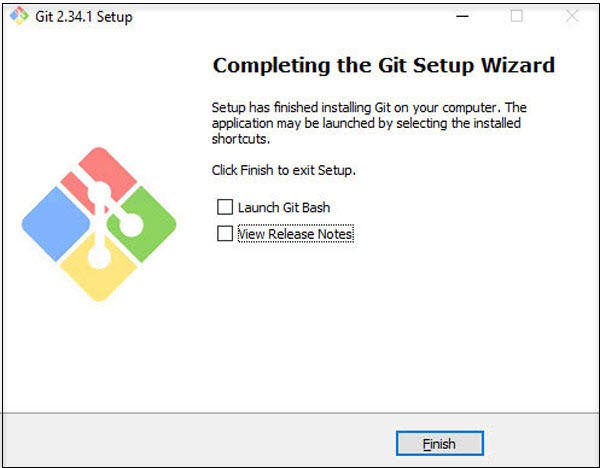
| You will work with version control throughout the next sections. There is no repository on your computer yet, so there is no point in starting a Git shell right now. It is worth reading the release notes of any software you install. The "what changed" information is especially useful when upgrading to a new major version. For a fresh install you can skip the release notes for now and come back to them later if you need to. |
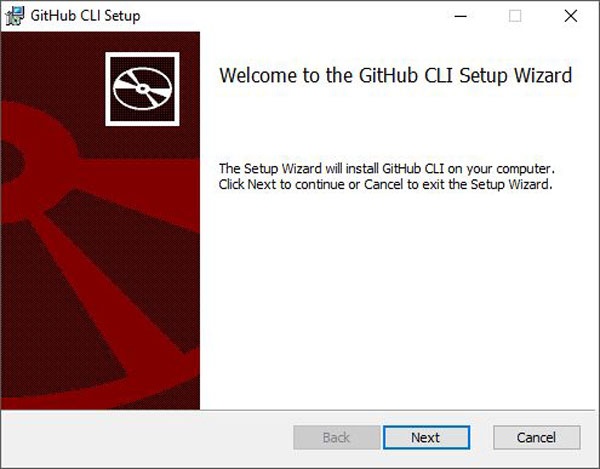
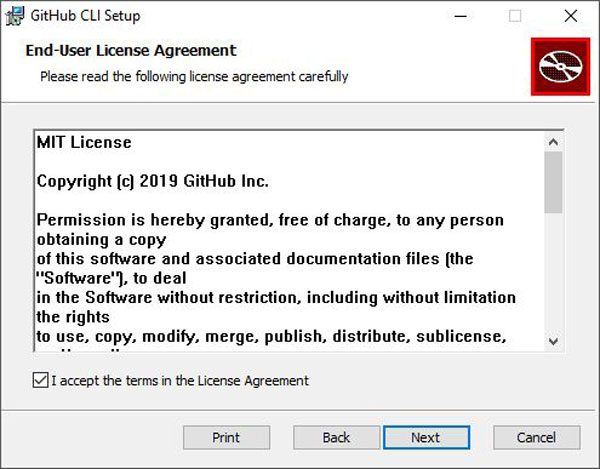
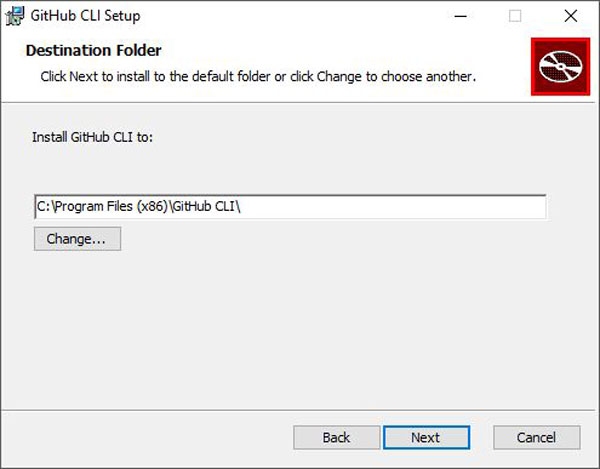
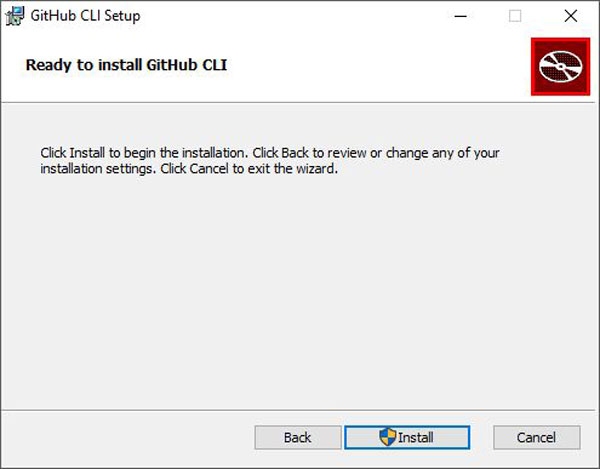
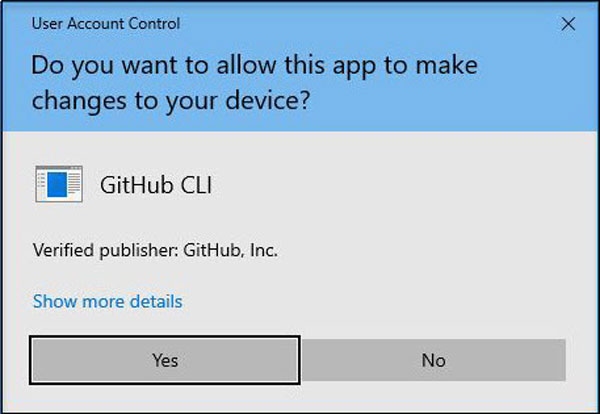
Install Github CLI
You will manage J1 projects mostly through short commands typed in a shell. The GitHub CLI (command-line interface) helps when those commands need to talk to GitHub directly — for example, when creating or cloning a repository.
To download the installer, visit GitHub CLI Home, or use the direct link for the latest Windows installer (current as of 01/22): Installer v2.4.0.
Installation only takes a few steps.
Install Visual Studio Code
Installing the VS Code editor is quick. The installer chooses sensible defaults for nearly everything, so there is very little to configure afterwards.
Each step is annotated below to help you understand what the dialogs do.

| The Atom installation runs fully automatically. The installer applies all the necessary default settings; you can adjust them later if you need to. When installation finishes, Atom starts automatically and asks a few follow-up questions. |
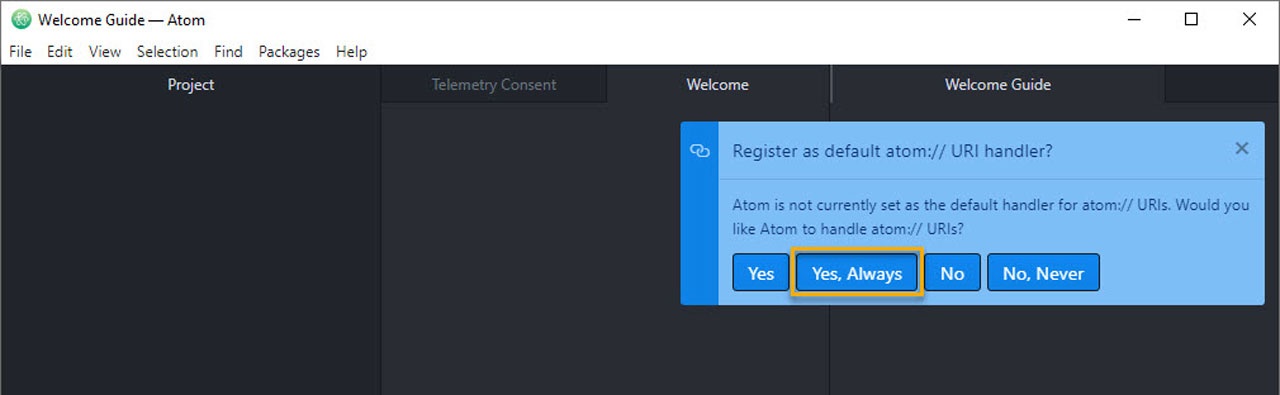
| A URI (Uniform Resource Identifier) is a short string that identifies a resource — typically a file, a network location, or a program. URIs are how the web finds and loads pages, and they also work for resources on your local computer. Atom uses URIs that start with |
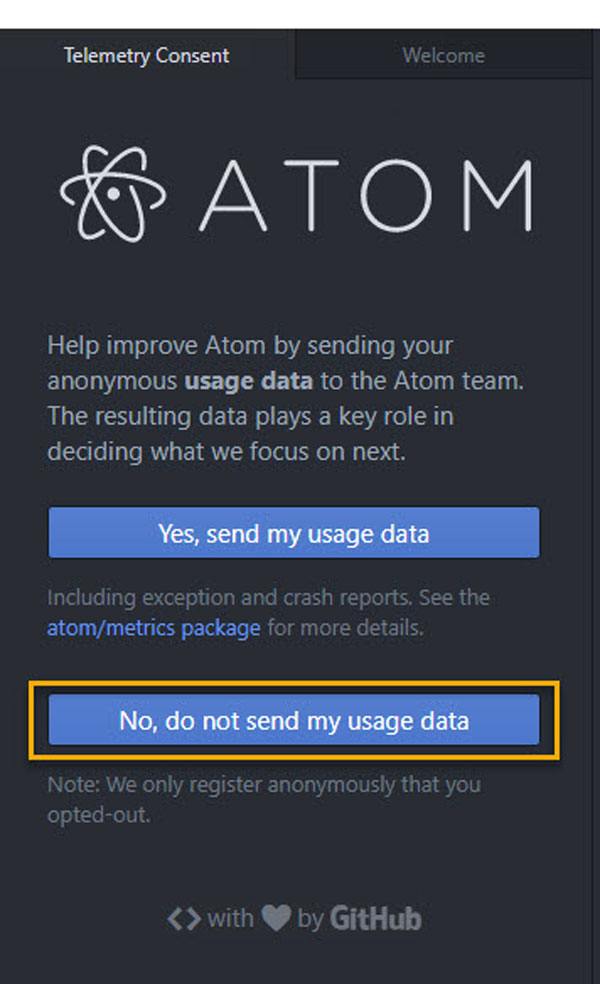
| Atom can send usage information back to its developers over the Internet to help them improve the product. Whether to allow this is up to you. The author of this tutorial uses Atom on Windows mainly for J1 projects, with a very simple setup; in that case the telemetry data is not very useful, so the option is turned off. But the choice is yours. |
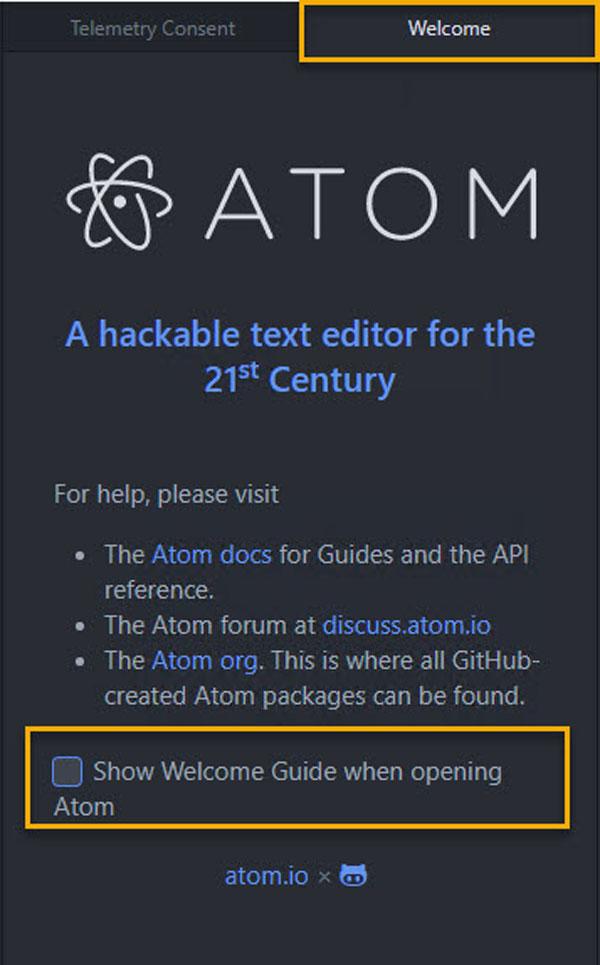
| You can choose to display a welcome guide every time you start a new Atom window. The first time you use Atom, the welcome tab can be helpful. Plenty of good tutorials on Atom are available online as well. Keep this option on or off as you prefer. You can disable the welcome tab at any time. |
Project Management
Installing and updating the development environment for J1 was a tough job. Creating and starting a J1 project, on the other hand, is much easier. After a handful of steps you have arrived and can finally start your new web. In the following, you will know all the necessary work steps for managing a J1 project. There are different ways to create a J1 project or a new website. You already know one way: 1-click deployment via Netlify. This type of deployment has automatically created a new repo in your workspace on Github.
The opposite way is, of course, also possible. That means you first create a J1 project locally on your PC and then connect the local project as a Git Repo with Github. It is also very easy to provide the website via Netlify. Only a few steps will be required to publish locally generated sites via Netlify.
Download and Install J1 Theme Gem
The Ruby gem j1-template is the foundation for managing J1 projects. The first step is to download the current version of this gem from the Internet. Ruby gems are downloaded directly with the Ruby package manager: the gem command downloads and installs a module in a single step.
Create the Users Gem folder
You can install Ruby gems either system-wide (available to every user on the computer) or per-user (available only to the current account). A per-user install does not require administrator rights on your operating system, and it makes loading gems for a project much easier.
| With a per-user setup, every user can install the gems a project needs without administrator rights. The default per-user gem folder for J1 projects is
|
Create the .gem folder on Windows
To create the .gem folder on Windows, you can use the environment variables %HOMEDRIVE% and %HOMEPATH% to refer to your home directory:
.gem folder on Windowsmd %HOMEDRIVE%%HOMEPATH%\.gemCreate the .gem folder on Unix/Linux
To create the .gem folder on Unix or Linux:
.gem folder on Linuxmkdir ~/.gemInstall the Gem j1-template
cls && gem install j1-template --remote --user-install --no-document (1) (2) (3)| 1 | Download the gem over the Internet from rubygems.org (--remote) |
| 2 | Install the gem per-user, into your home folder (.gem/ruby) (--user-install) |
| 3 | Skip the gem’s developer documentation (--no-document) |
J1 is a gem-based template for the Jekyll site generator. It depends on several other gems, and those will be downloaded and installed automatically as dependencies. Below is a summary of what you see on screen during the install:
Fetching warden-1.2.9.gem
Fetching rack-2.2.3.gem
...
WARNING:  You don't have c:/users/<user_name>/.gem/ruby/3.1.0/bin in your PATH, (2)
          gem executables will not run.
...
Successfully installed rack-2.2.3
Successfully installed warden-1.2.9
...
Building native extensions. This could take a while...  (1)
...
Successfully installed j1-template-2024.3.8
64 gems installed| 1 | During installation, some gems generate platform-specific extensions |
| 2 | The warning line in the output is important. See Extend the search path for how to deal with it. |
The first J1 installation takes a little while. There are several reasons for that: many other Ruby gems have to be downloaded, and some of them build platform-specific extensions for your operating system as part of the install. All of these steps happen automatically — you do not have to type anything else.
Installing Ruby gems into your home directory has one important side effect. Gems can contain programs (small command-line tools), not just libraries of code. That is exactly the case for J1: the j1-template gem ships with a command-line tool called j1 that manages J1 projects. To use the j1 command, you have to extend your operating system’s program search path (PATH). The next section Extend the search path shows how to do this on Windows.
Extend the search path
The j1-template gem brings along an easy-to-use command-line program called j1, which you use to manage J1 projects. After a per-user installation, any program that comes with a gem ends up in this folder under your home directory:
C:\Users\<user_name>\.gem\ruby\3.1.0\binFor Windows to find a gem-based program when you type its name, that folder must be on the system search path (the PATH environment variable). To add the folder to PATH, run the following command in a shell (command prompt):
SETX PATH "%PATH%;%HOMEDRIVE%%HOMEPATH%\.gem\ruby\3.1.0\bin"SUCCESS: Specified value was saved.There is one catch when you extend the search path this way. The new PATH is saved straight away, but it is still unknown in the shell window you typed the command in. To pick up the change, you have to restart the shell.
| On Windows that means closing all open command-prompt windows and starting a fresh one. Without the restart, the |
Check the J1 control program
The j1 command-line program is what you use to manage J1 projects. After installing the j1-template gem, check in a new shell which version of J1 you have:
j1 --versionj1 2024.3.8| As of 02/22, the current version of J1 is 2024.3.8. Do not use older versions. |
You can list all the things j1 can do by asking for the help screen:
j1 --helpj1 2024.3.8 -- J1 Theme is a gem-based Template made for Jekyll
Usage:
j1 <subcommand> [options]
Options:
-h, --help Show this message
-v, --version Print the name and version
-t, --trace Show the full backtrace when an error occurs
Subcommands:
generate Generates a J1 project scaffold in PATH
help Show the help message, optionally for a given subcommand
patch Install patches available for J1 projects
rebuild Rebuild the J1 projects website (1)
reset Reset a J1 project to factory state
setup Initialize a J1 project for first use
site Run the website of a J1 project| 1 | rebuild, reset, setup and site are the top-level commands for controlling J1 projects. |
Setting up Git
You have already installed Git, but it is not configured yet. To create and use Git repositories for your local J1 projects, you use the git command on the command line. The basic setup of Git is very short: you only need to tell Git two things about your default identity:
-
your user name
-
your personal email address
Open a shell and run the following commands:
git config --global user.name "<your_user_name>" (1)| 1 | Replace <your_user_name> with the user name you want Git to use (for example, the name of your Windows user account). |
git config --global user.email "<you@example.com>" (1)| 1 | Replace <you@example.com> with your personal email address. |
That is all there is to the basic Git setup. From now on, every Git command will record these personal details so that other contributors can see who made which change and how to contact you.
How to manage J1 projects
Creating and starting a J1 project is very easy. After only a handful of steps you will have a new website ready to go. The next few sections walk through every step in detail.
Here is the high-level overview:
-
set up a project
-
(optional but recommended) bring the project under Git version control
-
initialize the project
-
start the project and open the included website
A project consists of several files and folders. A typical structure of a J1 project looks like this:
  ├──── .
  │     └─ _data  (1)
  │     └─ _includes (2)
  │     └─ _plugins (3)
  │     └─ assets (4)
  │     └─ collections (5)
  │     └─ pages (6)
  │     └─ utilsrv
  ├──── _config.yml (7)
  ├──── config.ru
  ├──── dot.gitattributes
  ├──── dot.gitignore
  ├──── dot.nojekyll
  ├──── favicon.ico
  ├──── Gemfile (8)
  ├──── index.html (9)
  ├──── package.json (10)
  └──── README.md
| 1 | Configuration data for the website |
| 2 | Global includes used by all (Asciidoc) content sources |
| 3 | Built-in (Ruby) plugins for Jekyll |
| 4 | Static assets for the web (images, for example) |
| 5 | Content folder that contains all blog posts |
| 6 | Content folder that contains all (article) pages |
| 7 | Central Jekyll site configuration |
| 8 | Central Ruby Gemfile that lists every required gem |
| 9 | Homepage for the website |
| 10 | Central NPM project file used to manage the site |
Manage existing J1 Projects
If you deployed your site with the 1-Click method from the chapter Awesome Site, the new website now lives as a repository in your personal GitHub workspace. In Git terms, that GitHub repository is the remote — the central version of your J1 project.
| If you have not yet created a website on GitHub, or you do not want to use GitHub and Netlify for now, you can still create a local J1 project. To create and manage purely local J1 projects you do not need any service provider. In that case, skip ahead to Create new J1 projects. |
The next few steps create a local working copy of your remote repository — in Git terms, the local. With this working copy on your PC, you can edit the site in your development environment and then sync the changes back to the remote on GitHub.
First, sign in to GitHub from the GitHub login page using your personal account.
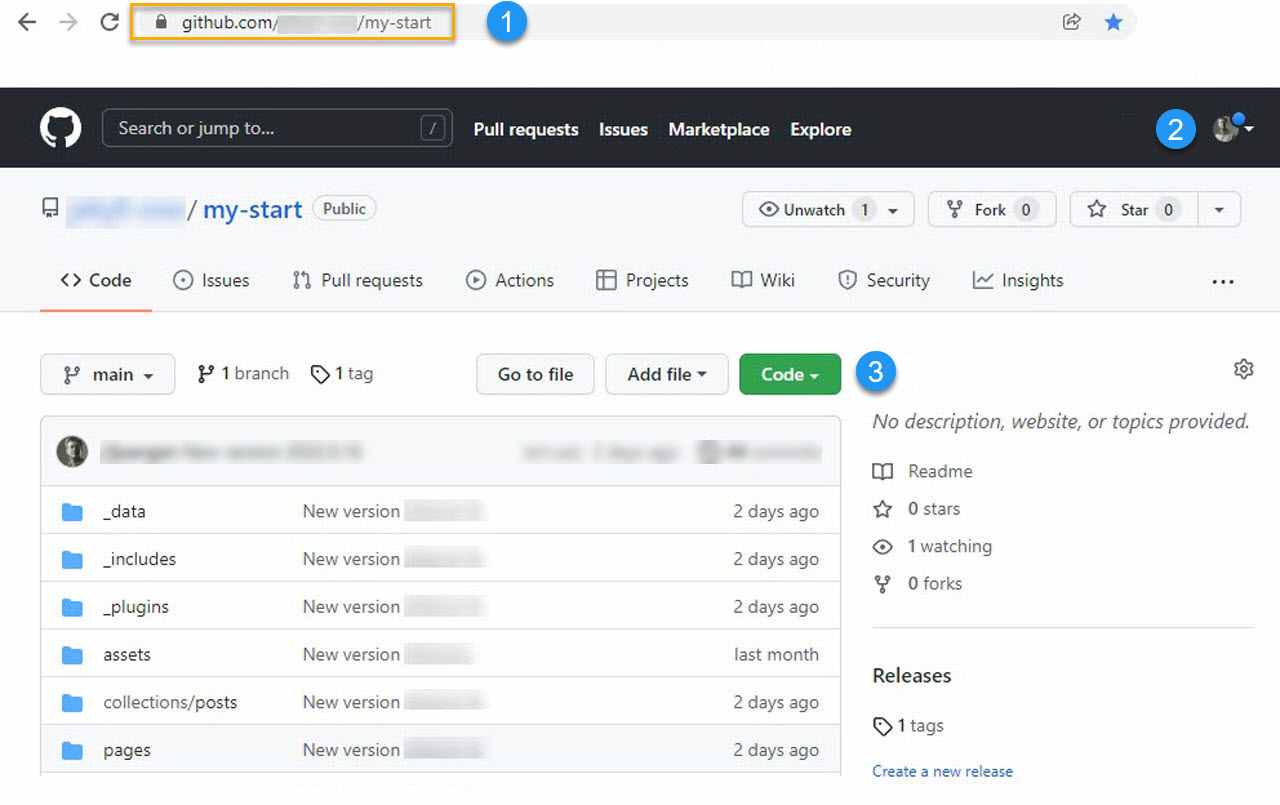
URL of your repository on GitHub
Access your personal account
Select URI to access a repo from Git
Create a working copy
Now it is time to use Git for the first time. Just as the j1 command controls J1 projects, the git command controls Git repositories. For J1 work, the command line is the most convenient way to manage your repositories. Most repository operations are very short commands that you will quickly memorize.
First, create a folder on your PC where all your website projects will live. For the examples below we use C:\J1\Projects:
mkdir C:\J1\Projects && cd C:\J1\ProjectsYou can now create a local working copy from your remote GitHub repository like this:
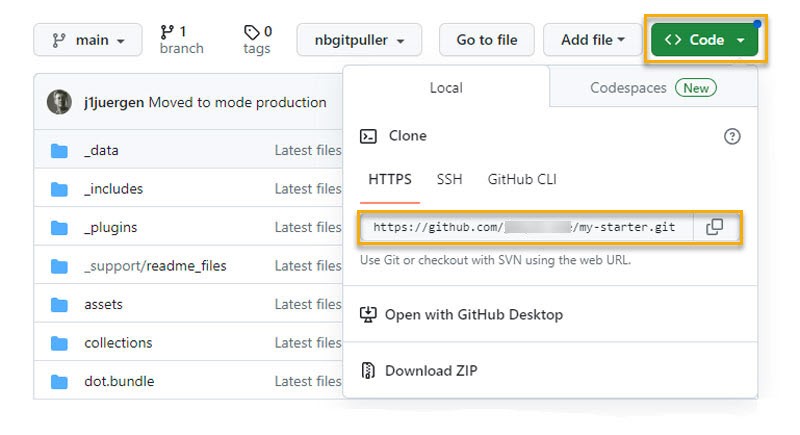
git clone <URI_of_your_repo_at_Github> (1)| 1 | URI: copy the URI from the GitHub web interface, as shown in the screenshot above (3). |
The command needs to know which repository to copy (clone). You provide that information through the URI of your GitHub repository. To get the URI, click the green Code button on your repository’s GitHub page and copy the HTTPS URL.
cloneCloning into '<name_of_your_repo>'...
remote: Enumerating objects: 1930, done.
remote: Counting objects: 100% (1930/1930), done.
remote: Compressing objects: 100% (777/777), done.
remote: Total 1930 (delta 1022), reused 1927 (delta 1019), pack-reused 0
Receiving objects: 100% (1930/1930), 27.76 MiB | 4.83 MiB/s, done.
Resolving deltas: 100% (1022/1022), done.That is all you need to create a local working copy with Git. You can skip the next section and continue at Initialize a project to make your J1 project ready to use.
Create new J1 projects
If the j1-template gem is installed you can create completely new J1 projects from scratch. New projects are created with the j1 command on the command line.
If you have not already done so, create a folder where your local project copies will live. In the examples below that folder is C:\J1\Projects:
mkdir C:\J1\Projects && cd C:\J1\ProjectsThe j1 generate command creates a new project folder (my-start) inside your current folder.
j1 generate my-startYYYY-MM-DD hh:mm:ss - GENERATE: Running bundle install in <path_to_your_projects>/my-start ...
YYYY-MM-DD hh:mm:ss - GENERATE: Install bundle in USER gem folder ~/.gem ...
YYYY-MM-DD hh:mm:ss - GENERATE: Fetching gem metadata from https://rubygems.org/...
YYYY-MM-DD hh:mm:ss - GENERATE: Resolving dependencies...
YYYY-MM-DD hh:mm:ss - GENERATE: Using bundler 2.3.26
YYYY-MM-DD hh:mm:ss - GENERATE: Using ruby2_keywords 0.0.5
YYYY-MM-DD hh:mm:ss - GENERATE: Fetching public_suffix 5.0.1
YYYY-MM-DD hh:mm:ss - GENERATE: Fetching asciidoctor 2.0.18
YYYY-MM-DD hh:mm:ss - GENERATE: Fetching bump 0.10.0
YYYY-MM-DD hh:mm:ss - GENERATE: Fetching builder 3.2.4
YYYY-MM-DD hh:mm:ss - GENERATE: Fetching colorator 1.1.0
YYYY-MM-DD hh:mm:ss - GENERATE: Fetching concurrent-ruby 1.2.2
YYYY-MM-DD hh:mm:ss - GENERATE: Fetching date 3.3.3
YYYY-MM-DD hh:mm:ss - GENERATE: Fetching unf_ext 0.0.8.2 (x64-mingw-ucrt)
YYYY-MM-DD hh:mm:ss - GENERATE: Fetching eventmachine 1.2.7
YYYY-MM-DD hh:mm:ss - GENERATE: Fetching http_parser.rb 0.8.0
YYYY-MM-DD hh:mm:ss - GENERATE: Fetching execjs 2.8.1
...
YYYY-MM-DD hh:mm:ss - GENERATE: C:/Users/<user>/.gem/ruby/3.1.0;C:/DevTools/Ruby31/lib/ruby/gems/3.1.0;
YYYY-MM-DD hh:mm:ss - GENERATE: Install patches in USER gem folder ~/.gem ...
YYYY-MM-DD hh:mm:ss - GENERATE: Install patches on path C:/Users/<user>/.gem/ruby/3.1.0 ...
YYYY-MM-DD hh:mm:ss - GENERATE: Install patches successful
YYYY-MM-DD hh:mm:ss - GENERATE: Generated Jekyll site installed in folder <path_to_your_projects>/my-startj1 generate my-start creates a folder called my-start inside your current folder and fills it with every file the new project needs. When the command finishes, change into the new folder. The last step is to bring the new project under Git version control.
Setting up Git for your project
Version control is your safety net. We highly recommend putting every project under Git control as soon as it is created. To initialize the new project as a Git repository, first move into the project folder:
cls && cd C:\J1\Projects\my-startgit add . && git commit -am "Initial version"| If you see an error message like this: Author identity unknown *** Please tell me who you are. Run git config --global user.email "you@example.com" git config --global user.name "Your Name" to set your account's default identity. Omit --global to set the identity only in this repository. fatal: unable to auto-detect email address (got 'user@hostname.(none)') you need to set up your account’s default identity first. See the section Setting up Git for the details. |
Your safety net is now in place — a good choice. To make the new project ready to use, continue with the steps in the next section to initialize it.
Initialize a project
In the example below, the project is called my-start. For the next steps, make sure you are inside your project folder:
cls && cd C:\J1\Projects\my-startYou only have to initialize a project once. Initialization downloads any additional NodeJS and Ruby modules the project needs, both for the development tooling and for the Jekyll build engine.
| All the tasks for developing a J1 website are defined as scripts in the NodeJS package manager |
| A project can be driven by either of the package managers |
Initializing a project is done by the j1 command using the setup top-level script. The setup task triggers many sub-tasks, but you do not have to deal with them yourself — they all run automatically.
j1 setupFor an overview of what setup does, here is a summary of its output:
Check consistency of the J1 project ...
YYYY-MM-DD hh:mm:ss - SETUP: Running bundle install in <path_to_your_projects>\my-start ...
YYYY-MM-DD hh:mm:ss - SETUP: Install bundle in USER gem folder ~/.gem ...
YYYY-MM-DD hh:mm:ss - SETUP: Fetching gem metadata from https://rubygems.org/...
YYYY-MM-DD hh:mm:ss - SETUP: Using bundler 2.3.26
YYYY-MM-DD hh:mm:ss - SETUP: Using ruby2_keywords 0.0.5
YYYY-MM-DD hh:mm:ss - SETUP: Using public_suffix 5.0.1
YYYY-MM-DD hh:mm:ss - SETUP: Using asciidoctor 2.0.18
YYYY-MM-DD hh:mm:ss - SETUP: Using builder 3.2.4
YYYY-MM-DD hh:mm:ss - SETUP: Using bump 0.10.0
YYYY-MM-DD hh:mm:ss - SETUP: Using colorator 1.1.0
YYYY-MM-DD hh:mm:ss - SETUP: Using concurrent-ruby 1.2.2
YYYY-MM-DD hh:mm:ss - SETUP: Using date 3.3.3
YYYY-MM-DD hh:mm:ss - SETUP: Using unf_ext 0.0.8.2 (x64-mingw-ucrt)
YYYY-MM-DD hh:mm:ss - SETUP: Using eventmachine 1.2.7
...
YYYY-MM-DD hh:mm:ss - SETUP: Bundle complete! 30 Gemfile dependencies, 79 gems now installed.
YYYY-MM-DD hh:mm:ss - SETUP: Bundled gems are installed into `C:/Users/<user>/.gem`
YYYY-MM-DD hh:mm:ss - SETUP: Install patches in USER gem folder ~/.gem ...
YYYY-MM-DD hh:mm:ss - SETUP: Install patches on path C:/Users/<user>/.gem/ruby/3.1.0 ...
YYYY-MM-DD hh:mm:ss - SETUP: Initialize the project ...
YYYY-MM-DD hh:mm:ss - SETUP: Be patient, this will take a while ...
YYYY-MM-DD hh:mm:ss - SETUP:
YYYY-MM-DD hh:mm:ss - SETUP: > j1@2024.3.8 setup <path_to_your_projects>/my-start
YYYY-MM-DD hh:mm:ss - SETUP: > npm --silent run setup-start && ..
YYYY-MM-DD hh:mm:ss - SETUP:
YYYY-MM-DD hh:mm:ss - SETUP: Setup project for first use ..
YYYY-MM-DD hh:mm:ss - SETUP: Bootstrap base modules ..
YYYY-MM-DD hh:mm:ss - SETUP: done.
YYYY-MM-DD hh:mm:ss - SETUP: Configure environment ..
YYYY-MM-DD hh:mm:ss - SETUP: done.
YYYY-MM-DD hh:mm:ss - SETUP: Create project folders ..
YYYY-MM-DD hh:mm:ss - SETUP: Create log folder ..
YYYY-MM-DD hh:mm:ss - SETUP: Create archived log folder ..
YYYY-MM-DD hh:mm:ss - SETUP: Create etc folder ..
YYYY-MM-DD hh:mm:ss - SETUP: done.
YYYY-MM-DD hh:mm:ss - SETUP: Bootstrap project modules ..
YYYY-MM-DD hh:mm:ss - SETUP: Bootstrap utility server modules ..
YYYY-MM-DD hh:mm:ss - SETUP: done.
YYYY-MM-DD hh:mm:ss - SETUP: Detect OS ..
YYYY-MM-DD hh:mm:ss - SETUP: OS detected: Windows_NT
YYYY-MM-DD hh:mm:ss - SETUP: Build site incremental ..
YYYY-MM-DD hh:mm:ss - SETUP: Configuration file: <path_to_your_projects>/my-start/_config.yml
YYYY-MM-DD hh:mm:ss - SETUP:             Source: <path_to_your_projects>/my-start
YYYY-MM-DD hh:mm:ss - SETUP:        Destination: <path_to_your_projects>/my-start/_site
YYYY-MM-DD hh:mm:ss - SETUP:  Incremental build: enabled
YYYY-MM-DD hh:mm:ss - SETUP:       Generating...
YYYY-MM-DD hh:mm:ss - SETUP:            J1 Lunr: enabled
YYYY-MM-DD hh:mm:ss - SETUP:            J1 Lunr: generate search index
YYYY-MM-DD hh:mm:ss - SETUP:           J1 Feeds: enabled
YYYY-MM-DD hh:mm:ss - SETUP:           J1 Feeds: generate rss feeds for: excerpts only
YYYY-MM-DD hh:mm:ss - SETUP:           J1 Feeds: generate rss feeds for: #posts of unlimited
YYYY-MM-DD hh:mm:ss - SETUP:           J1 Feeds: generate rss feeds for: all posts
YYYY-MM-DD hh:mm:ss - SETUP:        J1 SEO Tags: enabled
YYYY-MM-DD hh:mm:ss - SETUP:        J1 SEO Tags: generate seo tags
YYYY-MM-DD hh:mm:ss - SETUP:         J1 Sitemap: enabled
YYYY-MM-DD hh:mm:ss - SETUP:         J1 Sitemap: generate sitemap files
YYYY-MM-DD hh:mm:ss - SETUP:       J1 Paginator: enabled
YYYY-MM-DD hh:mm:ss - SETUP:       J1 Paginator: generate auto pages: disabled
YYYY-MM-DD hh:mm:ss - SETUP:       J1 Paginator: generate paginator pages: enabled
YYYY-MM-DD hh:mm:ss - SETUP:       J1 Paginator: generate paginator pages: 2 page|s generated
YYYY-MM-DD hh:mm:ss - SETUP:                     done in 64.236 seconds.
YYYY-MM-DD hh:mm:ss - SETUP:  Auto-regeneration: disabled. Use --watch to enable.
YYYY-MM-DD hh:mm:ss - SETUP: .. build finished.
YYYY-MM-DD hh:mm:ss - SETUP: To open the site, run: yarn site
YYYY-MM-DD hh:mm:ss - SETUP: Initializing the project finished successfully.
YYYY-MM-DD hh:mm:ss - SETUP: To open your site, run: j1 site
Setting up a project takes a few minutes — usually longer the first time, because Ruby and NodeJS modules have to be downloaded from the Internet. How long depends on your Internet speed and the performance of your PC.
You can think of setup as an extended install process: it downloads the modules the project needs and then uses the Jekyll engine to build the new website for the first time.
Start a project (website)
Once setup is finished, all the components are in place. You can start the Starter Web with a single top-level command:
j1 siteThe site task does a lot for you: it makes sure the development server is ready, starts Jekyll in watch mode, and finally opens the generated website in a browser when everything is up.
| The browser used is whichever one is set as your default in your operating system. |
Check consistency of the J1 project ...
Check setup state of the J1 project ...
YYYY-MM-DD hh:mm:ss - SITE: Starting up your site ...
YYYY-MM-DD hh:mm:ss - SITE:
YYYY-MM-DD hh:mm:ss - SITE: > j1@2024.3.8 j1-site <path_to_your_projects>/my-start
YYYY-MM-DD hh:mm:ss - SITE: > run-p -s j1-site:*
YYYY-MM-DD hh:mm:ss - SITE:
YYYY-MM-DD hh:mm:ss - SITE: Startup the site ..
YYYY-MM-DD hh:mm:ss - SITE: Startup UTILSRV ..
YYYY-MM-DD hh:mm:ss - SITE: Log file exists :        messages_YYYY-MM-DD
YYYY-MM-DD hh:mm:ss - SITE: Stop the server. Exiting ...
YYYY-MM-DD hh:mm:ss - SITE: Reset file: messages_2023-04-07
YYYY-MM-DD hh:mm:ss - SITE: Configuration file: <path_to_your_projects>/my-start/_config.yml
YYYY-MM-DD hh:mm:ss - SITE:  Auto-regeneration: enabled for '.'
YYYY-MM-DD hh:mm:ss - SITE: LiveReload address: http://localhost:30001
YYYY-MM-DD hh:mm:ss - SITE:     Server address: http://localhost:30000/
YYYY-MM-DD hh:mm:ss - SITE:   Server running... press ctrl-c to stop.
YYYY-MM-DD hh:mm:ss - SITE:         LiveReload: Browser connected
Rebuild a J1 project
While you are developing a website you will sometimes need to rebuild it from scratch. J1 normally runs Jekyll in incremental mode with automatic regeneration: when you edit content, only the affected pages are rebuilt, and the browser reloads them.
A few changes — typically changes to the project’s configuration files — are not picked up by automatic regeneration. In those cases you have to rebuild the site manually. The rebuild task does exactly that: it recreates the whole website from scratch.
j1 rebuildCheck consistency of the J1 project ...
Check setup state of the J1 project ...
REBUILD: Rebuild the projects website ...
REBUILD: Be patient, this will take a while ...
YYYY-MM-DD hh:mm:ss - REBUILD:
YYYY-MM-DD hh:mm:ss - REBUILD: > j1@2024.3.8 rebuild <path_to_your_projects>/my-start
YYYY-MM-DD hh:mm:ss - REBUILD: > run-s -s rebuild:* && run-s -s post-rebuild:*
YYYY-MM-DD hh:mm:ss - REBUILD:
YYYY-MM-DD hh:mm:ss - REBUILD: Rebuild site incremental ..
YYYY-MM-DD hh:mm:ss - REBUILD: Clean up site files ..
YYYY-MM-DD hh:mm:ss - REBUILD: Configuration file: <path_to_your_projects>/my-start/_config.yml
YYYY-MM-DD hh:mm:ss - REBUILD: Cleaner: Removing _site...
YYYY-MM-DD hh:mm:ss - REBUILD: Cleaner: Removing ./.jekyll-metadata...
YYYY-MM-DD hh:mm:ss - REBUILD: Cleaner: Removing ./.jekyll-cache...
YYYY-MM-DD hh:mm:ss - REBUILD: Cleaner: Nothing to do for .sass-cache.
YYYY-MM-DD hh:mm:ss - REBUILD: Configuration file: <path_to_your_projects>/my-start/_config.yml
YYYY-MM-DD hh:mm:ss - REBUILD: Source: <path_to_your_projects>/my-start
YYYY-MM-DD hh:mm:ss - REBUILD: Destination: <path_to_your_projects>/my-start/_site
YYYY-MM-DD hh:mm:ss - REBUILD: Incremental build: enabled
YYYY-MM-DD hh:mm:ss - REBUILD: Generating...
YYYY-MM-DD hh:mm:ss - REBUILD: J1 Lunr: enabled
YYYY-MM-DD hh:mm:ss - REBUILD: J1 Lunr: generate search index
YYYY-MM-DD hh:mm:ss - REBUILD: J1 Feeds: enabled
YYYY-MM-DD hh:mm:ss - REBUILD: J1 Feeds: generate rss feeds for: excerpts only
YYYY-MM-DD hh:mm:ss - REBUILD: J1 Feeds: generate rss feeds for: #posts of unlimited
YYYY-MM-DD hh:mm:ss - REBUILD: J1 Feeds: generate rss feeds for: all posts
YYYY-MM-DD hh:mm:ss - REBUILD: J1 SEO Tags: enabled
YYYY-MM-DD hh:mm:ss - REBUILD: J1 SEO Tags: generate seo tags
YYYY-MM-DD hh:mm:ss - REBUILD: J1 Sitemap: enabled
YYYY-MM-DD hh:mm:ss - REBUILD: J1 Sitemap: generate sitemap files
YYYY-MM-DD hh:mm:ss - REBUILD: J1 Paginator: enabled
YYYY-MM-DD hh:mm:ss - REBUILD: J1 Paginator: generate auto pages: disabled
YYYY-MM-DD hh:mm:ss - REBUILD: J1 Paginator: generate paginator pages: enabled
YYYY-MM-DD hh:mm:ss - REBUILD: J1 Paginator: generate paginator pages: 2 page|s generated
YYYY-MM-DD hh:mm:ss - REBUILD: done in 63.599 seconds.
YYYY-MM-DD hh:mm:ss - REBUILD: Auto-regeneration: disabled. Use --watch to enable.
YYYY-MM-DD hh:mm:ss - REBUILD: .. rebuild finished.
YYYY-MM-DD hh:mm:ss - REBUILD: To open the site, run: yarn site
REBUILD: The projects website has been rebuild successfully.
REBUILD: To open the site, run: j1 siteAfter a rebuild you can restart the development server with site and the website will reload in your browser:
j1 siteReset a J1 project
Mistakes happen. A wrong setting in your J1 configuration can keep the site from starting, or make it behave in odd ways. In those cases, resetting the project to its original state often helps.
| A reset does not change your content. Your pages, posts, and assets are left untouched. |
The reset task does the reset for you: it removes all the generated configuration files and modules that are no longer needed.
j1 resetCheck consistency of the J1 project ...
Check setup state of the J1 project ...
YYYY-MM-DD hh:mm:ss - RESET: Reset the project to factory state ...
YYYY-MM-DD hh:mm:ss - RESET: Be patient, this will take a while ...
YYYY-MM-DD hh:mm:ss - RESET:
YYYY-MM-DD hh:mm:ss - RESET: > j1@2024.3.8 reset <path_to_your_projects>/my-start
YYYY-MM-DD hh:mm:ss - RESET: > run-s -s reset:*
YYYY-MM-DD hh:mm:ss - RESET:
YYYY-MM-DD hh:mm:ss - RESET: Reset project to factory state ..
YYYY-MM-DD hh:mm:ss - RESET: Clean up base modules ..
YYYY-MM-DD hh:mm:ss - RESET: Clean up site files ..
YYYY-MM-DD hh:mm:ss - RESET: Configuration file: <path_to_your_projects>/my-start/_config.yml
YYYY-MM-DD hh:mm:ss - RESET: Cleaner: Removing _site...
YYYY-MM-DD hh:mm:ss - RESET: Cleaner: Removing ./.jekyll-metadata...
YYYY-MM-DD hh:mm:ss - RESET: Cleaner: Removing ./.jekyll-cache...
YYYY-MM-DD hh:mm:ss - RESET: Cleaner: Nothing to do for .sass-cache.
YYYY-MM-DD hh:mm:ss - RESET: Clean up projects files ..
YYYY-MM-DD hh:mm:ss - RESET: Remove bundle config folder ..
YYYY-MM-DD hh:mm:ss - RESET: Remove log folder ..
YYYY-MM-DD hh:mm:ss - RESET: Remove etc folder ..
YYYY-MM-DD hh:mm:ss - RESET: Remove various log files ..
YYYY-MM-DD hh:mm:ss - RESET: Remove lock files ..
YYYY-MM-DD hh:mm:ss - RESET: Clean up utility server ..
YYYY-MM-DD hh:mm:ss - RESET: done.
YYYY-MM-DD hh:mm:ss - RESET: The project reset finished successfully.
YYYY-MM-DD hh:mm:ss - RESET: To setup the project, run: j1 setupIf you have just reset a project, you have to initialize it again with the setup task before you can use it.
j1 setupOnce the project is set up again, you can start the development server with site and the site will open in your browser as before:
j1 siteCreating Content
The content of a website matters; there is no doubt about that. Therefore, the first chapter on editing a website should be dedicated to this topic. Working on the content will be the largest part of all the tasks to create a website.
As soon as you start work on the first page, you will notice that all pages are written as a source text. The sources are easy to read as they are plain text. However, it is not immediately apparent what the resulting page will look like when the actual HTML target is formatted and generated to be displayed in a browser.
Content from Sources
Writing a website as plain-text source files may feel strange at first, especially if you have never worked this way before. Source-based projects have their own rhythm: you focus on the content first, and the visual result second.
This is a deliberate choice. When you are writing, you want to capture your ideas without interruption. Worrying about fonts, spacing, or page layout at the same time slows you down. Source files let you write down the skeleton of your idea as plain text, knowing that the formatting will be applied automatically later.
J1 is a JAMstack website, which means it is built from a handful of programming and markup languages. The two you will deal with most often are:
-
YAML — used for configuration
-
Asciidoc — used for the actual content of pages and posts
Building a website is part craft and part art. The craft needs the right tools; the art needs your creativity. This chapter helps with both.
As you work through this section, you will probably ask yourself questions like these:
-
Which pages already exist on my site?
-
How can I reuse the existing content for my own pages?
-
What kinds of content does Jekyll support?
-
How exactly does the Jekyll engine turn my source files into HTML?
-
How does the J1 Theme help me build and structure new pages?
-
How can I configure reusable parts of a website with J1?
Let’s get started. You are about to learn how to build a modern website and present its content well using J1 Theme.
Edit and fire up your site
The primary tool for this exploration and editing is the source code editor. The editor is the swiss army knife, the ultimate tool for daily work on websites. The editor offers essential functions for fast and reliable editing of the content, such as creating and adapting the configuration of the template system.
If not already done, start a new command shell, change the folder to your J1 project and fire up the build-in website:
cls && cd C:\J1\Projects\my-start && j1 siteFor the following example, the source code editor Atom is used. Start your editor and open your project’s folder (the project my-start is used for all the next examples):
Menu section
Project section
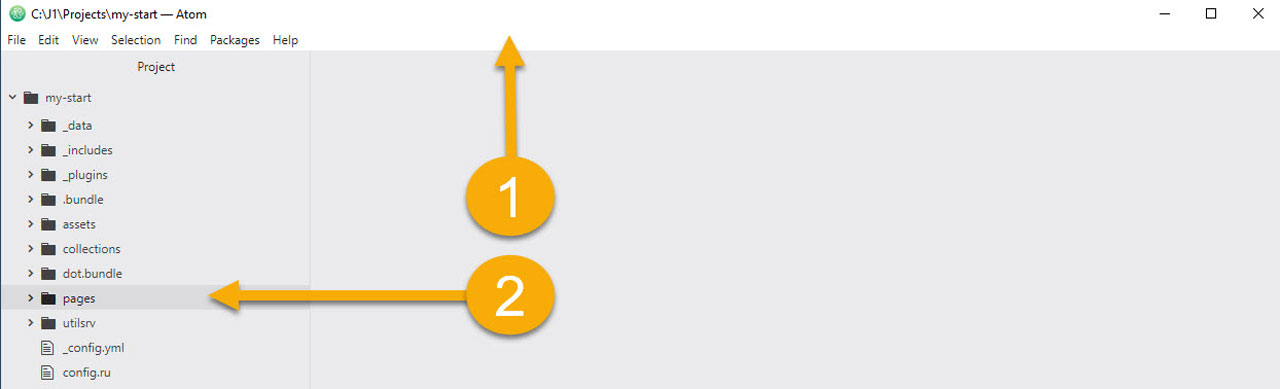
From the project section (2), navigate in the tree view to the folder pages/public/about and double-click the file about_site.adoc to open and edit.
Explore existing content
The quickest and most direct way to gain initial experience in dealing with a website’s content is to examine pages that are already finished, that already exist. The website built into the J1 Theme will help a lot to understand most of the elements used by the Jekyll engine and J1 Theme. The site supports you to learn the J1 Theme in a quite visual way and helps you to practice everyday routines and procedures.
The Homepage
All website pages have one thing in common: using layouts to generate the HTML code. The home page makes no difference in the use of layouts. See the Layouts section for more details.
---
layout:                                 home
compress:                               true
title:                                  Jekyll One
tagline:                                explore what J1 Theme can do
---
<pre> (1)
  This page is created by the layout: home.
  If this text is displayed (instead of the home page expected),
  something went  wrong with the layout definitions. Check  the
  output of the Jekyll engine building this site.
  Check the  contents   of folder _layouts. Verify  if the base
  layout  "home" exists  and the  referring  chain
  (inheritance) is correct.
</pre>| 1 | No contents are specified in the source part for the Homepage. |
The Homepage behaves different in the source part for the content. All the content of a homepage is configured by the layout using lanes to reference different (content) generators for building blocks like banners and panels.
# ------------------------------------------------------------------------------
# Layout configuration settings
#
lanes:
  # ----------------------------------------------------------------------------
  # HEADER region (body-header)
  #
  # MASTER header (attic)
  #
  #   All pages are using a specific (master) header placed at the top
  #   postion of a page (if enabled). Attics are fully configurable and
  #   can provide text information and|or image-related data like pictures
  #   or videos. Find the configuration for 'attics' with:
  #
  #     attics:  ~/_data/modules/attics.yml
  #
  # ----------------------------------------------------------------------------
  #
  - lane:
      enabled:                          true    (1)
      id:                               header
      region:                           body-header
      type:                             sync
      base:                             _includes/themes/j1
      path:                             modules/attics
      file:                             generator.html
  # ----------------------------------------------------------------------------
  # CONTENT region (region body-main)
  #
  #  For the J1 Theme GEM (J1 run-time version), ONLY the building
  #  blocks already prepared can be used to generate the contents of
  #  a home page. To change the content for a 'lane', find the configuration
  #  for 'banners', 'panels' and FABs (floting action button) with:
  #
  #     banners:  ~/_data/blocks/banner.yml
  #     panels:   ~/_data/blocks/panel.yml
  #     fab:      ~/_data/modules/fab.yml
  #
  #   NOTE:
  #     Do NOT add any HTML CONTENT here (directly).
  #
  # ----------------------------------------------------------------------------
  # ----------------------------------------------------------------------------
  # TEASER banner
  #
  #   Simple intro element for a page to give an overview on the contents
  #   provided. Find the configuration with:
  #
  #     banners:  ~/_data/blocks/banner.yml
  #
  # NOTE:
  #   The property 'id' of a banner element MUST be the same as specified
  #   the configuration for banners (banner.yml).
  #
  # ----------------------------------------------------------------------------
  #
  - lane:
      enabled:                          true    (2)
      id:                               home_teaser_banner
      region:                           body-main
      type:                             async
      properties:                       g-2 elevated-z0
  # ----------------------------------------------------------------------------
  # CUSTOM content
  #
  #   Load custom rendered static HTML data files or custom HTML templates
  #   using LIQUID processing.
  #
  #   NOTE:
  #     Only includes from folder '~/_includes' are accepted to load
  #     HTML data (include) files from.
  #
  # ----------------------------------------------------------------------------
  #
  - lane:
      enabled:                          false   (3)
      id:                               custom_content
      region:                           body-main
      type:                             sync
      base:                             _includes/custom
      path:                             static
      file:                             custom_teaser.html
...| 1 | Place the top header (attic) |
| 2 | Enable|Place a teaser (banner) element |
| 3 | Disabled element (not placed on a page) |
The Homepage is configured a little differently from other pages. The main reasons are:
-
a Homepage (the landing page) is more complex than a normal page
-
it uses a lot of dynamic content (content that changes)
-
it reuses ready-made building blocks like banners and panels
How to configure a homepage can be found in section Configure the Homepage.
Page blocks
In the editor on the right, you find all open files organized in tabs. For now, only a single file is opened: the about file about_site.adoc. To work on content pages, typically, you’ll have to open multiple files in your editor, but it is easy to switch from one file to the next using those tabs.
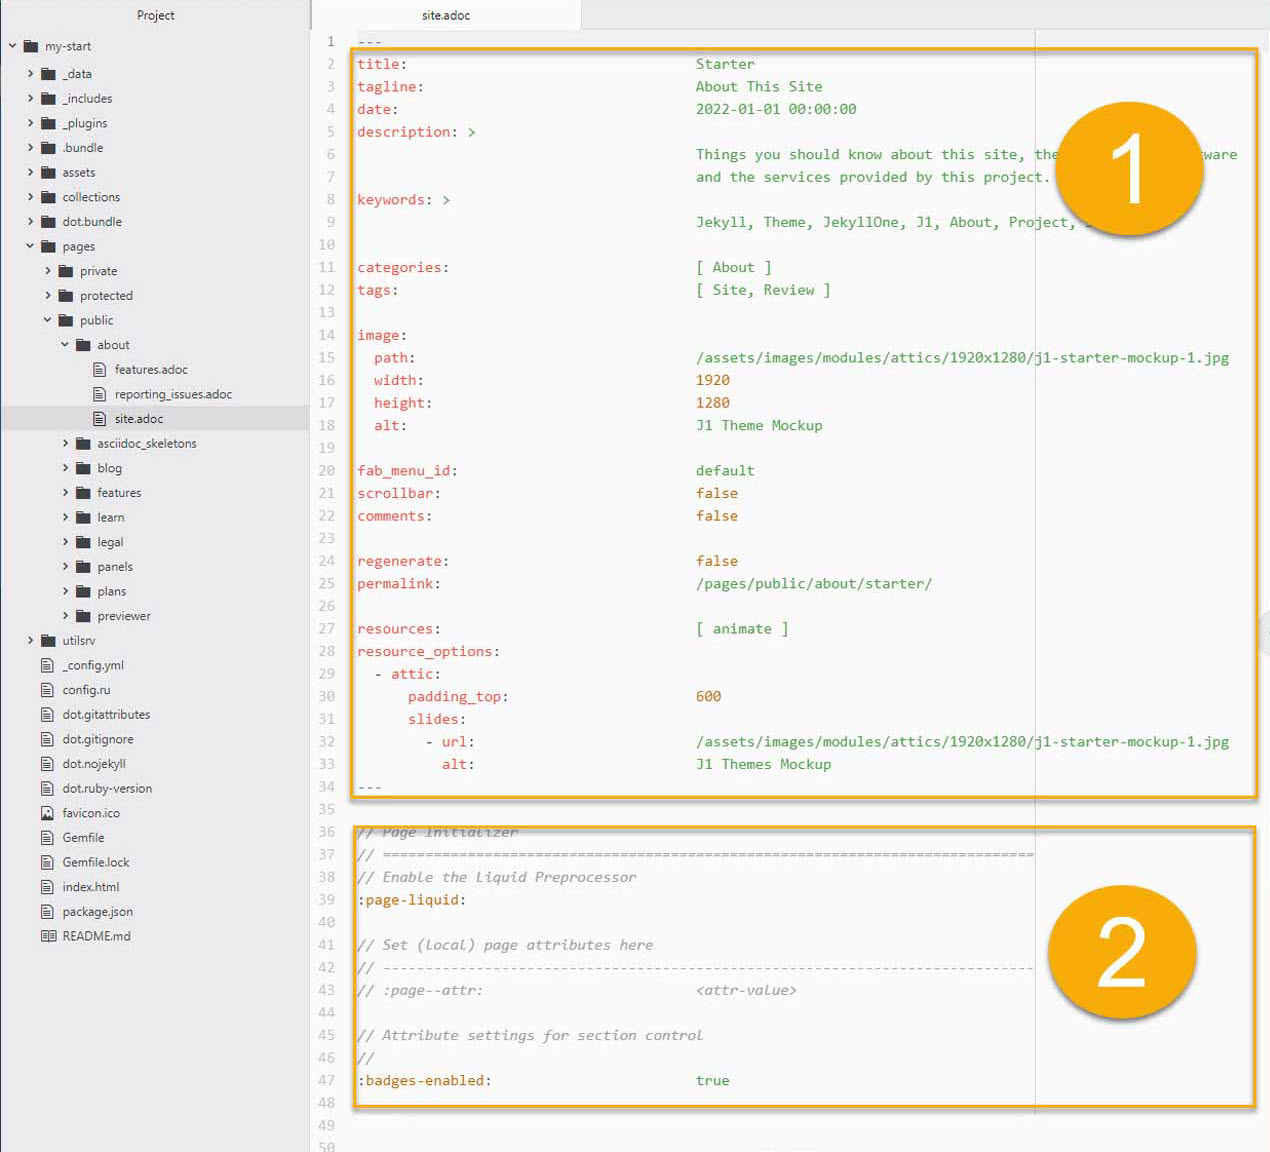
The following screenshots is showing a typical structure of a content page. You can identify two main blocks in each of a content file:
-
a control block
-
a content block
The control block consists of the front matter and the prologue section. The name control block suggests that the control sections are used by the builder engine for individual page settings. The content block defines the unique content of a page. Remarkable here is, the block content does not contain any HTML code; no HTML markups.
Assume that the page contains the source code for a HTML page that must be processed by a magic first, then it’s understandable that writing content is not done by using HTML code. The page about_site.adoc is of type text, but the file extension is .adoc. The reason for that is, this text file contains source code of Asciidoc markup, not HTML.
Front matter section
Prologue section
Content block
You can guess that the magic behind processing the source files has to do with the Jekyll builder engine. Other magics are provided via the template system J1 in combination with Jekyll builder engine:
-
processing of the (J1) prologue section
-
processing Asciidoc code (markups)
This very rough overview should be enough for the time being to do a few practical things: change existing content.
Change existing source pages
The page about_site has been discussed already, but how can this page be accessed? Now, J1’s menu system comes into the game. Open the page as shown in the screenshot.

| The menu system of J1 is a module, a fairly complex component that provides a lot of functionality. The menu system supports visitors to get access to all website pages of type |
Add an additional paragraph
For a simple change, duplicate the paragraph:
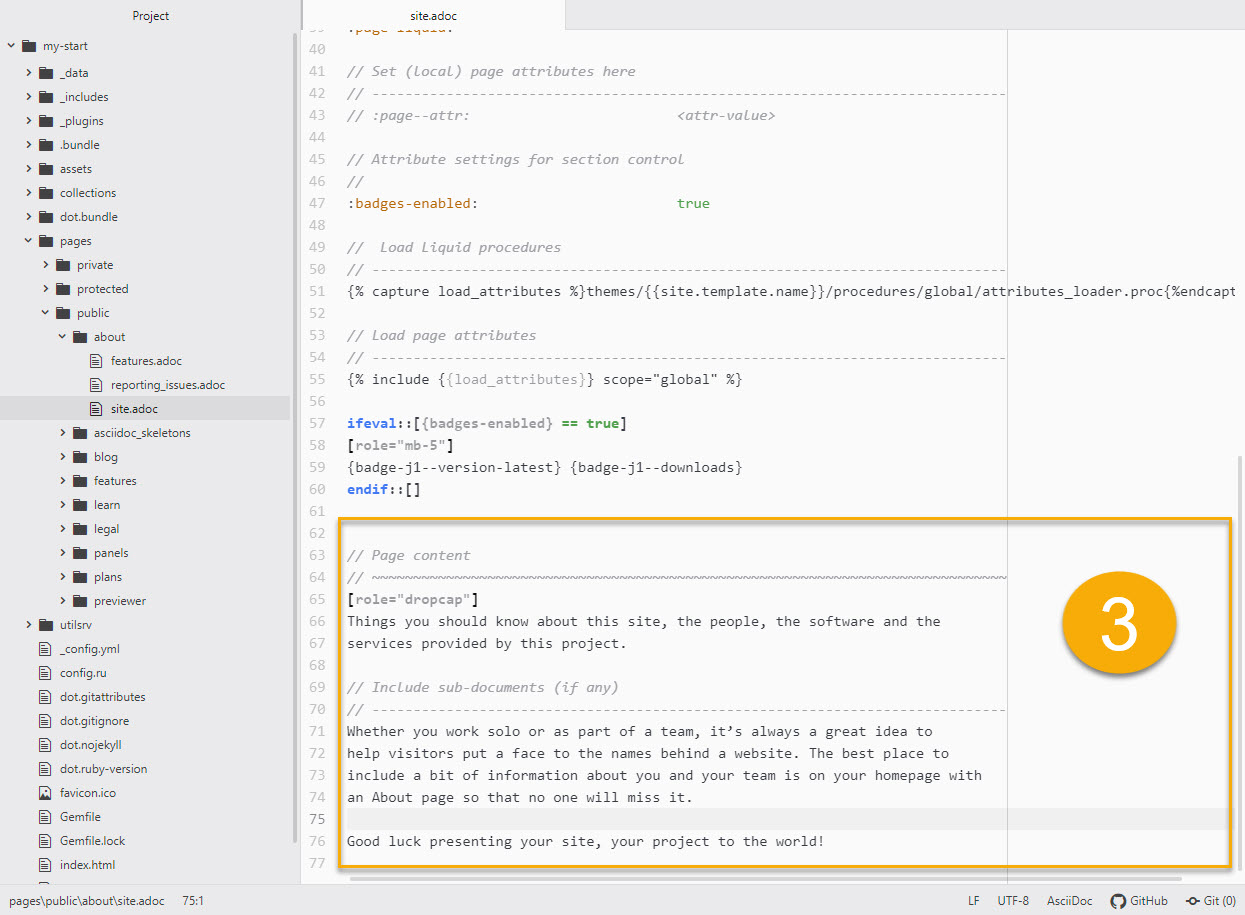
Whether you work solo or as part of a team, it’s always a great idea to
help visitors ...
Mark the block in your editor and copy (Ctrl + c) and paste (Ctrl + v) this block below the existing one and save the file (Ctrl + s). In your shell, you see the changes has been detected and processed.
YYYY-MM-DD hh:mm:ss - SITE:       Regenerating: 1 file(s) changed at YYYY-MM-DD hh:mm:ss
YYYY-MM-DD hh:mm:ss - SITE:                     pages/public/about/about_site.adoc
YYYY-MM-DD hh:mm:ss - SITE:       J1 Lunr: creating search index ...
YYYY-MM-DD hh:mm:ss - SITE:       J1 Lunr: finished, index ready.
YYYY-MM-DD hh:mm:ss - SITE:       J1 Paginator: autopages, disabled|not configured
YYYY-MM-DD hh:mm:ss - SITE:       J1 Paginator: pagination enabled, start processing ...
YYYY-MM-DD hh:mm:ss - SITE:       J1 Paginator: finished, processed 2 pagination page|s
YYYY-MM-DD hh:mm:ss - SITE:                     ...done in 9.6753299 seconds.
In the web browser, the page should have been reloaded automatically and now look like this:

| By default, Jekyll uses the Webrick webserver to YYYY-MM-DD hh:mm:ss - SITE: [YYYY-MM-DD hh:mm:ss] ERROR Errno::ECONNABORTED:
An established connection was aborted by the software
in your host machine.
@ io_fillbuf - fd:16
YYYY-MM-DD hh:mm:ss - SITE: PATH_TO_RUBY/lib/ruby/2.7.0/webrick/httpserver.rb:82:in `eof?'
YYYY-MM-DD hh:mm:ss - SITE: PATH_TO_RUBY/lib/ruby/2.7.0/webrick/httpserver.rb:82:in `run'
YYYY-MM-DD hh:mm:ss - SITE: PATH_TO_RUBY/lib/ruby/2.7.0/webrick/server.rb:307:
in `block in start_thread'The good news: error messages of this type can be ignored. It seems this is a side-effect of the caching strategy of Jekyll if a site is served in incremental mode by Webrick. The bad news: no solution has been available to fix this issue until now. For the time being, please ignore all errors of this type. |
Modify the Front matter
A Front matter is a YAML data block and must be the first section in the file of all content pages. This section is defined by triple-dashed lines to set predefined variables or set custom ones of your own.
The Front matter defines a set of variables and metadata on individual pages for the Jekyll build-in template engine Liquid as well as for the Markup processing engines to generate HTML code from Markdown and Asciidoc sources for the content. The template engine Liquid is used by Jekyll to create dynamically the common HTML code that is shared by all content pages of a page layout.
| Find more information on Liquid with the Liquid User Guide. |
The Markup processing engines transform the content portion of an individual page into the resulting HTML code. The template engine Liquid and the Markup processing engines are working closely together. The engine Liquid produces the HTML code shared by all pages of a specific layout and injects the HTML-code portion generated by the Markup processing engines individually for a specific content page. Later in this chapter, with section Layouts, you’ll learn more about the relationship of the processing engines to understand better how Jekyll (engines) processes the Source Pages of a website.
| Don’t repeat yourself If you don’t want to repeat yourself for frequently used Front matter variables over and over, define defaults for them and only override them where necessary. The defauls are configured with the Jekyll site configuration file |
With the help of the Front matter, all web pages are customized in a very simple way. Typical individual settings of websites are the page title and the tagline. The page title describes which page it is. The tagline provides additional information about the content of the page in question.
Other important individual page settings are:
-
the description (description), which is displayed in the local search (QuickSearch) for hits as a summary of the page
-
the keywords generated as (HTML) metadata for each page. Search engines use keywords to analyze the content of web pages and contribute to better search results
-
the categories and tags to organize the content. Categories and tags are displayed in the local search (QuickSearch) for hits on a page and can help your visitors to classify better a page they have found
-
the permalink to optimize the catalogs of search engines (SEO) to simplify the URLs of your web pages
-
the used J1 modules (resources) of the website, which are not generally loaded for a page
-
the options of the loaded modules (resource_options), which allow individual settings for each page
Set the page title and/or tagline
Use the about_site page again to modify the settings for the variables title and tagline:
title:                                  J1 Theme
tagline:                                about
Change the tagline like so:
you should know aboutand save the page. Creating (HTML) pages are a dynamic process. All changes to the Front matter are dynamically applied to the site. Sure, changing the tagline is a simple example, but it shows Jekyll’s dynamic behavior. All values of variables are taken into account in the templates (layouts), and after re-creating a modified page, they also carry the adjusted settings.
Modify the Prologue
The Prologue (Page Initializer) is a feature of the J1 Theme. Behind this are additional settings for the Asciidoctor generator, such as additional programs (procedures) of the template engine Liquid, which are automatically applied to each page.
The settings for the Asciidoctor generator are formulated as Asciidoc-Markup language tags. The About page uses the badges-enabled tag to control the output of badges. When the value of the tag badges-enabled is set to true, an additional line with badges is generated in the further processing of the page:
This is where another piece of J1 Theme magic comes into play: procedures for the template engine Liquid and attributes (variables) handled by the Asciidoc processor Asciidoctor. Together, they let collections of Asciidoc variables be processed for a page.
Collections of Asciidoc variables are stored in files. The files of these control variables are named attributes.asciidoc and can be found in two locations:
-
global:
~/_includes/attributes.asciidoc(your project folder, e.g.my-start) -
local:
<your_page_folder>/_includes/attributes.asciidoc
Asciidoc attributes (variables) defines:
-
frequently used URLs
-
Frequently used special characters and character chains (strings)
-
Author information
-
Data on image and video files
The use of variables increases the readability of the source code and can significantly simplify the notation when using data elements for Asciidoc macros. Individual Asciidoc variables can be defined and frequently used attributes can be loaded from files via the prolog of the source code of a page.
Conditional code blocks
With the help of conditional code blocks, you can easily individualize the content of a page. A simple example of the application is the output of a line with badges common on the Internet. In the Prolog section of the source code, you can find the local attribute badges-enabled. The variable is used to control a conditional code block. Just rewrite the value of this (Asciidoc) variable to the value true.
:badges-enabled: trueThis means that the additional code is evaluated when the modified page is generated and transferred to the output of the HTML page.
Try to find out what lies behind the attributes of each Badge (for example: badge-j1—license) are hidden. |
Attributes used for Asciidoc markups
In addition to simple tags, the Asciidoc markup language offers a large set of macros for generating more complex HTML structures that can be used to integrate font icons (macro icon:) or HTTP hyper links ((macro link:) for example. Asciidoc attributes are very useful and will greatly simplify the notation of Asciidoc markups for macros.
Add the following code to the about_site page and save the changes to include the additional lines of code in the HTML output:
A battery symbol is used on the pages of the J1 Theme documentation,
which symbolizes the individual level of knowledge for the use of:
* Functions for beginners of template system J1: {level--beginner}
* Functions for users with basic knowledge of J1: {level--intermediate}
* Advanced J1 features: {level--advanced}
* Functions for experts in the application of J1: {level--expert}
You find an overview of all the functions of the template system J1 on the
page link:{url-j1--features}[J1 Theme Features, {browser-window--new}].
In behind the attribute {level—xyz}, the Asciidoctor macro icon: is used. Check the global attribute configuration ~/_includes/attributes.asciidoc for more details.
// TAGS, global asciidoc attributes (variables)
// -----------------------------------------------------------------------------
tag::tags[]
...
:icon-battery--quarter:                           icon:battery-quarter[role="md-gray"]
...
// level indicators
//
:level--beginner:                                 {icon-battery--quarter}
The notation of the link: macro benefits in two ways in terms of readability:
-
the URL parameter is shorter than the actual HTML link and is easier to read and understand in the source text due to the symbolic notation
-
the additional parameter via the
browser-window—newattribute is self-explanatory. Clicking on this link will open a new browser tab (window) to display the page.
Complex changes on content sources
For Jekyll, many templates are available that cover all typical use cases for websites. The bad story: most of them require programming and low-level customization. Deep knowledge of Jekyll and valuable experience of templating techniques using HTML, CSS, and Javascript are required.
This not the case if you’re using J1. Typical examples of using the configuration capabilities in conjunction with integrated software of the the following sections explain the template system.
Asciidoc Extensions
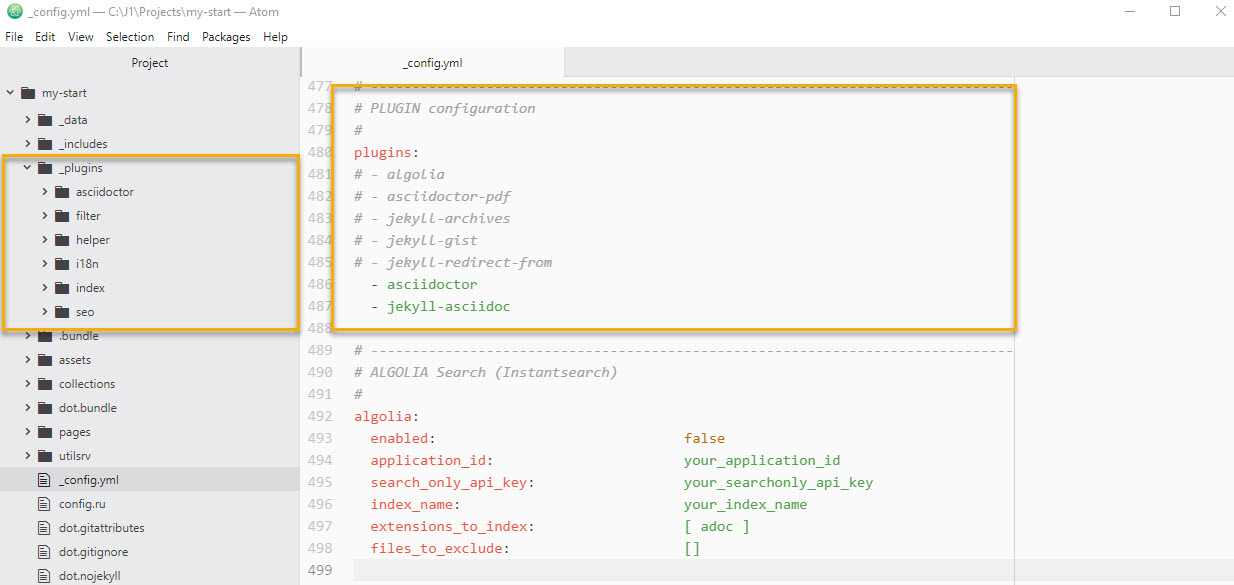
Jekyll, like Asciidoctor, is extendable by additional functions. One large number of plugins are available here. Extensive functional extensions are usually offered as additional Ruby GEMs. The gem-based ones Plugins are installed like ordinary GEM and then via the Site configuration ~/_config.yaml included.
  # ----------------------------------------------------------------------------
  # PLUGIN configuration
  #
  plugins:
    - asciidoctor
    - jekyll-asciidoc
    - jekyll-sitemap
    - j1-paginator
For minor extensions that don’t necessarily require the procedures of Ruby GEM, the program code of a plugin is installable in the folder ~_plugins of the J1 project. Plugins in the ~_plugins directory automatically integrated without additional configuration settings. The restriction here compared to a GEM: The plugin’s source must consist of only one file.
Many lightweight plugins are already available in the ~_plugins directory. All extensions for the Asciidoc markup language or the engine Asciidoctor are stored in the directory ~_plugins/asciidoctor-extensions.
The simpler and clearer the website’s source code, the better the source to be read without generating the HTML output. In addition, the code becomes more compact and generally easier to write down. As simpler the code, the fewer errors can occur in the notation.
Blocks that result in complex HTML markup in later HTML output are noted in Asciidoc via macros. Macros are parameterizable markups and the parameters control how the Asciidoc engine processes to generate target code.
| There are two AsciiDoc macro types: block and inline. As for all macros, the block and inline forms differ by the number of colons that follow the macro name. The block form uses two colons (::), whereas the inline form only uses a single one (:). |
Inline Lorem Macros
Inline macros can either be integrated within a section of the text, for example, a paragraph, or, like block macros, can create independent code sections. A good example of using these macros is so-called blind texts, known as Lorem-Ipsum texts. If a new content page is developed, the content of new articles should be written down in rough sections by the authors first. The sections outline the idea of what the page is supposed to describe, but the actual text is (still) unknown.
Blind texts can be a great help when providing sketches of new pages with a type of text. The sketch will be much more similar to a real page with dummy text and will help the author develop the page’s structure and content.
| You can find examples of dummy texts supported by the J1 Theme in the round trip on the page Asciidoc Extensions. |
The page about_site.adoc should be used again for experiments with dummy texts. Suppose your new website describes your business as a Delivery service for breakfast buffets. The About pages provide an overview of what the company can do for customers and what can be found on the pages of your presence.
A sketch of the content could have the following sections:
-
Experience in catering since YYYY
-
Your services
-
Large selection of national and internal dishes
-
Compilation of buffets per person
-
Crockery and cutlery service
-
-
Your delivery service
-
Delivery areas
-
Delivery times and days
-
-
Contact addresses Contact person PPP
Service mailbox MMM
These sections can initially be formulated as headings. This skeleton type makes the page clear whether sections are also be used later for the final text.
== Experience in catering since YYYY
== Our services
=== Large selection of national and internal dishes
=== Compilation of buffets per person
=== Crockery and cutlery service
== Our delivery service
=== Delivery areas
=== Delivery times and days
== Contact addresses
Contact person PPP +
Service mailbox MMM
Copy the heading skeleton into the about_site.adoc page. If the page is newly generated, you will find that pure headings do not look good. The source text resembles a real skeleton and is not pleasant to read from this perspective. Writing content is not easy. Terrible source code and websites are more than terrifying from a psychological point of view. The motivation at work will suffer, and many things that need to be done become more tedious and even harder to do.
Change the first headings like this:
== Experience in catering since YYYY
lorem:sentences[5]
lorem:sentences[7]
== Our services
lorem:sentences[7]
lorem:sentences[5]
=== Large selection of national and internal dishes
lorem:sentences[5]
The impression of the page as a source and in the generated web page changes significantly. Customize the page with additional dummy texts and replace the placeholders PPP and MMM with appropriate Lorem macros.
| Inline macros can be used like block macros if blank lines are placed around the inline macros. The blank lines create new sections, as are automatically generated with block macros. |
Image Block Macros
Complex markup typically includes all elements related to images. These web page components will never be part of sections: they are separate, independent parts of a page.
| The base path for all image-related data is a side-wide (Asciidoc) configuration (see |
A commonly used Asciidoc block-macro to place images on a page is the image:: macro:
.image_title
image::<path_to_image>["<alt_text>", role="<additional CSS styles"]| The |

Again, change the content of about_site to add a simple image to that page. To make it simple for now, use the image GrandPa’s 80th Birthday. Add the following markup to that page and watch the outcome:
.Your added image
image::/assets/image/module/gallery/old_time/image/grand_pa/image-1.jpg["GrandPa's 80th Birthday", role="mb-4"]
The additional CSS style (role) mb-4 comes from the Bootstrap framework and adds a margin below the image. Play a bit with the additional CSS styles. The parameter wm-800 is a CSS style provided by J1 that limits the width of a block element to a maximum of 800 pixels on a page. Add the next snippet below the existing one.
.Your added image - Limit the image width
image::/assets/image/module/gallery/old_time/image/grand_pa/image-1.jpg["GrandPa's 80th Birthday", role="mb-4 wm-800"]
Other, more complex Asciidoc Macros are available with J1 for image-based data discussed in section J1 Modules. More configuration changes on a page and additional configuration is needed to make use of J1 Modules like Lightboxes and Galleries for image data.
Admonition Block Macros
Admonition macros are emphased text elements placed in the running text but create independent sections. Admonitions are intended to draw the reader’s attention to the text, noted in 5 different levels.
| Name | Example | ||
|---|---|---|---|
|
| ||
|
| ||
|
| ||
|
| ||
|
|
Two variants can be used for the notation of Admonition Macros:
NOTE: Your text goes here..Admonition title
[NOTE]
====
Your text goes here.
====The simplified notation is well suited if the text consists of only a few sentences and only Asciidoc inline-macros are used to design the test. The notation as a Block element is necessary if title lines or more complex block macros such as source blocks or tables are used.
| Admonition using a title Admonition NOTE written as a block element using a |
Add the about_site page again and add various Admonition macros to the source code. Use both spellings. A title element can also be used for block notation.
Anatomy of source pages
You were already able to examine the general structure of a source page in the Page blocks section. You learned that the source of a page consists of the control-block and the content-block. Your modified about_site page might look like this:

Besides the actual content of the page from the content-block , there are a lot of other elements like that Navigation and page header . Look at other sites You’ll find that all pages on your site have these elements on your site.
This behavior is explained by the page model that the Jekyll builder engine uses to generate HTML pages. Besides the unique content of a page from the content block, all pages inherit components fundamentally required for each page. In other words, all pages consist of general elements that each page has and that unique content.
The structure of an HTML page is complex. In addition to the visible elements displayed in the browser, many other invisible HTML elements are required for a complete web page. For this, take a look at the HTML code of a web page. Displaying the HTML code can be called up with the key combination Ctrl+U. The HTML code of the fairly simple page about_site consists of hundreds of lines. The code contains many invisible HTML elements, which are required for loading the resources used, for example. The resources of a page include the required CSS styles that give a page its shape and Javascript components responsible for the dynamic behavior of pages.
An important promise of the template system J1 is: To create a website is no programming. No programming is required because all required programs exist already and are appropriately used by the builder engines to generate the resulting HTML codes of the pages. Knowledge of the details of these programs is not necessary, but it is very helpful to know how the HTML code of a page is created, how the Jekyll builder engine generates the resulting HTML code from source pages.
Layouts
Jekyll’s page model for generating HTML code from page sources is difficult to understand. But even here, it is not necessary to know all the details. However, you should be familiar with principles: The layouts.
Layouts are construction templates for HTML pages, each describing a specific step of processing. The resulting HTML code is created by applying several layouts in a specific order: inheritance.
Jekyll applies a strategy of inheriting content along a line of inheritance to layouts. The unique content is created via the layout of the respective page type. For example, page for regular content pages or post for blog posts. Content shared across all pages is described using the default layout. As a very simple picture of processing pages with Jekyll can be the following (Inheritance) succession are understood:
HTML-Code < Jekyll < layout-default < layout-page < Source code (Asciidoc)The Jekyll builder engine first reads the source code of a webpage, the page about_site, for example. The source of this page is connected with the layout page. This construction template processes only the specific parts of a page: the content portion. The layout page is associated with layout default to add all the general components, like CSS- and Javascript files, needed for a full webpage.
The construction step via the default layout complements all general components of a website. It connects (inherits) the results from the (base) layout page with the results of processing from the (general) layout default to the final resulting HTML code.
| Layouts describe which programs are called and in which order. These programs are associated with configuration data that describes the details of the work step in question. All Configuration data is in the project directory |
| Layout | Configuration | Description |
|---|---|---|
|
| All general components of a website are generated via the |
|
| All individual components of the homepage are generated via the details specified in the layout |
|
| All individual components of a website of type page are generated via the |
| The template system J1 uses many other layouts. To not completely go beyond the scope of this tutorial, these layouts will not be discussed. |
Lanes
The Template System J1 uses HTML generators to create the layouts. The HTML Generators process certain sections of an HTML page. If you have a look at the general structure of an HTML page, the code sections are very simple:
<!DOCTYPE html>         (1)
<html>
  <head>
    invisible content   (3)
  </head>
  <body>
    visible content     (4)
  </body>
<html> (2)| 1 | Instruction to the web browser about what version of HTML the page is written in (HTML5 and beyond). |
| 2 | Specifies the data container for the HTML code |
| 3 | Invisible content of a webpage. Specifies required resources like CSS or JavaScript files to be loaded for a page |
| 4 | Visible content of a webpage |
J1 Theme divides the sections (3) and (4) into more specific parts:
-
Invisible content
-
Definition of meta data
-
Loading CSS files
-
Loading Javascript files
-
Definition of control data
-
-
Visible content
-
Page Header
-
Page Navigation
-
Page Content
-
Page Footer
-
To make J1 Theme fully configurable and flexible as much, the specific parts of HTML pages are specified as so-called lanes. The lane structure is based on the sections of an HTML page, but devides the <head> and <body> section in more specific (logic) parts.
Lanes in a layout are configured top-down and create a stack processed in the order they are configured. Have a look at the configuration of the layout page (_data/layouts/page.yml):
# Layout configuration settings
#
lanes:
  # ----------------------------------------------------------------------------
  # MASTER header (attic)
  # All pages are using a specific header to display a title and a
  # tagline. Title and tagline are to be configured with the FRONTMATTER
  # of a page for individual data (text).
  #
  # ----------------------------------------------------------------------------
  #
  - lane:                               (1)
      enabled:                          true
      region:                           body-header
      type:                             sync
      base:                             _includes/themes/j1
      path:                             modules/attics
      file:                             generator.html
  # ----------------------------------------------------------------------------
  # PAGE content
  #
  - lane:                               (2)
      enabled:                          true
      region:                           body-main
      type:                             sync
      base:                             _includes/themes/j1
      path:                             layouts
      file:                             content_generator_page.html
  # ----------------------------------------------------------------------------
  # PAGE fab
  #
  - lane:                               (3)
      enabled:                          true
      id:                               fab-container
      region:                           body-main
type: async| 1 | specifies a generator to create a header |
| 2 | specifies a generator to create the content portion |
| 3 | specifies a placeholder for the FAB button |
As mentioned earlier, the layout page is associated with layout default. This association means the default layout specifies lanes that contain generators to complete a page for all the HTML code that all webpages are using.
Summary
As mentioned earlier, Jekyll’s page model for generating HTML code via layouts is not easy to understand. J1 Theme adds some extra complexity on top of that to make the Template system fully configurable. The key takeaways from the previous section are:
-
pages are not built as one big block but in small steps defined as layouts
-
each layout handles a specific sub-task during page generation
-
layouts are linked to each other through inheritance
-
a layout defines content generators that run in a row, in the order given by the lanes
If you are interested, the configuration files of the layouts can provide information about which programs are started to generate the HTML code of a page in which order.
In the source view of a browser to display the HTML code (Ctrl+U), you find for each program appropriate (HTML) comments. These comments give a good overview of how the HTML code came about.
Create content from scratch
Authors should create source pages from scratch to create their content for a website. To not start completely from a blank page, J1 offers ready-made skeletons for new source pages. In the ~/pages/public/asciidoc_skeletons folder, three different types support different methods of developing new pages.
| Name | Description |
|---|---|
| Simple documents are used quite often. If the number of chapters is about or less than three and the document is small in size. This document type use only global Asciidoc include files. |
| Multi-chapter documents are used for more complex articles of a website. If the number of chapters is or exceeds three for an article, it could make sense to split a larger documents chapter-wise into separate files. This document type is based on multiple Asciidoc documents and make use of local and global Asciidoc include files. |
| A document of type documentation (book) typically consists in a large number of chapters and sections. To make this manageable, book-type documents are splitted in multiple files placed in a nested folder structure. Complex AsciiDoc projects of type documentation can be worked on by multiple authors. |
Creating pages
The skeleton of a page based on the template simple-document is used for all further experiments. This template is used very frequently, as many pages on a website only use a handful of chapters to structure the content.
First, create a superordinate directory ~/pages/public/sandbox to manage your new pages. Copy the whole simple-document folder from the ~/pages/public/asciidoc_skeletons location to your new sandbox folder ~/pages/public/sandbox.
| If you copy existing content folders that contain documents, conflicts will arise because the copy creates pages with identical URLs on the web. After copying, in Front matter of the new file, the |
After completing the copy, a few things need to be adjusted:
-
Change the name of the folder
simple-documenttosimple-sandbox -
Open the file
simple.adocfrom this directory and write thepermalinkparameter to the value/pages/public/sandbox/simple/around.
After the generation is complete, the new page is available in your web my-site under the URL:
http://localhost:40000/pages/public/sandbox/simple/
| To better understand how the templates work, the three skeletons generate the same page content but based on a different source model. The sources are structured completely differently but deliver the same result in the generated website. |
This current content of the template should not play any role for the following tests and can be overwritten by more initial settings. Open the simple.adoc page and replace the existing content with the following code:
simple.adoc---
title: Sandbox
tagline: simple sandbox
date: 2022-01-01 00:00:00
description: >
Simple documents are used quite often. If the number
of chapters is about or less than three and the document
is small in size. This document type does not use any
(local) Asciidoc include files or attributes.
categories: [ Knowledge ]
tags: [ Asciidoc, Sandbox, Document ]
robots:
index: true
follow: true
permalink: /pages/public/sandbox/simple/
regenerate: false
resources: [ lightbox ]
resource_options:
- toccer:
collapseDepth: 3
- attic:
padding_top: 400
padding_bottom: 50
opacity: 0.5
slides:
- url: /assets/image/page/skeleton/antonino-visalli-1920x1280.jpg
alt: Photo by Antonino Visalli on Unsplash
alignY: top
badge:
type: unsplash
author: Antonino Visalli
href: //unsplash.com/@_visalli
---
// Page Initializer
// =============================================================================
// Enable the Liquid Preprocessor
:page-liquid:
// Set (local) page attributes here
// -----------------------------------------------------------------------------
// :page--attr: <attr-value>
// Load Liquid procedures
// -----------------------------------------------------------------------------
{% capture load_attributes %}themes/{{site.template.name}}/procedures/global/attributes_loader.proc{%endcapture%}
// Load page attributes
// -----------------------------------------------------------------------------
{% include {{load_attributes}} scope="global" %}
// Page content
// ~~~~~~~~~~~~~~~~~~~~~~~~~~~~~~~~~~~~~~~~~~~~~~~~~~~~~~~~~~~~~~~~~~~~~~~~~~~~~
The Asciidoc skeleton *simple-document* a helper for setting up a base file
and folder structure for simple-document AsciiDoc pages based on _Jekyll_ and
_J1 Theme_. You need *both* to use this skeleton creating AsciiDoc
documents from it.
// Include sub-documents (if any)
// -----------------------------------------------------------------------------
== Chapter 1
lorem:sentences[5]
== Chapter 2
lorem:sentences[5]
=== Section 1
lorem:sentences[3]Content categories
The builder engine Jekyll differentiates between two different categories of content:
-
unordered content (pages)
-
ordered content (posts)
Thus, all pages of type Page are unordered, while all Blog Posts are orderly. The property of order is only of interest to programmers. To make documents accessible to visitors, navigation options are needed. From the perspective of the Jekyll engine, there are no options for (automatic) structuring Pages for programmers. For Posts, this is quite different.
The Template System J1 structures Page and Post type documents in its way. The template provides you with ready-made programs that structure a website’s content and are accessible to visitors via navigation do. Authors have little exposure to the Jekyll builder engine’s elementary delivery methods to visitors.
J1 provides these navigation components :
-
J1 Navigator, for Page type documents
-
J1 Blog Navigator, for Post type documents
The Posts Explorer is used for navigating blog posts and is discussed in the subsequent J1 Blog Navigator section. The first thing to look at is how documents of the Page type can be made accessible to your visitors.
J1 Navigator
The J1 Navigator component is a module in the sense of J1. Modules are dynamic components and use CSS and Javascript elements to provide the necessary functionality for a website. One of the features provided by the module J1 Navigator is the Menu Bar that provides visitors dropdown menus to browse and select content pages.

The J1 Navigator module offers several other functions, but changes to the menu bar are the most common. To manage the menu bar settings more handy, the settings are separated into a configuration file: ~/_data/modules/navigator_menu.yml.
Open this file in your editor. The first impression conveys that the menu configuration isn’t that easy either. The configuration is simple, but extensive existing settings appear initially complex.
The menu system supports items with and without submenus (dropdowns). The simplest element in the menu bar is an item that does not create any other sub-menus (dropdowns). The configuration for an entry in Level 0 has the following form:
# ------------------------------------------------------------------------------
# TopLevel item FEATURES (commented out)
#
# - item:                               Features
#   href:                               /#panel_home_intro
# ------------------------------------------------------------------------------
# Menu SANDBOX
#
- item:                                 Sandbox
  href:                                 /pages/public/sandbox/simple/
Add the configuration from above to the file ~/_data/modules/navigator_menu.yml below the entries of the Learn menu. The result should then look like this:

An entry in Level 1 is helpful to enable a little more options in the menu entries for sandbox documents. The submenu allows you to call up different pages as a dropdown. The configuration for an entry in Level 1 has the following form:
# ------------------------------------------------------------------------------
# Menu SANDBOX
#
- item:                                 Sandbox
  sublevel:
    - title:                            Simple Sandbox page
      href:                             /pages/public/sandbox/simple/
      icon:                             pencil
Drop-down menus offer other advantages:
-
All entries can be provided with an icon
-
All entries have an individual text that can help visitors to classify the content of a page
The presented configuration of the sandbox shows that entries are not particularly complicated. Compare the settings of the menu bar of your site with the menu displayed in the browser. The principle of the menu configuration will certainly become a lot clearer quickly and will also help write more extensive entries.
J1 Modules
AsciiDoc macros have already been discussed in the Asciidoc Extensions section. Asciidoc macros, which make J1 Modules usable in websites, are a little more complex. The use of modules requires additional settings in configuration files, but again there are none programming required.
J1 modules are independent Javascript programs integrated into the template system. Modules are listed as Resources (the actual programs) and integrated into the template system with the help of adapters. The adapters, complemental Javascript programs, ensure that no programming is required to use the module. Only suitable settings are necessary for using J1 Modules.
| All programs provided and integrated with J1 are Open Source projects and can be used for free. |
The job of Asciidoctor Macros for J1 Modules is to generate the HTML markup that the connected JavaScript programs need to provide a website’s dynamic features in the browser. The settings control how a module behaves. The adapters start the matching JavaScript programs when the website is shown in the browser and apply customizations if required.
| Modules are complex J1 components and are certainly not easy to understand. From the perspective of non-programming authors, only the settings of the modules are important. |
Frequently used Asciidoc Macros for J1 modules used to embed lightboxes or galleries of images are:
.block_title
lightbox::<block_id>[ <images_width>, <images_data_id>, <role="<additional CSS styles>"> ]
If more than a single image is given for a J1 Lightbox block, the images can be grouped to enable a simple sliding functionality through this group of related images. Enabling this function, the group option needs to be configured for the macro.
.block_title
lightbox::<block_id>[ <images_width>, <images_data_id>, <group_name>, <role="<additional CSS styles>"> ]

.block_title
gallery::<gallery_id>[ <role="<additional CSS styles>"> ] The role parameter for specifying additional CSS styles is optional in all macros and can be omitted. |
A Lightbox is a quite simple J1 Module to include single images or groups of images via a lightbox macro lightbox:: on a page. In particular, displaying images for high resolutions using the image:: macro cannot be used for original sizes on a page. Lightboxes can help here. The images are displayed in smaller sizes but can be expanded to their original resolution by clicking on the image.
Apply the example Lightbox for single images to your new sandbox document simple.adoc below the dummy text of the first chapter. The given source include the J1 Lightbox Module with an additional dummy text below:
lightbox::images-lightbox-standalone[ 800, {data-images-lightbox--standalone}, role="mb-4"]
lorem:sentences[3]
The parameters in the Asciidoc markup have the following meaning:
images-lightbox-standalone-
All modules require an ID. The Asciidoc macro generates the necessary HTML markup for the module, but the generated HTML block requires a unique identifier. Modules can use the ID to distinguish between elements of the same type (lightbox for example). For the Lightbox module, the ID can be freely selected. However, it is advisable to derive the ID from the attribute’s name to make uniqueness of the identifier sure.
800-
Limiting the size (width) of the image displayed on the page to 800 pixels.
data-images-lightbox—standalone-
The curly brackets address an Asciidoc attribute. The definition of these variables can be found in the global ascidoc attributes file
~/_includes/attributes.asciidoc. role="mb-4"-
Specifying
mb-4(Bootstrap style) adds a CSS style for the lightbox that creates an additional border below the Lightbox element.
In a second step, add the example Lightbox displaying groups of images to the sandbox document below the dummy text in the second chapter. The Asciidoc code for embedding the lightbox with an additional blind text is:
lightbox::images-lightbox-group[ 395, {data-images-lightbox--group}, lb_group, role="mb-4 wm-800" ]
lorem:sentences[3]
The parameters in the Asciidoc markup have the following meaning:
lb_group-
The Asciidoc attribute
data-images-lightbox—groupcontains two images. To display both images in the Lightbox, the parameterlb_groupcreates a group and you can switch between the images. role="mb-4 wm-800"-
Again, the information supplements CSS styles for the lightbox. The styles apply an additional border below the Lightbox and limit the element’s width on the page to 800 pixels.
The lightbox module is quite simple. Only simple Asciidoc variables are required to configure the images.
:data-images-lightbox--standalone: "modules/gallery/old_times/image-2.jpg, GrandPa's 80th Birthday"
:data-images-lightbox--group:      "modules/gallery/old_times/image-3.jpg, GrandPa's annual journey, modules/gallery/old_times/image-4.jpg, GrandPa's annual journey"
The module of the simple lightbox is very well suited for individual images. Still, it becomes more difficult to use it for several images, and it is hardly possible to display more than two or three images as a group in a meaningful way. Galleries are a better solution for displaying of image groups, even in large numbers.
The J1 Theme offers the very powerful Justified Gallery-Module for displaying larger groups of images. The configuration is more extensive since the module offers significantly more functions. The example Image gallery clearly shows the various functions.
A picture gallery combines two J1 modules:
-
a gallery component (JustifiedGallery)
-
a powerful lightbox (LightGallery) that adds additional functionality to the full-size image display
Most J1 modules are only required on certain pages. Therefore, loading the required resources only makes sense if the components are used on a page. Which modules will be loaded for a page configured from the Front matter via the resources parameter of a page. To make use of an image gallery, replace the settings in the Front matter of the simple.adoc page with the following code:
resources: [ lightbox, lightGallery, justifiedGallery ]| The need to give additional information about a page’s resources (modules) seems cumbersome. Site visitors reject the best pages with good design and excellent content if the page takes too long to be displayed in the browser. In addition to content and design, the performance of a website is essential. Reducing the number of resources for a page will significantly reduce the time required to load a page in a web browser. |
The macro for embedding an image gallery from the example shown macro for image galleries is:
gallery::jg_old_times_2[ role="mb-4 wm-800" ]
lorem:sentences[3]
The parameters in the Asciidoc markup have the following meaning:
jg_old_times_2-
Like any module, a unique ID is required to distinguish elements of the same type. In contrast to the markup of the lightbox
lightbox::, this identifier is not freely selectable and must correspond to the ID of the gallery from the configuration of the module. role="mb-3 wm-800"-
As with the lightbox module, the specifications add CSS styles for displaying the element on the page.
It is noticeable that the notation of the markup uses fewer parameters than is the case with the lightbox macro lightbox::. The reason for this is the outsourcing of the settings to a separate configuration file ~/_data/modules/justifiedGallery.yml.
jg_old_times_2# ----------------------------------------------------------------------------
# Old Times 2
#
- gallery:
enabled: true
id: jg_old_times_2
type: image
images_path: /assets/image/module/gallery/old_time/image/grand_pa
thumb_path: /assets/image/module/gallery/old_time/image/grand_pa
images: [
image_01.jpg, image_02.jpg,
image_03.jpg, image_04.jpg
]
captions_gallery: [
"GrandPa's 80th Birthday",
"GrandPa's 80th Birthday",
"GrandPa's annual journey",
"GrandPa's annual journey"
]
gallery_options:
rowHeight: 200
margins: 5
lightbox_options:
lightbox: lg
mode: lg-fade
cssEasing: cubic-bezier(0.25, 0, 0.25, 1)As the last step for this section, expand the Asciidoc markup code of the image gallery into the new sandbox document below the dummy text in the second chapter below the Section 1 section.
How do you like the custom sandbox page now?
By adding images, the sandbox page has taken shape. The page has gained some dynamic in the browser but can still be read easily in the source text. The Asciidoc markups remain legible for the author without the website necessarily being called up in the browser. The decisive advantage of the Asciidoc markup language: even complex elements can be written down simple, remain legible, and the meaning stays understood.
Creating posts
Creating content of type post does not differ from Page type articles. All Asciidoc markup can be used equally for both types without exception. That raises the question: What’s the difference between Post and Pages if it’s not the content?
The difference between the two content types is determined by the methods of generation provided by the Jekyll post-builder engine. The site builder Jekyll describes itself as Blog-Aware. The ability Blog-Aware is intended to describe that the generator offers special procedures for this type of content and offers extended possibilities for processing blog articles.
Ordering posts
As already described in the section Content categories, the content type post is ordered. In other words, unlike articles of type page, blog posts can be sorted. Things could be sorted by criteria like size, weight, or color. But how do you sort digital content and why?
In the history of the development of web presentations on the Internet, various purposes of use of websites on the World Wide Web (WWW) have emerged. A special group of websites here is news portals. Portals use their methods to make the site’s content, the news, available to the visitors.
A good example of such a news portal is the New York Times. The design of the site is surprisingly simple. The site presents its content as simple blocks, arranged like differently sized bricks in a wall. This Masonry Grid layout works especially well for a so-called Portfolio: a collection of items presented together.
A similar behavior of displaying the collection of blog posts is used by the J1 Theme on the homepage. The appearance of the wall like the stones (blocks) on the side, is completely different for J1 Theme. However, the representations on the NYT portal are comparable to J1.
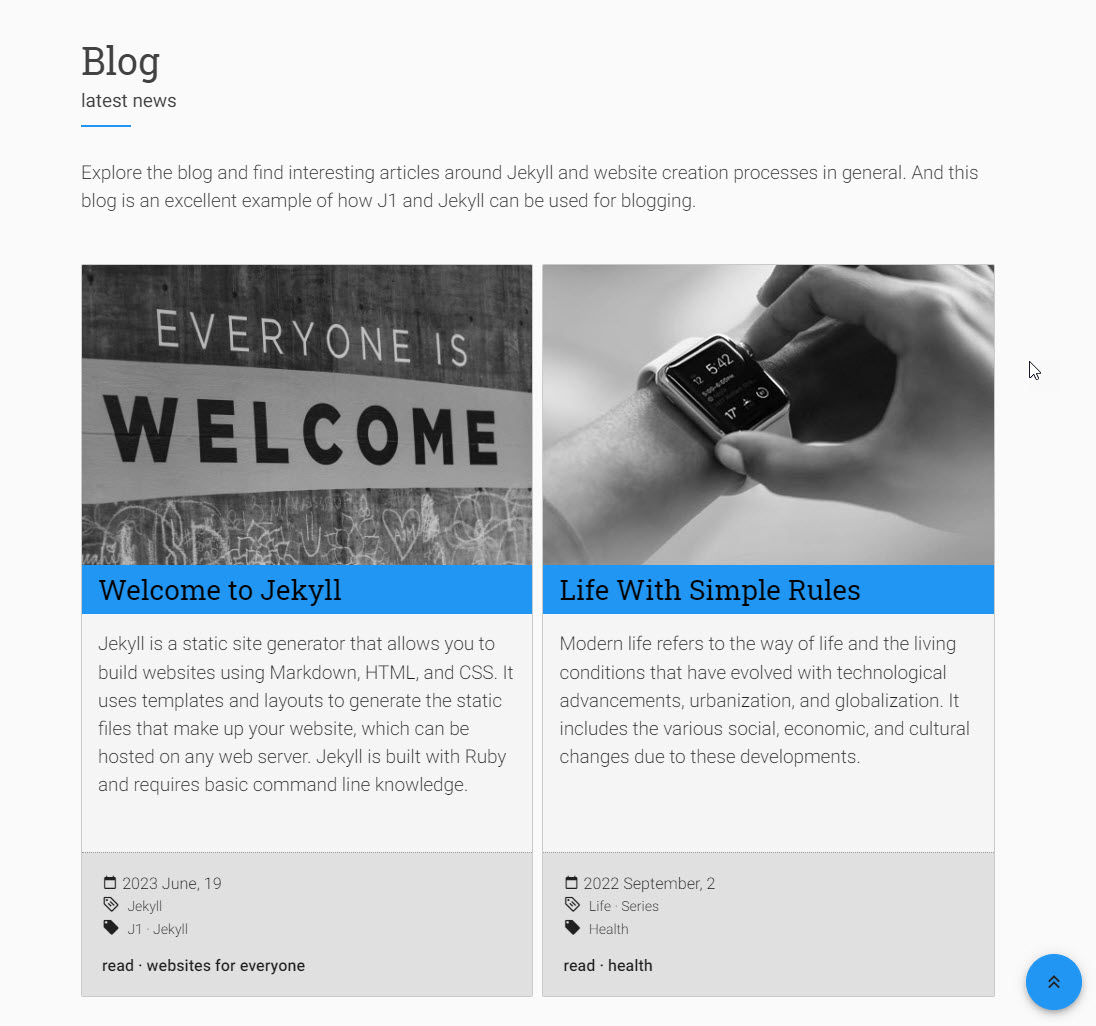
Another block representation of posts is found in the J1 Blog Navigator on the preview page.
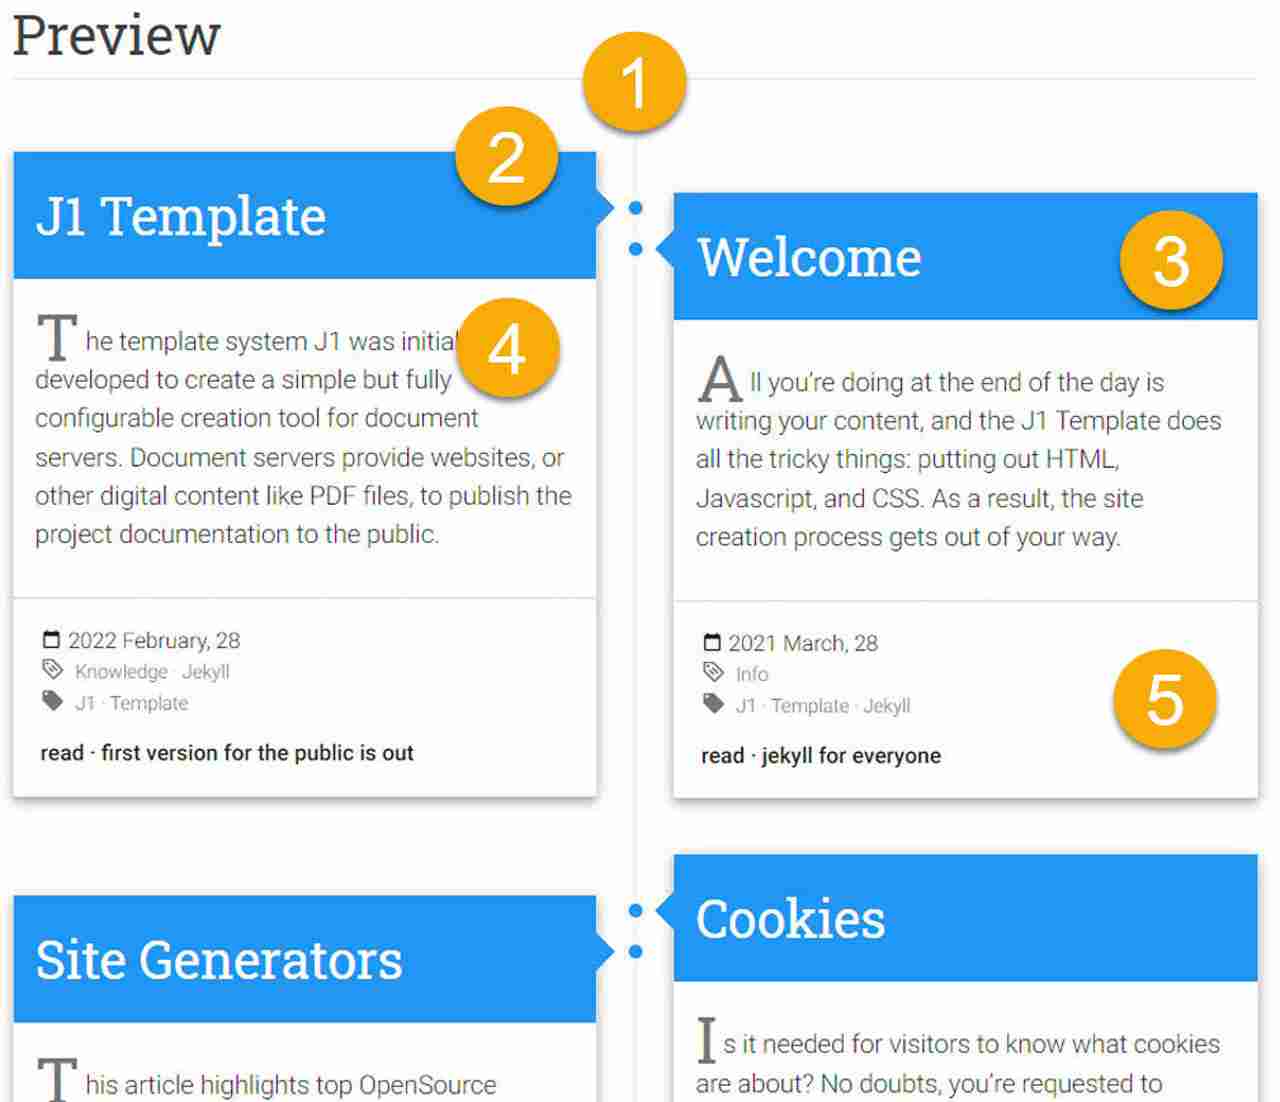
Timeline
Article block
Block header
Block preview
Block footer
An important criterion for arranging messages is the time. An article on the latest James Bond film in cinemas only makes sense if the year the film will be released (timeline) is clear. Each message is displayed in a summary block with a title (header), an excerpt of the respective contribution, and provides additional information in a footer.
The order over time is shown on the homepage in the block Latest News. All articles are shown in reverse order of appearance, so new articles first. The footer shows two additional ordering criteria that are available for blog articles with Jekyll and J1:
Categories — Sorting criterion to group articles by category
Tags — Sorting criterion that provides information about the content of an article
It is also possible to specify categories and tags for pages of the Page type, but the options for automatic evaluation that Jekyll offers for blog articles are missing here.
| The practical application of the sorting criteria is explained in more detail in the following section J1 Blog Navigator. |
Writing blog articles
There are no major differences between posts and pages when it comes to creating the content. However, the organization of content types in a Jekyll project is different. If the items of type page are placed in the folder pages, then all items of type post are created in the directory collections.
| In addition to posts, Jekyll offers the article type collections for ordered content, a kind of content that combines the properties of posts and pages. Collections extends Jekyll’s post and pages publishing functionality, to support other content types that aren’t ordered by date, but have a relationship with one another. Unfortunately, collections are not discussed in this tutorial. You can find a good description to understand collections in the blog of Ben Balter. |
Another major difference to Pages is the structure of the filenames of blog articles. If you were able to assign the names of the articles in Pages freely, a fixed scheme for the names of the source pages must be observed in Posts. To create a post, add the source file to your _posts directory using the following format for the file name:
YEAR-MONTH-DAY-<title>.adoc
Where the placeholder YEAR is a four-digit number, and the placeholders MONTH and DAY are both two-digit numbers. The file extension adoc shows that the content format used in the file is Asciidoc. The following are examples of valid post filenames:
2021-01-01-about-cookies.adoc
2021-03-28-welcome-to-j1.adoc
Like every other page, blog post files must begin with a Front matter, which is typically used to set a layout and other data to control the processing. Note from here, the value for the front matter variable layout for posts is set to the value post.
---
layout: post
title:  Welcome to Jekyll!
---
[role="mt-5"]
== Welcome to Jekyll posts
*Hello world*, this is my first Jekyll blog post.
We hope you like it!
You don’t have to start from a blank page, even with new blog articles. A simple template simple-post for new blog posts is available in the ~/collections/asciidoc_skeletons folder.
| Name | Description |
|---|---|
| Simple documents are used quite often. If the number of chapters is about or less than three and the document is small in size. This document type does not use any (local) Asciidoc include files or attributes. |
By their nature, blog articles are news, which (should) reach a maximum of the size of simple articles of the type pages in terms of page length. It is conceivable that blog articles on one topic span several articles. A typical use case here is tutorials that are organized as blog articles. You can find out how to group blog articles as a series of posts using the methods of J1 in the Grouping posts section.
Create a new article for the further steps. Like new pages, copy the simple-post directory to the ~/collections/posts/public folder and rename the source file. Use for the source of the new blog article in the folder ~/collections/posts/public/simple-post/_posts the current date, for example:
2022-03-06-new-post.adoc| The template source has the extension |
Then customize the front matter of the new post’s source to your liking, for example:
simple-post.adoc---
layout: post
title: Your first post article
tagline: blog posts from scratch
categories: [ Examples ]
tags: [ Posts, Tutorial ]
---To start again with an empty structure for the new blog article, overwrite the source’s content with a simple skeleton structure as well.
simple-post.adoc// Page content
// ~~~~~~~~~~~~~~~~~~~~~~~~~~~~~~~~~~~~~~~~~~~~~~~~~~~~~~~~~~~~~~~~~~~~~~~~~~~~~
// Include sub-documents (if any)
// -----------------------------------------------------------------------------
[[readmore]]
== Chapter 1
lorem:sentences[5]
== Chapter 2
lorem:sentences[5]As mentioned, the methods of developing Posts content are no different from for Pages. You can make the same adjustments for the new blog article that you already got to know in the Creating pages section for ordinary (article) pages.
Have fun with your experiments with the content of the posts!
Categories generated by Jekyll
Tags and categories are elementary classification criteria for the content type post. In addition to functions for evaluating the categories, the Jekyll builder engine offers another property: automatic categorization of blog articles. You have already seen the ~collections\posts directory structure for the post content-type:
collections├─ . │ └─ collections (1) │ └─ posts (2) │ └─ private │ └─ protected │ └─ public (3) │ └─ simple-post (3) │ └─ _posts (4)
| 1 | global content folder collections (ordered content) |
| 2 | global content folder of the content type post |
| 3 | category folders |
| 4 | category content folder _posts |
The folder structure below ~collections\posts is only used by the template system J1 to organize the articles. However, Jekyll evaluates this folder structure and creates automatic categories, which are assigned to the respective posts. The directory structure that directs the builder engine automatically deducts the following categories:
-
posts
-
public
-
simple post
These automatic categories are automatically assigned to all articles in the respective category content folder. For native Jekyll projects, this is certainly a good way to have categories generated via the builder engine. For the template system, the automatic category mappings are not very helpful. For J1 projects, there are tags on how to explicitly configure categories via the front matter of the articles. The explicit specification is much more flexible and allows the specific assignment of categories according to the authors' ideas, which are independent of the respective storage location of a contribution.

Automatic categories are an integral part of Jekyll and, unfortunately, cannot be switched off. Appropriate settings must be made in the J1 site configuration ~_data/j1_config.yml to dispense this functionality from Jekyll.
To suppress the evaluation of the layouts via J1, all not desired automatic categories are to be specified manually in the category_blacklist variable:
category_blacklist# ==============================================================================
# POST global configuration settings
#
# NOTE: Set global settings for the Jekyll builder-engine to control
# the HTML outputs generated by J1
#
# ------------------------------------------------------------------------------
posts:
# ----------------------------------------------------------------------------
# category_blacklist
# --------------------------------------------------------------------------
# List of categories (automatically) generated by Jekyll to be SKIPPED.
# (Additional) Categories are generated by Jekyl from folder names but
# NOT used for J1 to be displayed in preview boxes or J1 Posts Navigator
# views.
#
# Default: [ posts, public, private, protected, featured, series ]
#
# ----------------------------------------------------------------------------
category_blacklist: [ posts, public, private, protected, featured, series ]| All new blog articles are created using the template system J1 automatically included in all ads for posts. See the J1 Blog Navigator section for details on processing and displaying posts. |
The new blog article was automatically integrated via the Creators Blog preview boxes on the home page:
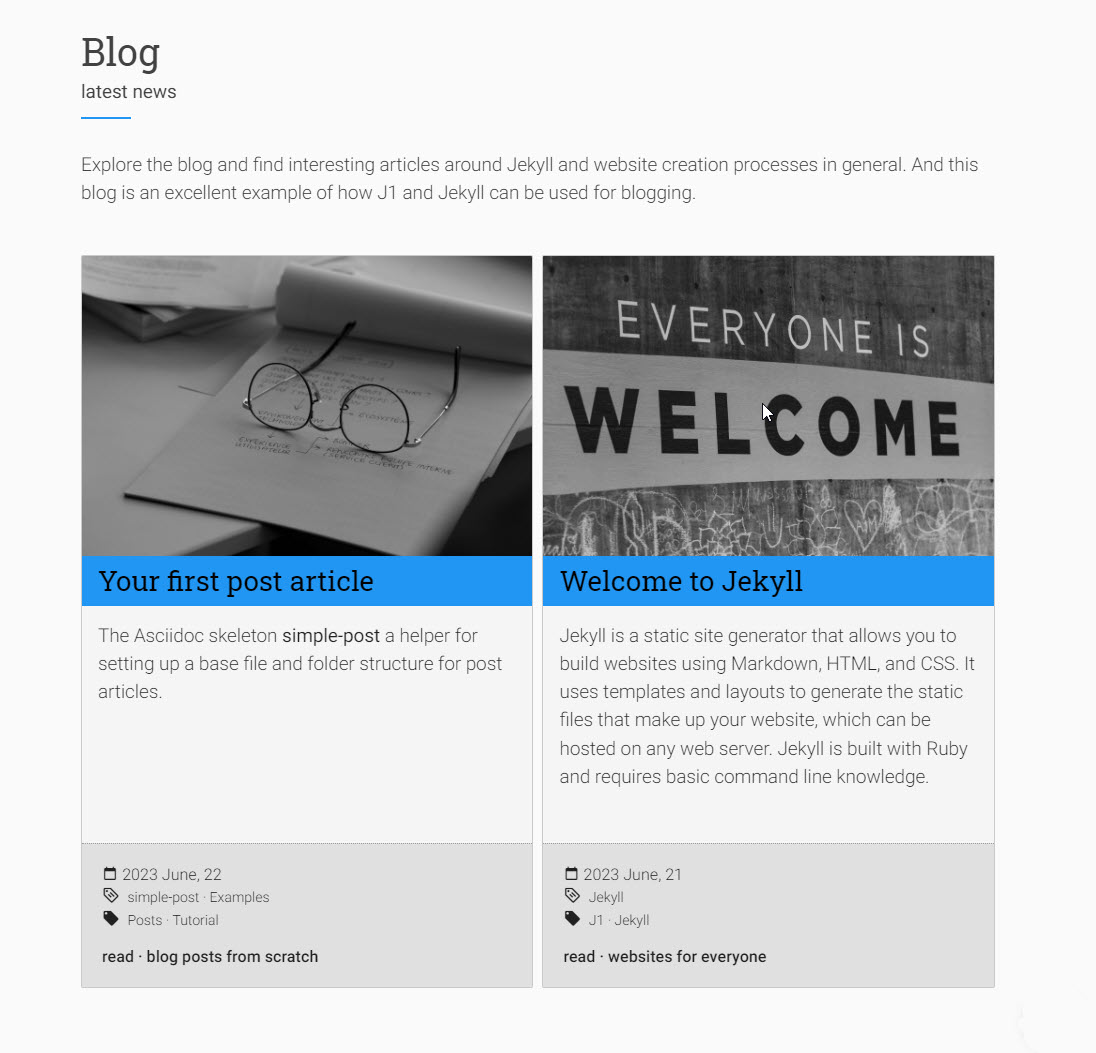
However, the automatic category simple-post is evaluated and displayed in the preview box since the entry in the variable category_blacklist is still missing. Adjust settings in the J1 site configuration ~_data/j1_config.yml accordingly:
category_blacklist category_blacklist: [ posts, public, private, protected, featured, series, simple-post ]J1 Blog Navigator
You have learned that articles of the content type page have to be manually integrated via the menu system of the J1 Navigator. The integration of the content of blog articles is fundamentally different. All articles of lead to portfolios, i.e., collections of content managed via the J1 module J1 Blog Navigator. Manual integration is not necessary. The Navigator component manages the content automatically. Available blog articles are automatically adopted and displayed. Comparable to the menu system for simple pages, the J1 Blog Navigator provides views for surfing the content of the generated Portfolios.
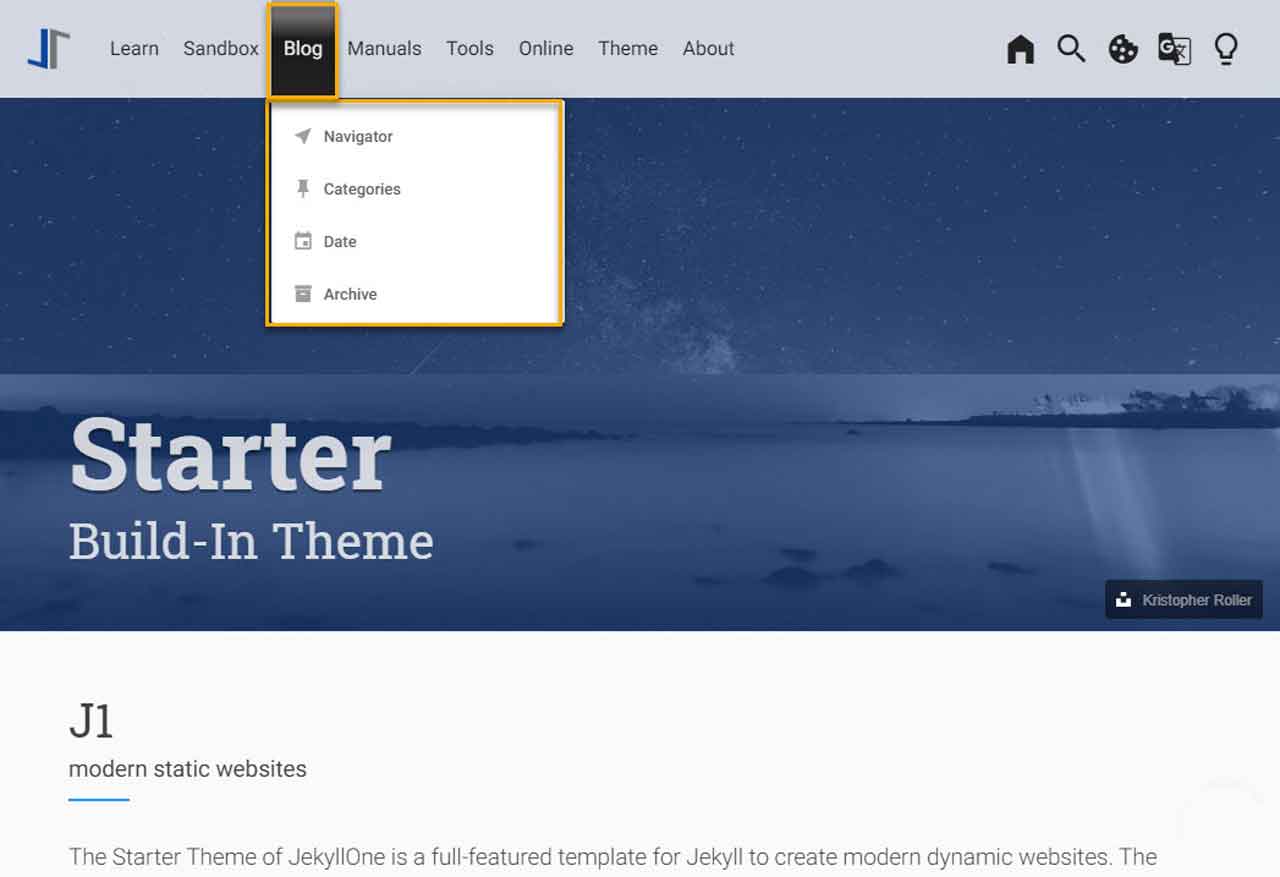
The Blog Navigator is accessed via the menu bar via the Blog entry. By opening the entry Blog Explorer in the dropdown menu, you reach the main page of the module with all available portfolio views:
-
Categories — articles are grouped by category
-
Date — articles are grouped by date
-
Archive — all articles available sorted from the youngest to the oldest
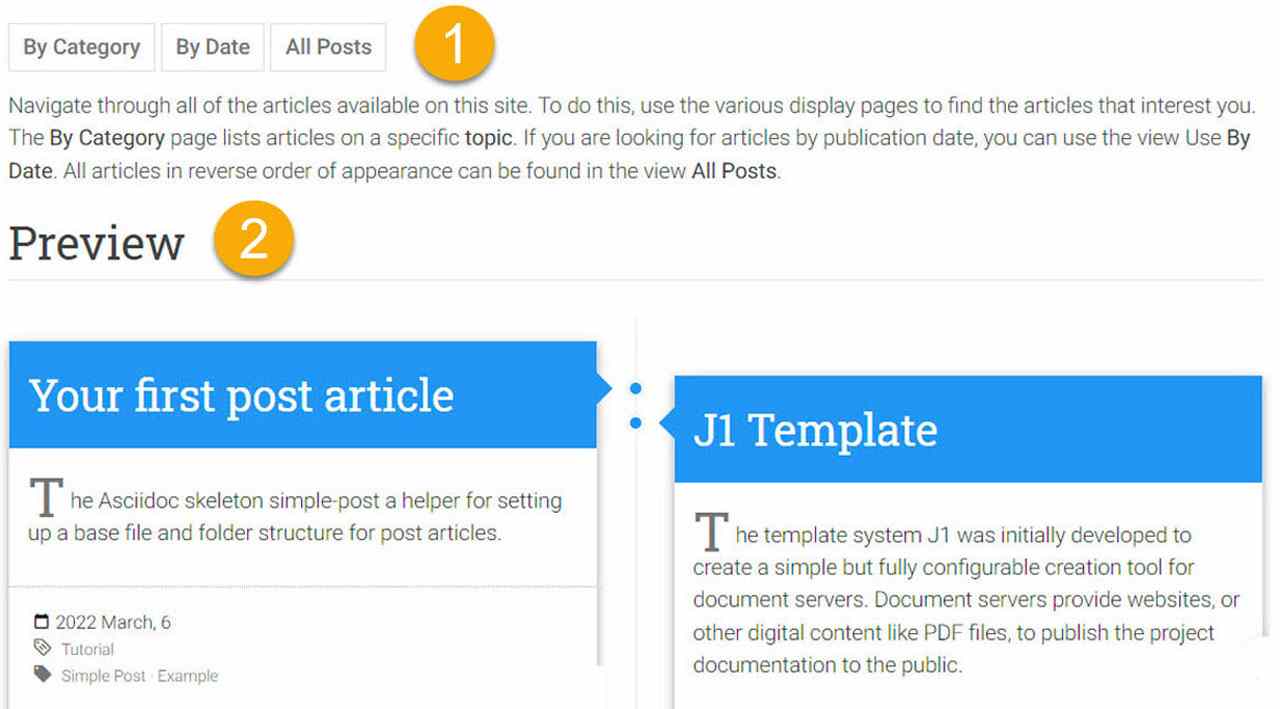
portfolio viewers (ordered content)
portfolio preview
The Blog Explorer is very easy to use and intuitive for site visitors. Test the various options that the explorer provides via the portfolio views. The J1 Blog Navigator component can have various parameters be configured as a module. The settings for this are found in the central directory of the module configurations under ~/_data/modules:
-
default settings:
defaults\blog_navigator.yml -
user settings:
blog_navigator.yml
Grouping posts
In some cases, it may make sense to group blog articles into a group of related articles. The post layout offers this possibility, controlled via the series variable in the front matter.
To try out the grouping feature, make a copy of the existing post 2022-03-06-new-post.adoc in the same directory and give this source file a new name:
2022-03-06-new-post-2.adocThen adjust the Front matter of the two articles for the summary as a group. Override the following variables in both articles:
simple-post.adoc---
layout: post
title: Your first post article
tagline: blog posts from scratch
categories: [ Examples ]
tags: [ Posts, Tutorial ]
image: /assets/image/module/attic/sigmund-1920x1280.jpg
series: simple-post
regenerate: false
---simple-post-2.adoc---
layout: post
title: Your second post article
tagline: blog posts from scratch
categories: [ Examples ]
tags: [ Posts, Tutorial ]
image: /assets/image/module/attic/sigmund-1920x1280.jpg
series: simple-post
regenerate: false
---By default, the variable’s value in the front matter of an article is set to false. Setting the value to false results that the article does not belong to any group. The articles are grouped by changing the value of the variable series to simple-post in the front matter. After the generation is complete, open one of the two articles about the J1 Blog Explorer:
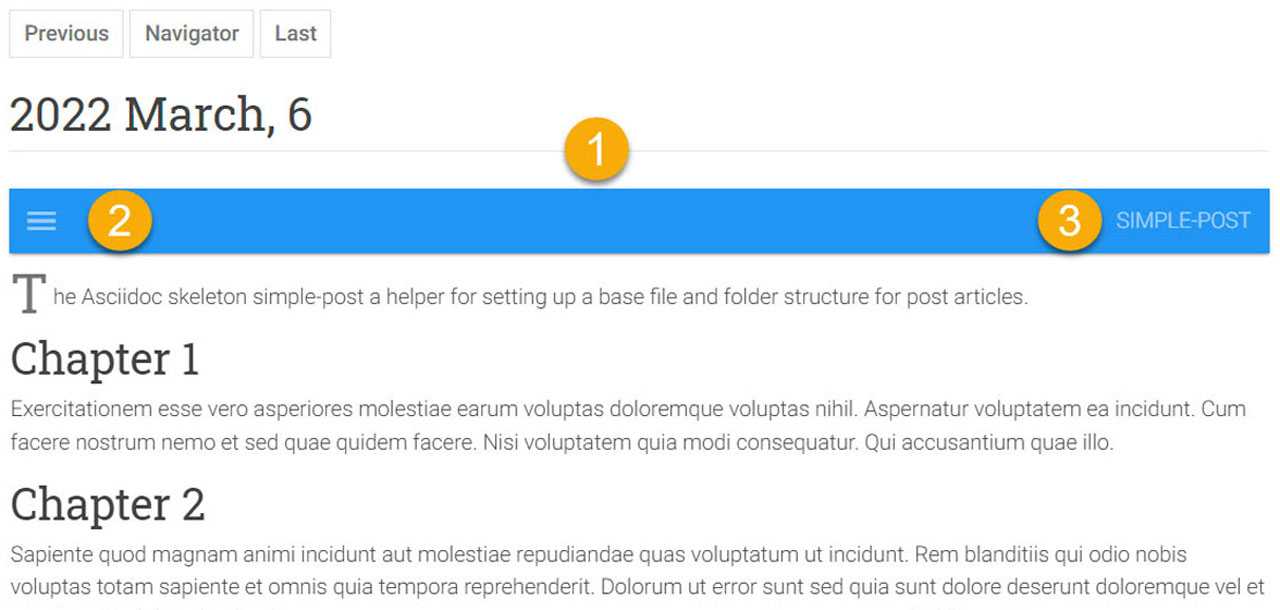
group explorer
menu button
group name
An additional element Group Explorer has been created by processing the J1 templates for the layout post. Use the menu button to open the Group Selector.
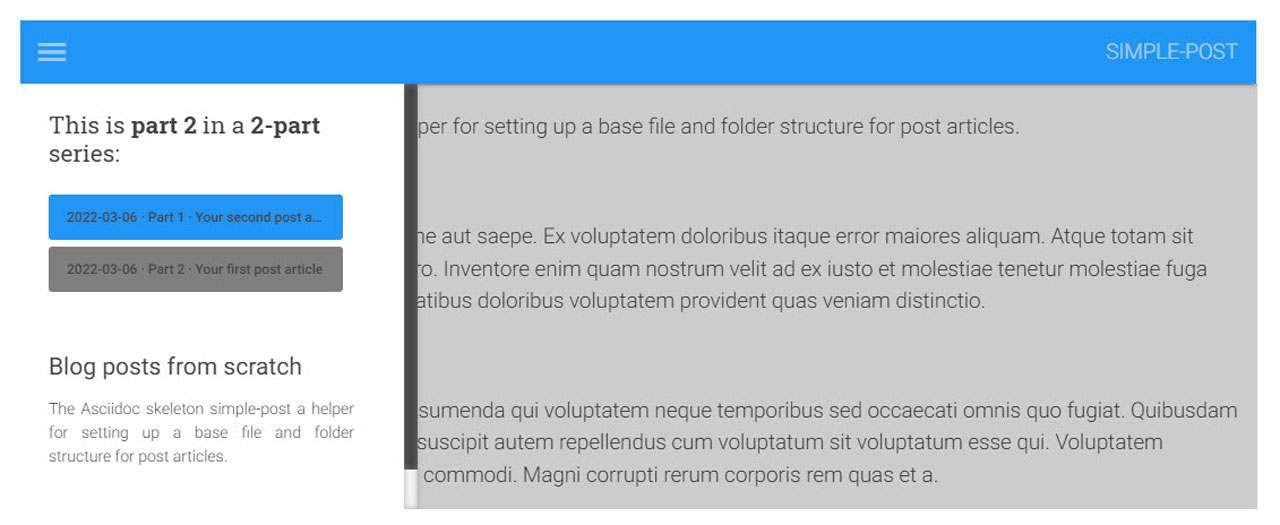
The articles are grouped, and the individual contributions of the group can be selected by clicking on the selector. In principle, any number of articles can be grouped. Even so, it is a good idea to limit a group to 3-6 articles so you do not confuse your visitors with huge article groups.
Configure the Homepage
Writing content for the homepage is a bit different from writing posts and pages. As described in section The Homepage, already existing (or your own) building blocks are used to generate the content of the landing page.
To configure the homepage, the layout data file ~/_data/layouts/home.yml is used to enable or disable the building blocks used for the landing page. Two examples for custom content are prepared to generate and place them on the homepage:
  # ----------------------------------------------------------------------------
  # CUSTOM content
  #
  #   Load custom rendered static HTML data files or HTML templates.
  #
  #   NOTE:
  #
  #   For Jekyll, only includes from folder '~/_includes' are accepted
  #   to load HTML data (include) files from.
  #
  # ----------------------------------------------------------------------------
  #
  - lane:
      enabled:                          false
      id:                               custom_content
      region:                           body-main
      type:                             sync
      base:                             _includes/custom
      path:                             static  (1)
      file:                             bs5_accordion.html
  - lane:
      enabled:                          false
      id:                               custom_content
      region:                           body-main
      type:                             sync
      base:                             _includes/custom
      path:                             templates (2)
file: bs5_accordion.html| 1 | already rendered static content based on a HTML file |
| 2 | configurable (dynamic) content based on a HTML template |
Both examples place the same HTML code. The static version (1) is equivalent to the code generated by the dynamic version (2). That way, it is easy to compare the outcome of configurable (dynamic) content based on a HTML template.
| For the development of dynamic content, it is recommended to start with a static version. Developing dynamic content is an iterative process that replaces the static contents by their dynamic counterparts using the Liquid template language. |
More about Front matter Variables
If you compare the already existing articles with the pages you created, one thing stands out: The existing pages seem to miss some Front matter variables.
To not repeat frequently used Front matter variables with identical values, it is advised to use default settings. Find the default settings of the Front matter variables with the site configuration /_config.yml.
Here you define common values and are only overwritten in the sources if necessary. For all articles of content type page, the variable layout has the default value page. The default value posts is set for all articles of content type post. Default values are configurable for many other variables not to repeat yourselves.
| Variable | Description |
|---|---|
| The Layout used for a source page. |
| If the builder-engine Jekyll runs in mode incremental, the variable controls if a source is regenerated always ( |
The front matter variable image: is used to display images. The variable controls the image used in the header-sections for the boxes displayed.
| Variable | Description |
|---|---|
| Sets the title of a page. Shown in the master header (module attic) and is used for webbrowsers to name the tab or window.. |
| Sets the subtitle of a page. Shown in the master header (module attic) below the title. |
| HTML meta-data key. The data of |
| A list categories used for the source. Categories are displayed in search results for all posts and pages. If the content is of type |
| A list tags used for the source. Tags are displayed in search results for all posts and pages. If the content is of type |
| If the content is of type |
| If set to |
| If set to |
| If the content is of type |
| Enables ( |
| Defines what floating action button should be used fo a page. Valid id’s can be found in the FAB module configuration |
| Enables ( |
Configure Fontmatter defaults
The (YAML) Array defaults: in the site configuration /_config.yml is responsible for configuring the default values. This array contains (nested) lists scope and values consisting of name-value pairs. Sounds difficult at first but is much easier to understand if you look at the configuration.
~/_config.yml file# ------------------------------------------------------------------------------
# FRONTMATTER defaults
#
# Using the YAML Front Matter is a way the (individual) configuration
# for post and pages can be specified. Very often, a lot of config
# options are repeated on each and every post or page. Setting the
# layout for each file, adding categories to a post, etc. might be
# the same for the majority of your content.
#
# Instead of repeating this configuration each time a page is being
# created, Jekyll provides a way to set these configuration items
# as defaults in this site configuration (_config.yml).
#
defaults:
# ----------------------------------------------------------------------------
# PUBLIC - FEATURED
#
- scope:
path: posts/public/featured
type: posts
values:
layout: post
author: J1 Team
compress: true
# ----------------------------------------------------------------------------
# PUBLIC - SERIES
#
- scope:
type: posts
path: posts/public/series
values:
layout: post
author: J1 Team
compress: true| All configuration files in Jekyll or J1 projects included Data of type |
In the configuration shown, the default values of Posts are declared, with the parameters in the scope list having the following meaning:
-
path— the location (directory) of the content -
type— the corresponding content type (here:post)
The values list contains the desired Front matter variables for the default values to be set up. Find a complete list of the configuration for variables and their values for your new blog articles below:
# ----------------------------------------------------------------------------
# PUBLIC - SIMPLE POST
#
- scope:
    path:                             posts/public/simple-post
    type:                             posts
  values:
    layout:                           post
    author:                           J1 Team
    compress:                         true
    image:                            /assets/image/module/attic/joanna-kosinska-1920x1280.jpg
    robots:
      index:                          true
      follow:                         true
    personalization:                  false
    exclude_from_search:              false
    series:                           false
    toc:                              true
    fab_menu_id:                      page_ctrl_simple
    scrollbar:                        false
    resource_options:
      - toccer:
collapseDepth: 3| Changes to Site configuration settings |
Add the settings from above in the configuration file /_config.yml below the existing settings for posts in the following section:
# ----------------------------------------------------------------------------
# POSTS
#
As a final adjustment to your blog articles, the variables layout can be deleted from the Front matter settings in the simple-post articles. To activate the changes to the site configuration, the running web must be stopped in the shell (Windows: command prompt) and then restarted afterward.
-
stopping a running web: (Ctrl+C)
-
(re)starting a web:
j1 site
| Knowledge and experience dealing with the front matter will greatly help you on changes for your pages' behavior at runtime quickly and easily. |
By changing more front matter defaults, you can now make further adjustments to the variables in the Front matter. Try out how the changes affect your blog articles!