Installing the development environment for J1 was the hardest part. Creating and starting a J1 project, by contrast, is much easier. After only a handful of steps you will be ready to launch your new website.
In this section you will learn every step needed to manage a J1 project. J1 gives you two ways to create a project or a new website:
-
Top-down: start with 1-Click Deployment on Netlify. This creates a new repository in your GitHub workspace automatically — you have already seen this in the chapter "A Awesome Site".
-
Bottom-up: create the J1 project locally on your PC first, then connect it to GitHub as a Git repository. Publishing the local website through Netlify takes only a few extra steps.
Both ways work. Pick whichever fits your situation.
15 Minutes to read
All Chapters
Find here an overview on all chapters this tutorial:
Meet & Greet
A awesome Site
Development System
You are here — Project Management
Creating Content
Download and Install J1 Theme Gem
The Ruby gem j1-template is the foundation for managing J1 projects. The first step is to download the current version of this gem from the Internet. Ruby gems are downloaded directly with the Ruby package manager: the gem command downloads and installs a module in a single step.
Create the Users Gem folder
You can install Ruby gems either system-wide (available to every user on the computer) or per-user (available only to the current account). A per-user install does not require administrator rights on your operating system, and it makes loading gems for a project much easier.
| With a per-user setup, every user can install the gems a project needs without administrator rights. The default per-user gem folder for J1 projects is
|
Create the .gem folder on Windows
To create the .gem folder on Windows, you can use the environment variables %HOMEDRIVE% and %HOMEPATH% to refer to your home directory:
.gem folder on Windowsmd %HOMEDRIVE%%HOMEPATH%\.gemCreate the .gem folder on Unix/Linux
To create the .gem folder on Unix or Linux:
.gem folder on Linuxmkdir ~/.gemInstall the Gem j1-template
cls && gem install j1-template --remote --user-install --no-document (1) (2) (3)| 1 | Download the gem over the Internet from rubygems.org (--remote) |
| 2 | Install the gem per-user, into your home folder (.gem/ruby) (--user-install) |
| 3 | Skip the gem’s developer documentation (--no-document) |
J1 is a gem-based template for the Jekyll site generator. It depends on several other gems, and those will be downloaded and installed automatically as dependencies. Below is a summary of what you see on screen during the install:
Fetching warden-1.2.9.gem
Fetching rack-2.2.3.gem
...
WARNING:  You don't have c:/users/<user_name>/.gem/ruby/3.1.0/bin in your PATH, (2)
          gem executables will not run.
...
Successfully installed rack-2.2.3
Successfully installed warden-1.2.9
...
Building native extensions. This could take a while...  (1)
...
Successfully installed j1-template-2024.3.8
64 gems installed| 1 | During installation, some gems generate platform-specific extensions |
| 2 | The warning line in the output is important. See Extend the search path for how to deal with it. |
The first J1 installation takes a little while. There are several reasons for that: many other Ruby gems have to be downloaded, and some of them build platform-specific extensions for your operating system as part of the install. All of these steps happen automatically — you do not have to type anything else.
Installing Ruby gems into your home directory has one important side effect. Gems can contain programs (small command-line tools), not just libraries of code. That is exactly the case for J1: the j1-template gem ships with a command-line tool called j1 that manages J1 projects. To use the j1 command, you have to extend your operating system’s program search path (PATH). The next section Extend the search path shows how to do this on Windows.
Extend the search path
The j1-template gem brings along an easy-to-use command-line program called j1, which you use to manage J1 projects. After a per-user installation, any program that comes with a gem ends up in this folder under your home directory:
C:\Users\<user_name>\.gem\ruby\3.1.0\binFor Windows to find a gem-based program when you type its name, that folder must be on the system search path (the PATH environment variable). To add the folder to PATH, run the following command in a shell (command prompt):
SETX PATH "%PATH%;%HOMEDRIVE%%HOMEPATH%\.gem\ruby\3.1.0\bin"SUCCESS: Specified value was saved.There is one catch when you extend the search path this way. The new PATH is saved straight away, but it is still unknown in the shell window you typed the command in. To pick up the change, you have to restart the shell.
| On Windows that means closing all open command-prompt windows and starting a fresh one. Without the restart, the |
Check the J1 control program
The j1 command-line program is what you use to manage J1 projects. After installing the j1-template gem, check in a new shell which version of J1 you have:
j1 --versionj1 2024.3.8| As of 02/22, the current version of J1 is 2024.3.8. Do not use older versions. |
You can list all the things j1 can do by asking for the help screen:
j1 --helpj1 2024.3.8 -- J1 Theme is a gem-based Template made for Jekyll
Usage:
j1 <subcommand> [options]
Options:
-h, --help Show this message
-v, --version Print the name and version
-t, --trace Show the full backtrace when an error occurs
Subcommands:
generate Generates a J1 project scaffold in PATH
help Show the help message, optionally for a given subcommand
patch Install patches available for J1 projects
rebuild Rebuild the J1 projects website (1)
reset Reset a J1 project to factory state
setup Initialize a J1 project for first use
site Run the website of a J1 project| 1 | rebuild, reset, setup and site are the top-level commands for controlling J1 projects. |
Setting up Git
You have already installed Git, but it is not configured yet. To create and use Git repositories for your local J1 projects, you use the git command on the command line. The basic setup of Git is very short: you only need to tell Git two things about your default identity:
-
your user name
-
your personal email address
Open a shell and run the following commands:
git config --global user.name "<your_user_name>" (1)| 1 | Replace <your_user_name> with the user name you want Git to use (for example, the name of your Windows user account). |
git config --global user.email "<you@example.com>" (1)| 1 | Replace <you@example.com> with your personal email address. |
That is all there is to the basic Git setup. From now on, every Git command will record these personal details so that other contributors can see who made which change and how to contact you.
How to manage J1 projects
Creating and starting a J1 project is very easy. After only a handful of steps you will have a new website ready to go. The next few sections walk through every step in detail.
Here is the high-level overview:
-
set up a project
-
(optional but recommended) bring the project under Git version control
-
initialize the project
-
start the project and open the included website
A project consists of several files and folders. A typical structure of a J1 project looks like this:
  ├──── .
  │     └─ _data  (1)
  │     └─ _includes (2)
  │     └─ _plugins (3)
  │     └─ assets (4)
  │     └─ collections (5)
  │     └─ pages (6)
  │     └─ utilsrv
  ├──── _config.yml (7)
  ├──── config.ru
  ├──── dot.gitattributes
  ├──── dot.gitignore
  ├──── dot.nojekyll
  ├──── favicon.ico
  ├──── Gemfile (8)
  ├──── index.html (9)
  ├──── package.json (10)
  └──── README.md
| 1 | Configuration data for the website |
| 2 | Global includes used by all (Asciidoc) content sources |
| 3 | Built-in (Ruby) plugins for Jekyll |
| 4 | Static assets for the web (images, for example) |
| 5 | Content folder that contains all blog posts |
| 6 | Content folder that contains all (article) pages |
| 7 | Central Jekyll site configuration |
| 8 | Central Ruby Gemfile that lists every required gem |
| 9 | Homepage for the website |
| 10 | Central NPM project file used to manage the site |
Manage existing J1 Projects
If you deployed your site with the 1-Click method from the chapter Awesome Site, the new website now lives as a repository in your personal GitHub workspace. In Git terms, that GitHub repository is the remote — the central version of your J1 project.
| If you have not yet created a website on GitHub, or you do not want to use GitHub and Netlify for now, you can still create a local J1 project. To create and manage purely local J1 projects you do not need any service provider. In that case, skip ahead to Create new J1 projects. |
The next few steps create a local working copy of your remote repository — in Git terms, the local. With this working copy on your PC, you can edit the site in your development environment and then sync the changes back to the remote on GitHub.
First, sign in to GitHub from the GitHub login page using your personal account.
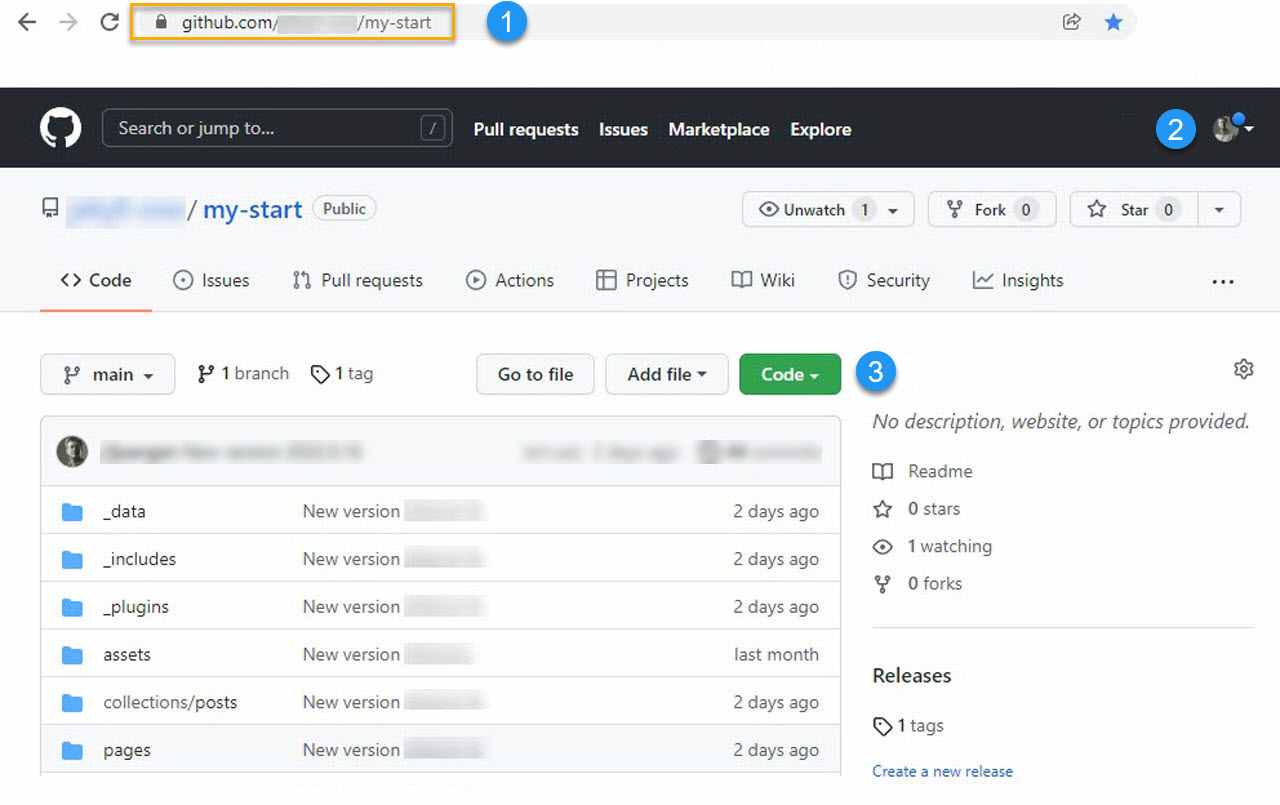
URL of your repository on GitHub
Access your personal account
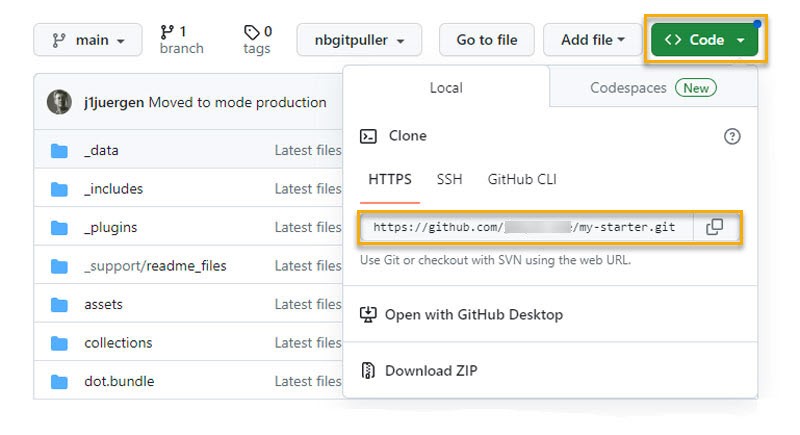
Select URI to access a repo from Git
Create a working copy
Now it is time to use Git for the first time. Just as the j1 command controls J1 projects, the git command controls Git repositories. For J1 work, the command line is the most convenient way to manage your repositories. Most repository operations are very short commands that you will quickly memorize.
First, create a folder on your PC where all your website projects will live. For the examples below we use C:\J1\Projects:
mkdir C:\J1\Projects && cd C:\J1\ProjectsYou can now create a local working copy from your remote GitHub repository like this:
git clone <URI_of_your_repo_at_Github> (1)| 1 | URI: copy the URI from the GitHub web interface, as shown in the screenshot above (3). |
The command needs to know which repository to copy (clone). You provide that information through the URI of your GitHub repository. To get the URI, click the green Code button on your repository’s GitHub page and copy the HTTPS URL.
cloneCloning into '<name_of_your_repo>'...
remote: Enumerating objects: 1930, done.
remote: Counting objects: 100% (1930/1930), done.
remote: Compressing objects: 100% (777/777), done.
remote: Total 1930 (delta 1022), reused 1927 (delta 1019), pack-reused 0
Receiving objects: 100% (1930/1930), 27.76 MiB | 4.83 MiB/s, done.
Resolving deltas: 100% (1022/1022), done.That is all you need to create a local working copy with Git. You can skip the next section and continue at Initialize a project to make your J1 project ready to use.
Create new J1 projects
If the j1-template gem is installed you can create completely new J1 projects from scratch. New projects are created with the j1 command on the command line.
If you have not already done so, create a folder where your local project copies will live. In the examples below that folder is C:\J1\Projects:
mkdir C:\J1\Projects && cd C:\J1\ProjectsThe j1 generate command creates a new project folder (my-start) inside your current folder.
j1 generate my-startYYYY-MM-DD hh:mm:ss - GENERATE: Running bundle install in <path_to_your_projects>/my-start ...
YYYY-MM-DD hh:mm:ss - GENERATE: Install bundle in USER gem folder ~/.gem ...
YYYY-MM-DD hh:mm:ss - GENERATE: Fetching gem metadata from https://rubygems.org/...
YYYY-MM-DD hh:mm:ss - GENERATE: Resolving dependencies...
YYYY-MM-DD hh:mm:ss - GENERATE: Using bundler 2.3.26
YYYY-MM-DD hh:mm:ss - GENERATE: Using ruby2_keywords 0.0.5
YYYY-MM-DD hh:mm:ss - GENERATE: Fetching public_suffix 5.0.1
YYYY-MM-DD hh:mm:ss - GENERATE: Fetching asciidoctor 2.0.18
YYYY-MM-DD hh:mm:ss - GENERATE: Fetching bump 0.10.0
YYYY-MM-DD hh:mm:ss - GENERATE: Fetching builder 3.2.4
YYYY-MM-DD hh:mm:ss - GENERATE: Fetching colorator 1.1.0
YYYY-MM-DD hh:mm:ss - GENERATE: Fetching concurrent-ruby 1.2.2
YYYY-MM-DD hh:mm:ss - GENERATE: Fetching date 3.3.3
YYYY-MM-DD hh:mm:ss - GENERATE: Fetching unf_ext 0.0.8.2 (x64-mingw-ucrt)
YYYY-MM-DD hh:mm:ss - GENERATE: Fetching eventmachine 1.2.7
YYYY-MM-DD hh:mm:ss - GENERATE: Fetching http_parser.rb 0.8.0
YYYY-MM-DD hh:mm:ss - GENERATE: Fetching execjs 2.8.1
...
YYYY-MM-DD hh:mm:ss - GENERATE: C:/Users/<user>/.gem/ruby/3.1.0;C:/DevTools/Ruby31/lib/ruby/gems/3.1.0;
YYYY-MM-DD hh:mm:ss - GENERATE: Install patches in USER gem folder ~/.gem ...
YYYY-MM-DD hh:mm:ss - GENERATE: Install patches on path C:/Users/<user>/.gem/ruby/3.1.0 ...
YYYY-MM-DD hh:mm:ss - GENERATE: Install patches successful
YYYY-MM-DD hh:mm:ss - GENERATE: Generated Jekyll site installed in folder <path_to_your_projects>/my-startj1 generate my-start creates a folder called my-start inside your current folder and fills it with every file the new project needs. When the command finishes, change into the new folder. The last step is to bring the new project under Git version control.
Setting up Git for your project
Version control is your safety net. We highly recommend putting every project under Git control as soon as it is created. To initialize the new project as a Git repository, first move into the project folder:
cls && cd C:\J1\Projects\my-startgit add . && git commit -am "Initial version"| If you see an error message like this: Author identity unknown *** Please tell me who you are. Run git config --global user.email "you@example.com" git config --global user.name "Your Name" to set your account's default identity. Omit --global to set the identity only in this repository. fatal: unable to auto-detect email address (got 'user@hostname.(none)') you need to set up your account’s default identity first. See the section Setting up Git for the details. |
Your safety net is now in place — a good choice. To make the new project ready to use, continue with the steps in the next section to initialize it.
Initialize a project
In the example below, the project is called my-start. For the next steps, make sure you are inside your project folder:
cls && cd C:\J1\Projects\my-startYou only have to initialize a project once. Initialization downloads any additional NodeJS and Ruby modules the project needs, both for the development tooling and for the Jekyll build engine.
| All the tasks for developing a J1 website are defined as scripts in the NodeJS package manager |
| A project can be driven by either of the package managers |
Initializing a project is done by the j1 command using the setup top-level script. The setup task triggers many sub-tasks, but you do not have to deal with them yourself — they all run automatically.
j1 setupFor an overview of what setup does, here is a summary of its output:
Check consistency of the J1 project ...
YYYY-MM-DD hh:mm:ss - SETUP: Running bundle install in <path_to_your_projects>\my-start ...
YYYY-MM-DD hh:mm:ss - SETUP: Install bundle in USER gem folder ~/.gem ...
YYYY-MM-DD hh:mm:ss - SETUP: Fetching gem metadata from https://rubygems.org/...
YYYY-MM-DD hh:mm:ss - SETUP: Using bundler 2.3.26
YYYY-MM-DD hh:mm:ss - SETUP: Using ruby2_keywords 0.0.5
YYYY-MM-DD hh:mm:ss - SETUP: Using public_suffix 5.0.1
YYYY-MM-DD hh:mm:ss - SETUP: Using asciidoctor 2.0.18
YYYY-MM-DD hh:mm:ss - SETUP: Using builder 3.2.4
YYYY-MM-DD hh:mm:ss - SETUP: Using bump 0.10.0
YYYY-MM-DD hh:mm:ss - SETUP: Using colorator 1.1.0
YYYY-MM-DD hh:mm:ss - SETUP: Using concurrent-ruby 1.2.2
YYYY-MM-DD hh:mm:ss - SETUP: Using date 3.3.3
YYYY-MM-DD hh:mm:ss - SETUP: Using unf_ext 0.0.8.2 (x64-mingw-ucrt)
YYYY-MM-DD hh:mm:ss - SETUP: Using eventmachine 1.2.7
...
YYYY-MM-DD hh:mm:ss - SETUP: Bundle complete! 30 Gemfile dependencies, 79 gems now installed.
YYYY-MM-DD hh:mm:ss - SETUP: Bundled gems are installed into `C:/Users/<user>/.gem`
YYYY-MM-DD hh:mm:ss - SETUP: Install patches in USER gem folder ~/.gem ...
YYYY-MM-DD hh:mm:ss - SETUP: Install patches on path C:/Users/<user>/.gem/ruby/3.1.0 ...
YYYY-MM-DD hh:mm:ss - SETUP: Initialize the project ...
YYYY-MM-DD hh:mm:ss - SETUP: Be patient, this will take a while ...
YYYY-MM-DD hh:mm:ss - SETUP:
YYYY-MM-DD hh:mm:ss - SETUP: > j1@2024.3.8 setup <path_to_your_projects>/my-start
YYYY-MM-DD hh:mm:ss - SETUP: > npm --silent run setup-start && ..
YYYY-MM-DD hh:mm:ss - SETUP:
YYYY-MM-DD hh:mm:ss - SETUP: Setup project for first use ..
YYYY-MM-DD hh:mm:ss - SETUP: Bootstrap base modules ..
YYYY-MM-DD hh:mm:ss - SETUP: done.
YYYY-MM-DD hh:mm:ss - SETUP: Configure environment ..
YYYY-MM-DD hh:mm:ss - SETUP: done.
YYYY-MM-DD hh:mm:ss - SETUP: Create project folders ..
YYYY-MM-DD hh:mm:ss - SETUP: Create log folder ..
YYYY-MM-DD hh:mm:ss - SETUP: Create archived log folder ..
YYYY-MM-DD hh:mm:ss - SETUP: Create etc folder ..
YYYY-MM-DD hh:mm:ss - SETUP: done.
YYYY-MM-DD hh:mm:ss - SETUP: Bootstrap project modules ..
YYYY-MM-DD hh:mm:ss - SETUP: Bootstrap utility server modules ..
YYYY-MM-DD hh:mm:ss - SETUP: done.
YYYY-MM-DD hh:mm:ss - SETUP: Detect OS ..
YYYY-MM-DD hh:mm:ss - SETUP: OS detected: Windows_NT
YYYY-MM-DD hh:mm:ss - SETUP: Build site incremental ..
YYYY-MM-DD hh:mm:ss - SETUP: Configuration file: <path_to_your_projects>/my-start/_config.yml
YYYY-MM-DD hh:mm:ss - SETUP:             Source: <path_to_your_projects>/my-start
YYYY-MM-DD hh:mm:ss - SETUP:        Destination: <path_to_your_projects>/my-start/_site
YYYY-MM-DD hh:mm:ss - SETUP:  Incremental build: enabled
YYYY-MM-DD hh:mm:ss - SETUP:       Generating...
YYYY-MM-DD hh:mm:ss - SETUP:            J1 Lunr: enabled
YYYY-MM-DD hh:mm:ss - SETUP:            J1 Lunr: generate search index
YYYY-MM-DD hh:mm:ss - SETUP:           J1 Feeds: enabled
YYYY-MM-DD hh:mm:ss - SETUP:           J1 Feeds: generate rss feeds for: excerpts only
YYYY-MM-DD hh:mm:ss - SETUP:           J1 Feeds: generate rss feeds for: #posts of unlimited
YYYY-MM-DD hh:mm:ss - SETUP:           J1 Feeds: generate rss feeds for: all posts
YYYY-MM-DD hh:mm:ss - SETUP:        J1 SEO Tags: enabled
YYYY-MM-DD hh:mm:ss - SETUP:        J1 SEO Tags: generate seo tags
YYYY-MM-DD hh:mm:ss - SETUP:         J1 Sitemap: enabled
YYYY-MM-DD hh:mm:ss - SETUP:         J1 Sitemap: generate sitemap files
YYYY-MM-DD hh:mm:ss - SETUP:       J1 Paginator: enabled
YYYY-MM-DD hh:mm:ss - SETUP:       J1 Paginator: generate auto pages: disabled
YYYY-MM-DD hh:mm:ss - SETUP:       J1 Paginator: generate paginator pages: enabled
YYYY-MM-DD hh:mm:ss - SETUP:       J1 Paginator: generate paginator pages: 2 page|s generated
YYYY-MM-DD hh:mm:ss - SETUP:                     done in 64.236 seconds.
YYYY-MM-DD hh:mm:ss - SETUP:  Auto-regeneration: disabled. Use --watch to enable.
YYYY-MM-DD hh:mm:ss - SETUP: .. build finished.
YYYY-MM-DD hh:mm:ss - SETUP: To open the site, run: yarn site
YYYY-MM-DD hh:mm:ss - SETUP: Initializing the project finished successfully.
YYYY-MM-DD hh:mm:ss - SETUP: To open your site, run: j1 site
Setting up a project takes a few minutes — usually longer the first time, because Ruby and NodeJS modules have to be downloaded from the Internet. How long depends on your Internet speed and the performance of your PC.
You can think of setup as an extended install process: it downloads the modules the project needs and then uses the Jekyll engine to build the new website for the first time.
Start a project (website)
Once setup is finished, all the components are in place. You can start the Starter Web with a single top-level command:
j1 siteThe site task does a lot for you: it makes sure the development server is ready, starts Jekyll in watch mode, and finally opens the generated website in a browser when everything is up.
| The browser used is whichever one is set as your default in your operating system. |
Check consistency of the J1 project ...
Check setup state of the J1 project ...
YYYY-MM-DD hh:mm:ss - SITE: Starting up your site ...
YYYY-MM-DD hh:mm:ss - SITE:
YYYY-MM-DD hh:mm:ss - SITE: > j1@2024.3.8 j1-site <path_to_your_projects>/my-start
YYYY-MM-DD hh:mm:ss - SITE: > run-p -s j1-site:*
YYYY-MM-DD hh:mm:ss - SITE:
YYYY-MM-DD hh:mm:ss - SITE: Startup the site ..
YYYY-MM-DD hh:mm:ss - SITE: Startup UTILSRV ..
YYYY-MM-DD hh:mm:ss - SITE: Log file exists :        messages_YYYY-MM-DD
YYYY-MM-DD hh:mm:ss - SITE: Stop the server. Exiting ...
YYYY-MM-DD hh:mm:ss - SITE: Reset file: messages_2023-04-07
YYYY-MM-DD hh:mm:ss - SITE: Configuration file: <path_to_your_projects>/my-start/_config.yml
YYYY-MM-DD hh:mm:ss - SITE:  Auto-regeneration: enabled for '.'
YYYY-MM-DD hh:mm:ss - SITE: LiveReload address: http://localhost:30001
YYYY-MM-DD hh:mm:ss - SITE:     Server address: http://localhost:30000/
YYYY-MM-DD hh:mm:ss - SITE:   Server running... press ctrl-c to stop.
YYYY-MM-DD hh:mm:ss - SITE:         LiveReload: Browser connected
Rebuild a J1 project
While you are developing a website you will sometimes need to rebuild it from scratch. J1 normally runs Jekyll in incremental mode with automatic regeneration: when you edit content, only the affected pages are rebuilt, and the browser reloads them.
A few changes — typically changes to the project’s configuration files — are not picked up by automatic regeneration. In those cases you have to rebuild the site manually. The rebuild task does exactly that: it recreates the whole website from scratch.
j1 rebuildCheck consistency of the J1 project ...
Check setup state of the J1 project ...
REBUILD: Rebuild the projects website ...
REBUILD: Be patient, this will take a while ...
YYYY-MM-DD hh:mm:ss - REBUILD:
YYYY-MM-DD hh:mm:ss - REBUILD: > j1@2024.3.8 rebuild <path_to_your_projects>/my-start
YYYY-MM-DD hh:mm:ss - REBUILD: > run-s -s rebuild:* && run-s -s post-rebuild:*
YYYY-MM-DD hh:mm:ss - REBUILD:
YYYY-MM-DD hh:mm:ss - REBUILD: Rebuild site incremental ..
YYYY-MM-DD hh:mm:ss - REBUILD: Clean up site files ..
YYYY-MM-DD hh:mm:ss - REBUILD: Configuration file: <path_to_your_projects>/my-start/_config.yml
YYYY-MM-DD hh:mm:ss - REBUILD: Cleaner: Removing _site...
YYYY-MM-DD hh:mm:ss - REBUILD: Cleaner: Removing ./.jekyll-metadata...
YYYY-MM-DD hh:mm:ss - REBUILD: Cleaner: Removing ./.jekyll-cache...
YYYY-MM-DD hh:mm:ss - REBUILD: Cleaner: Nothing to do for .sass-cache.
YYYY-MM-DD hh:mm:ss - REBUILD: Configuration file: <path_to_your_projects>/my-start/_config.yml
YYYY-MM-DD hh:mm:ss - REBUILD: Source: <path_to_your_projects>/my-start
YYYY-MM-DD hh:mm:ss - REBUILD: Destination: <path_to_your_projects>/my-start/_site
YYYY-MM-DD hh:mm:ss - REBUILD: Incremental build: enabled
YYYY-MM-DD hh:mm:ss - REBUILD: Generating...
YYYY-MM-DD hh:mm:ss - REBUILD: J1 Lunr: enabled
YYYY-MM-DD hh:mm:ss - REBUILD: J1 Lunr: generate search index
YYYY-MM-DD hh:mm:ss - REBUILD: J1 Feeds: enabled
YYYY-MM-DD hh:mm:ss - REBUILD: J1 Feeds: generate rss feeds for: excerpts only
YYYY-MM-DD hh:mm:ss - REBUILD: J1 Feeds: generate rss feeds for: #posts of unlimited
YYYY-MM-DD hh:mm:ss - REBUILD: J1 Feeds: generate rss feeds for: all posts
YYYY-MM-DD hh:mm:ss - REBUILD: J1 SEO Tags: enabled
YYYY-MM-DD hh:mm:ss - REBUILD: J1 SEO Tags: generate seo tags
YYYY-MM-DD hh:mm:ss - REBUILD: J1 Sitemap: enabled
YYYY-MM-DD hh:mm:ss - REBUILD: J1 Sitemap: generate sitemap files
YYYY-MM-DD hh:mm:ss - REBUILD: J1 Paginator: enabled
YYYY-MM-DD hh:mm:ss - REBUILD: J1 Paginator: generate auto pages: disabled
YYYY-MM-DD hh:mm:ss - REBUILD: J1 Paginator: generate paginator pages: enabled
YYYY-MM-DD hh:mm:ss - REBUILD: J1 Paginator: generate paginator pages: 2 page|s generated
YYYY-MM-DD hh:mm:ss - REBUILD: done in 63.599 seconds.
YYYY-MM-DD hh:mm:ss - REBUILD: Auto-regeneration: disabled. Use --watch to enable.
YYYY-MM-DD hh:mm:ss - REBUILD: .. rebuild finished.
YYYY-MM-DD hh:mm:ss - REBUILD: To open the site, run: yarn site
REBUILD: The projects website has been rebuild successfully.
REBUILD: To open the site, run: j1 siteAfter a rebuild you can restart the development server with site and the website will reload in your browser:
j1 siteReset a J1 project
Mistakes happen. A wrong setting in your J1 configuration can keep the site from starting, or make it behave in odd ways. In those cases, resetting the project to its original state often helps.
| A reset does not change your content. Your pages, posts, and assets are left untouched. |
The reset task does the reset for you: it removes all the generated configuration files and modules that are no longer needed.
j1 resetCheck consistency of the J1 project ...
Check setup state of the J1 project ...
YYYY-MM-DD hh:mm:ss - RESET: Reset the project to factory state ...
YYYY-MM-DD hh:mm:ss - RESET: Be patient, this will take a while ...
YYYY-MM-DD hh:mm:ss - RESET:
YYYY-MM-DD hh:mm:ss - RESET: > j1@2024.3.8 reset <path_to_your_projects>/my-start
YYYY-MM-DD hh:mm:ss - RESET: > run-s -s reset:*
YYYY-MM-DD hh:mm:ss - RESET:
YYYY-MM-DD hh:mm:ss - RESET: Reset project to factory state ..
YYYY-MM-DD hh:mm:ss - RESET: Clean up base modules ..
YYYY-MM-DD hh:mm:ss - RESET: Clean up site files ..
YYYY-MM-DD hh:mm:ss - RESET: Configuration file: <path_to_your_projects>/my-start/_config.yml
YYYY-MM-DD hh:mm:ss - RESET: Cleaner: Removing _site...
YYYY-MM-DD hh:mm:ss - RESET: Cleaner: Removing ./.jekyll-metadata...
YYYY-MM-DD hh:mm:ss - RESET: Cleaner: Removing ./.jekyll-cache...
YYYY-MM-DD hh:mm:ss - RESET: Cleaner: Nothing to do for .sass-cache.
YYYY-MM-DD hh:mm:ss - RESET: Clean up projects files ..
YYYY-MM-DD hh:mm:ss - RESET: Remove bundle config folder ..
YYYY-MM-DD hh:mm:ss - RESET: Remove log folder ..
YYYY-MM-DD hh:mm:ss - RESET: Remove etc folder ..
YYYY-MM-DD hh:mm:ss - RESET: Remove various log files ..
YYYY-MM-DD hh:mm:ss - RESET: Remove lock files ..
YYYY-MM-DD hh:mm:ss - RESET: Clean up utility server ..
YYYY-MM-DD hh:mm:ss - RESET: done.
YYYY-MM-DD hh:mm:ss - RESET: The project reset finished successfully.
YYYY-MM-DD hh:mm:ss - RESET: To setup the project, run: j1 setupIf you have just reset a project, you have to initialize it again with the setup task before you can use it.
j1 setupOnce the project is set up again, you can start the development server with site and the site will open in your browser as before:
j1 siteSummarized
A lot you’ve learned, time to summarize what is behind. The last chapter should help with that. The section Summarize offers some handy sections to remember what has been presented in this chapter. And giving an outlook of what could be done next, an overview of all chapters of this tutorial, and useful links to learn more.
See all sections below:
Recap — What has been done, what’s explored in current section
What Next — Find to go further, what’s planned next
All Chapters — The full chain, all chapters
Further Reading — List of helpful links to get more
Recap
A huge chunk is done; all heavy work to create a full chain for web development is behind you. Congratulations on what you achieved!
The website is now available from your local PC system, and all is in place to start the development of your web. It was a long way to go. Now, you have a development system that compares to systems used in the real world. You achieved to create a dev system on your PC, not something like a simple test environment. A warm welcome to the hacker’s world to develop professional and create real-world websites.
What Next
In the following section, you deal with existing content and how new content is created with the help of J1. It will be about discovering the existing articles to experience how to design your content. You will learn how new pages are created and which J1 Theme tools are already prepared for new content.
A little theory will help you understand how the Jekyll builder engine works. A bit of theoretical background is required but spread out as smaller bites across the sections. Academic lectures will never be. You will be able to create any content for your website. It is important to understand which types of documents Jekyll offers and how to write content to not conflict with the base ideas of Jekyll.
Start the most important work on a website.
Create your content!
All Chapters
Find here an overview on all chapters this tutorial:
Meet & Greet
A awesome Site
Development System
You are here — Project Management
Creating Content
Further Reading
Reading this chapter is not essential for working on the project first time. Additional links will be helpful to learn more. The references point to important sources of manufacturer documentation. Here you can find out all the possibilities what the products can offer. Experiences from others are extremely important when dealing with software and more complex projects. Links to other sites may answer common questions from the experience of professionals. Here you can think far outside the box of a project currently worked on.
Further links in the current section.